0420 Roto-Jet
17
TROUBLE SHOOTING GUIDE
Machine will not start when foot switch is depressed.
• Check the throttle valve, be sure to adjust the valve to the proper speed for the cleaning device
and the flexshaft size.
• Check the air supply connection and the quick disconnect hose coupling.
• Verify air supply connection to main piping is on.
• Check the foot switch hose for kinks or pinch points.
Machine starts but loses power and/or speed.
• Check for dirt or blockage in the air supply lines.
• Check for the proper lubrication flow to the machine from the lubricator.
• Verify the air supply has sufficient CFM (Liters per minute) to sustain the unit at speed. For more
information see “Air Supply” section.
• If the machine has been in service for many hours, or has been supplied with dirty air, the motor
may require a “Flush” operation. See “Maintenance” section.
• New vanes may be required if the machine has been in service longer than 5,000 hours. (Ser-
vice Repair Kit 04230 is available.)
• Remove machine cover and check the muffler for corrosion or restrictions.
Machine rotates but no water is flowing from the end of the flexshafting.
• Check the flexshaft and machine connection.
• Check the garden hose entering the machine for kinks or pinch points.
• Check the water supply valve to verify that it is “on” and that water pressure is sufficient.
Water is leaking from the machine.
• Check O-ring (part #P8309-25) in the Manifold Assembly (part #04213). Replace if missing or
worn.
• Remove the machine cover and verify that the tube from the water supply to the manifold is in
place.
• Seals within the manifold are damaged or worn. Replace with Manifold Assembly 04213 or call
an Elliott service facility.
Flexshaft stops rotating.
• Remove flexshaft from the machine and check the break-away coupling.
• Check the connection of the flexshaft and the machine, be sure flexshaft manifold cap is se-
cured on manifold.
• Remove the machine cover and check the coupling between the motor and the manifold for
proper alignment and tightness of the set screws.
Summary of Contents for Roto-Jet 0420
Page 2: ......
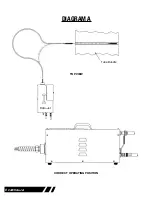
Page 8: ...8 0420 Roto Jet DIAGRAM A Tube Bundle Roto Jet TOP VIEW CORRECT OPERATING POSITION...
Page 19: ...0420 Roto Jet 19 NOTES...
Page 23: ...0420 Roto Jet 23...
Page 25: ......
Page 26: ......

