background image

Basic Playback

Basic Playback

16

1

Load a Picture CD.
The JPEG file is played in order automatically.

Playing a Picture CD

2

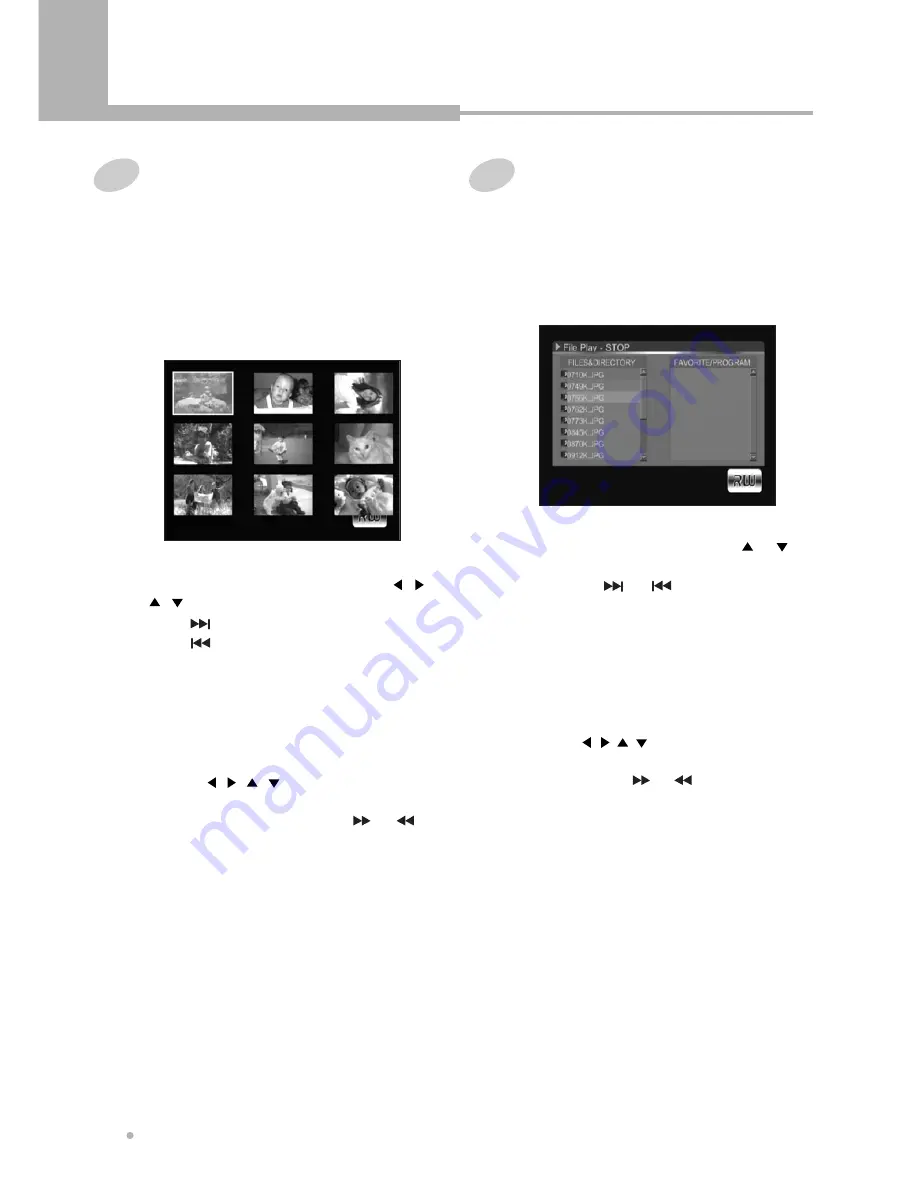
Press MENU button to see the file list. 
You can see 9 thumbnail pictures on TV
screen.

3

Select the desired picture by using     ,    ,    

,      button.

Press         button to see the next file list.
Press         button to see the previous file list.

4

Press ENTER button to start playback.

6

To start playback, press PLAY button. 
The JPEG file is played in order
automatically.

7

Transition mode
17 slideshow transition modes are provided. 
Use ANGLE button to switch the slideshow
transition mode.

1

Load a JPEG disc.
The JPEG file is played in order automatically.

Playing JPEG disc

2

Press STOP button to see th file list. 
The file list is displayed on the TV screen.

3

Select the desired file by using      or
button. 
If you press         or         button, you can see
the next file list or the previous file list.

4

Press ENTER button to start playback. 
The JPEG file is played in order automatically.

6

To start playback, press PLAY button. 
The JPEG file is played in order automatically.

5

Image rotation and zoom. 
You can rotate the image to the left or right
by using     ,   ,    ,     button. Also you can
enlarge the image up to 400% or reduce it up
to 12% by using        or        button.

5

Image rotation and zoom 
You can rotate the image to the left or right
by using     ,    ,     ,     button.
Also you can enlarge the image up to 400%
or reduce it up to 12% by using        or
button.

Summary of Contents for dvd-530s(pal)

Page 1: ......

Page 2: ...H LIQUIDS SUCH AS VASES SHALL BE PLACED ON THE APPARATUS CAUTION This product satisfies FCC regulations when shielded cables and connectors are used to connect the unit to other equipment To prevent e...

Page 3: ...likely to be walked on or pinched by items placed upon or against them paying particular attention to cords at plugs convenience receptacles and the point where they exit from the product OUTDOOR ANT...

Page 4: ...ly 19 Selecting Audio Languages DVD only 20 Repeating a Title Chapter 20 A B Repeat DVD only 21 ZOOM Screen 21 Switching the Camera Angle DVD only 22 Direct Search DVD 22 Using the Setup Menu Basic Op...

Page 5: ...t in hazards such as leakage and bursting Please observe the following Don t mix new and old batteries together Don t use different kinds of batteries together although they may look similar different...

Page 6: ...ed as DVD video format DVD R RW This unit can play DVD R and DVD RW discs recorded as DVD video format Also this unit can record the video and audio signal in DVD R or DVD RW disc Also this unit can r...

Page 7: ...DISC TRAY Put a disc to be played in here 13 CHANNEL DOWN UP Used to select the preset TV channels 12 RECORD Press to start a disc recording 11 RECORD MODE To select the record quality 16 S VIDEO IN...

Page 8: ...espectively 8 PROGRAM Indicates the program playback 9 OPERATING Information Indicates title Chapter and Track number and Time TV channel 3 ANGLE Indicates the current disc being played is viewed as m...

Page 9: ...t of TV 6 VIDEO OUT Connect CVBS to Composite Video Input of TV or monitor Or connect S VIDEO to S Video Input of TV or monitor S Video provides better picture quality than composite video 3 VIDEO IN...

Page 10: ...input to use for recording DISPLAY To view the Title Chapter Track information or Subtitle Language Audio Language Repeat mode DV IN To select a digital A V input from a DV camcorder C CHANNEL DOWN U...

Page 11: ...IT TITLE To edit a title Insert chapter Remove chapter Hide chapter ENTER Used to select the menu item G GOTO To move to a specific time in a track or title P PAUSE When you press this button during p...

Page 12: ...n which you get the picture and sound from DVD disc TV MODE Set up TV type according to type supported by user s TV Each time you press this button repeatedly the TV type will change among NTSC PAL an...

Page 13: ...ut The Euro AV terminal can be connected to TV equipped with Euro AV connector The audio transmitted on the Euro AV is stereo sound S Video Output The S Video output can be connected to the TV equippe...

Page 14: ...decoder From the Digital Audio Output menu select RAW or LPCM according to your decoder Connection for A V Input Terminals You can record programs from AV system such as VCR DVD player Camcorder etc A...

Page 15: ...tton to start playback Playing a DVD RW or DVD R disc 1 Load a DVD RW or DVD R disc The menu screen is displayed automatically 3 Press ENTER button to start playback Press POWER button to turn on your...

Page 16: ...disc The JPEG file is played in order automatically Playing JPEG disc 2 Press STOP button to see th file list The file list is displayed on the TV screen 3 Select the desired file by using or button I...

Page 17: ...e next chapter or track 2 Press PLAY button to resume normal playback 2 Each time you press SLOW button playback speed changes as below Slow Forward DVD 1 Press SLOW button during play mode The disc c...

Page 18: ...m playback remains active until you open the disc or turn off the DVD recorder 4 Repeat step 2 3 to build up a program list To delete a track from the program list select the track you want to delete...

Page 19: ...This operation works only with discs on which multiple subtitle languages are recorded If the loaded disc supports multiple subtitles you can select the subtitle language 2 Press DISPLAY button again...

Page 20: ...e one selected at the initial settings This operation works only with discs on which multiple audio languages are recorded If the loaded disc supports multiple audio languages you can select the audio...

Page 21: ...laying state changes to normal Use this function to repeat playback of a selected segment This is very useful for studying foreign languages because it repeats the selected segment until canceled We r...

Page 22: ...Also you can move to a specific time in a track or title 1 Press GOTO button during playback The playback information appears on TV screen 2 Each time you press GOTO button the search mode is changed...

Page 23: ...quality is changed 4 Press REC button to start your recording Press PAUSE button if you want to stop the recording for a short while Press REC button again to continue recording 5 Press STOP button to...

Page 24: ...n Enter the day of week by using 0 to 9 button 6 Select the Start time by pressing button press ENTER button Enter the Start time by using 0 to 9 button and press ENTER button to confirm 8 Switch VPS...

Page 25: ...setting Press ENTER button Select the details you want to change by pressing or button and press ENTER button Change the settings by using or the number buttons 0 to 9 When you have made all the chan...

Page 26: ...ng to the end 1 Press ENTER button after selecting Rename disc by using or button The keyboard will show on the screen 2 Select a letter which you want to input by using button and press ENTER button...

Page 27: ...mode to AV input mode 4 Press REC MODE button to select the record quality 6 Press STOP button to stop your recording 5 Press REC button to start your recording It starts to record on the free space...

Page 28: ...HANNEL or CHANNEL button Recorded programs will be erased from the beginning if overwritten NOTE You have to lock your DVD RW disc to play back it in other DVD recorders NOTE 1 Press ENTER button afte...

Page 29: ...using button It takes a few minutes to finalize the disc The FINALIZE function only works once in DVD R disc If a DVD R has been finalized you can not record or edit the DVD R any more NOTE 1 Insert a...

Page 30: ...the chapter by pressing ENTER button after selecting Unhide chapter Index picture You can change the thumbnail for the selected title Press ENTER button at the point where you prefer to be the thumbna...

Page 31: ...trol bars of the last line in the keyboard is for edit command If the inputting of letters is finished press ENTER button after selecting OK Rename title DVD RW DVD R 1 Press ENTER button after select...

Page 32: ...ur recording It starts to record from the beginning of the selected title Overwrite title DVD RW only 3 Press AV IN button to choose the A V input you want to record Every time this button is pressed...

Page 33: ...tup menu selections may not work properly NOTE The monitor screen of a projector or projection TV is easily burned out if a static picture is displayed for a long time Be careful not to allow the moni...

Page 34: ...LEVEL CHANGE PASSWORD This function is to disable the playing of specified DVD discs that are unsuitable for children There are a total of 8 levels If the level is 8 the contents of the disc are suit...

Page 35: ...audio by connecting the unit s 5 1 channel audio outputs to an amplifier equipped with 5 1 channel inputs Front Speaker Set the front speaker type according to your speakers which can fully reproduce...

Page 36: ...ct the language for On Screen Display messages that will be displayed on the TV screen When your desired language is selected all OSD messages are displayed in the selected language 2 DISC MENU Set th...

Page 37: ...ORMATION If there is no captured channel this feature is not available Performing a new channel search will erase and replace all previously stored channels NOTE 3 1 Press ENTER button after selecting...

Page 38: ...al is bad you can search the channel again Frequency Set the sound system used for the current channel Sound system If the captured signal is not good you can tune the channel fine Fine tune Select So...

Page 39: ...ting Date by using or button 2 Enter the date in order of day month year by using 0 to 9 button and press ENTER button 3 After selecting Time press ENTER button 4 Enter the time in order of hour minut...

Page 40: ...s Operating Instructions General Recording Timer Euro AV connectors 21 pin connector Audio characteristics Digital output Video Output Accessories Audio output DVD DVD R CD DA CD CD R CD RW DVD R RW M...

Page 41: ...stopped When the power is cut due to power failure or by unplugging the power cord settings will be canceled Incorrect video connections Check that connections are correct and that plugs are inserted...

Page 42: ...Make sure that the Digital Audio Out setting is set to RAW or LPCM Check that the RAW or LPCM settings are suitable for your amplifier check the amp s instruction manual DVDs and CDs use different rec...

Page 43: ......

Page 44: ...P N XXXXXXXXXXXX...

Reviews: