


6
OPERATING INSTRUCTIONS
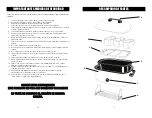
USING THE BUFFET SERVER:
NOTE: Wash Buffet Server Rack and the 3 Buffet Server Containers with warm soapy water and a
soft cloth. Rinse and dry thoroughly before using.
1.
Place the Main Cooking Pan into the
Roaster Oven Main Body. Fill the pan
with water approximately half way.
¾
WARNING: Never add water or any
other liquids to the Roaster Oven Main
Body directly.
2.
Place the Buffet Server Rack onto the
Main Cooking Pan. Make sure the rack
is secure and balanced.
3.
Insert the three Serving Containers into
the frame. Make sure they are also
secure and balanced.
4.
Place lid on and plug the Roaster Oven
into a working outlet. Preheat at 350°F
for 30 minutes or until the water inside
shows steady steam and is very hot. USE
CAUTION.
5.
Remove lid carefully and add hot, cooked
food into the individual Serving
Containers. Be careful not to overfill.
6.
Place lid back on and set the
temperature to 250°F to keep the food
warm. If necessary, the temperature can
be adjusted.
7.
Stir the food occasionally and keep food
covered to maintain the temperature.
8.
Check periodically and carefully add
more hot water to the Main Cooking Pan
if necessary.
¾
Note: When keeping food warm, temperatures
should always be maintained at 150°F or
above.
1.
Make sure that all three Serving Containers are
in place when using the Buffet Server.
2.
The Buffet Server is not intended to cook food.
Use the Buffet Server only to keep cooked food
warm.
3.
Only use the included Serving Containers with
the Buffet Server. Do not use other containers
that are glass, aluminum or ceramic.
4.
Do not use the Serving Containers and the
Buffet Server Rack on a gas or electric stove
top, or in an oven or microwave oven.
5.
It is recommended to spray the inside of the
Serving Containers with a non-stick cooking
spray or wipe the inside with a dab of vegetable
oil if you will be serving foods that have the
tendency to stick.
IMPORTANT TIPS WHEN USING
YOUR BUFFET SERVER
7
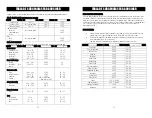
COOKING GUIDE
It is recommended to use a Meat Thermometer to determine the internal temperature when cooking
meat or poultry.
ROASTING GUIDE:
*The cooking chart below is approximate and should be used as a guideline only.
MEAT
WEIGHT (lbs.)
TEMPERATURE
MINUTES per lbs.
Beef Roasts
-
Standing Rib
-
Sirloin Tip
-
Tenderloin
-
Pot Roast
-
Corned Beef
4 – 6
3 – 5
3½ - 4
4 – 6
3 – 5
325°F
350°F
450°F
300°F
300°F
20 - 25
20 - 25
8 - 12
30 - 40
15 - 20
Lamb
-
Leg
-
Shoulder (boneless)
5 – 8
3 – 4
350°F
350°F
25
25
Pork
-
Loin Roast
-
Rolled Shoulder
-
Chops
-
Ribs
3 – 5
4 – 6
4 – 5
8 – 10
350°F
350°F
325°F
450°F to brown…
…decrease to 250°F
25 – 30
35 – 40
15 – 20
15 – 20
Smoked Ham
-
Bone-in
(Shankless)
-
Boneless
-
Fully Cooked
10 – 15
8 – 12
5 – 10
325°F
325°F
325°F
20 – 25
15 – 20
13-28
Veal
-
Loin
-
Shoulder
4 – 6
3 – 5
325°F
325°F
30 – 35
30 – 25
Poultry
-
Chicken (whole)
-
Chicken (whole)
-
Chicken (pieces)
-
Turkey (prebasted)
-
Turkey (prebasted)
-
Turkey, fresh
3½ - 5
6 – 8
6 – 8
10 – 14
14 – 22
10 – 14
350°F
350°F
350°F
375°F
375°F
350°F
15 – 17
18 – 20
8 – 10
12 – 17
13 – 18
15 – 20
It is recommended to use a Meat Thermometer to determine the internal temperature when cooking
meat or poultry.


