background image

13

ELITE EXERCYCLE ASSEMBLY MANUAL

SEAT ADJUSTMENT

Saddle Height Adjustment

Having your bike seat adjusted to the right height is essential for a comfortable ride, efficient 

pedalling and avoiding injury. There are 2 adjustments located on the seat post. The first is a 

vertical height adjustment, the second is for horizontal seat position. Although there are many 

methods and opinions on the optimal saddle setting, the following is a quick and easy method to 

get started. Further adjustments can be made afterwards to optimise your position and comfort.

Saddle Height Adjustment

Place your heels on the bike pedals and pedal backward. Your legs should be fully extended with 

your knees straight. If your hips rock from side to side while pedalling backward, the seat is too 

high. Place the ball of your foot on the pedal. There should now be a slight bend in your knee 

when the pedal is at its lowest point. This is a good starting point. 

Adjusting Seat Fore and Aft Position (if applicable to your bike)

Once you’ve adjusted the seat height, it’s time to find the correct fore-and-aft position of the 

saddle. This determines where you sit in relationship to the crank set (where the pedals are 

attached). This will help determine how comfortable and efficient you’ll be when riding and 

minimises stress to the knee by being in a more neutral position. If you want to check the fore-

and-aft setting at home, you will need a second person and a plumb line (a length of string with a 

nut or washer tied on the end will work fine).


Whilst sitting on the seat, bring your left crank arm around and have your helper stop the 

crank when the pedal is at three o’clock or parallel with the floor. For this measurement to be 

accurate, your shoes must be correctly positioned on the pedals (the balls of your feet should 

be over the pedal axles).


Holding this position, have your helper place the end of  the plumb line on the front of your 

leg, at a point just below the bony protrusion beneath the kneecap.


The plumb line’s weight should hang over your shoe. Check again to ensure that the crank-

arm and pedal are level. By looking at the plumb line the knee should be in alignment with the 

centre spindle or axle of the pedal. 


Adjust the saddle to the correct position then tighten the locking pin.

Summary of Contents for COLT

Page 1: ...ASSEMBLY MANUAL Record serial number Elite Colt Exercycle NS 1003U ...

Page 2: ...lease read through this manual to familiarise yourself with the operation of your new Elite Colt Exercycle Doing so will help to ensure that you get the most out of your machine enjoying safe and effective workouts ahead Even though we go to great efforts to ensure the quality of each product we produce occasional errors and or omissions do occur In any event should you find this product to have e...

Page 3: ...xercises to properly warm up Inspect the machine before each use make sure all of the connections are tightly secured Only one person at a time should use the machine If the user experiences dizziness nausea chest pain or any other abnormal symptoms STOP the workout at once CONSULT A PHYSICIAN IMMEDIATELY Position the machine on a clear levelled surface DO NOT use the machine near water or outdoor...

Page 4: ...y During the time of repair the product must not be used by anybody IMPORTANT HINTS A This product has been tested in accordance with the requirements of EN 957 1 A1 EN 957 5 standard Class HA HOME USE The maximum load is limited to 110KGS B Parents should be aware of the risk factor of young children playing on fitness equipment unattended Make sure that children are instructed properly in the us...

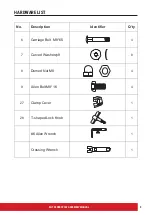
Page 5: ...ANUAL HARDWARE LIST y t Q r e i f i t n e d I n o i t p i r c s e D o N 6 Carriage Bolt M8 65 4 7 Curved Washer 8 8 8 Domed Nut M8 4 9 Allen Bolt M8 16 4 27 Clamp Cover 1 28 T shaped Lock Knob 1 6 Allen Wrench 1 Crossing Wrench 1 ...

Page 6: ...1 12 24 18 13 17 1 31 Tools Required For Assembling the Machine One Crossing Wrench and Allen Wrench provided by manufacturer NOTE It is strongly recommended that two or more people assemble this machine to avoid possible injury ...

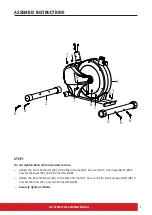
Page 7: ...o so Attach the Front Stabilizer 2 to the Main Frame 1 Secure it with 2 Carriage Bolts 6 2 Curved Washers 7 and 2 Domed Nut 8 Attach the Rear Stabilizer 3 to the Main Frame 1 Secure it with two Carriage Bolts 6 2 Curved Washers 7 and two Domed Nut 8 Securely tighten all Bolts 2 6 6 1 7 7 7 8 8 8 7 8 6 6 3 ...

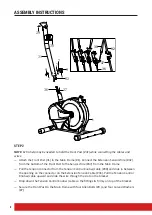
Page 8: ...Frame Pull the tension connector from the Tension Control Knob w cable 30 and slide in between the opening on the connector on the Extension Tension Cable 36 Pull the Tension Control Knob w cable upward and slide the wire through the slot on the bracket Drop down the Tension Control Knob w cable so the fitting sits firmly on top of the bracket Secure the Front Post to the Main Frame with four Alle...

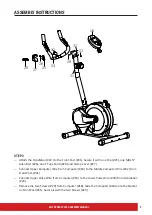
Page 9: ...ob 28 and Clamp Cover 27 Connect Upper Computer Wire from Computer 18 to the Middle Computer Wire 32 from Front Post 31 Connect Upper Pulse Wire from Computer 18 to the Lower Pulse Wire 33 from Handlebar 24 Remove the two Screws 29 from Computer 18 Slide the Computer 18 onto the bracket on Front Post 31 Secure it with the two Screws 29 1 23 25 26 27 29 32 28 18 24 33 31 ...

Page 10: ...s 14 from the Seat Post 13 Attach the Seat 17 to the Seat Post 13 Secure it with three Flat washer 14 three Spring washer 15 and three Nylon Nut 16 Insert the Seat Post 13 into the opening on Main Frame 1 Thread the Knob 10 Through the hole on Seat Post to securely lock it at selected height 10 13 17 14 15 16 1 ...

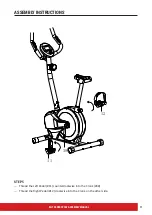
Page 11: ...11 ELITE EXERCYCLE ASSEMBLY MANUAL ASSEMBLY INSTRUCTIONS STEP 5 Thread the Left Pedal 11 counterclockwise into the Crank 38 Thread the Right Pedal 12 clockwise into the Crank on the other side 11 12 38 ...

Page 12: ...r Colt Exercycle is now complete Be sure to fully inspect your machine before using it for the first time WARNING Failure to visually check and test the assembly of your exercycle before use can cause damage to the exercycle and injury ...

Page 13: ...t it s time to find the correct fore and aft position of the saddle This determines where you sit in relationship to the crank set where the pedals are attached This will help determine how comfortable and efficient you ll be when riding and minimises stress to the knee by being in a more neutral position If you want to check the fore and aft setting at home you will need a second person and a plu...

Page 14: ...uring the process of pulse measurement because of the contact jamming the measurement value may be higher than the virtual pulse rate during the first 2 3 seconds then will return to normal level Note Contact Heart rate sensors are for reference only and may provide inaccurate readings as they are not medically certified devices If you require accurate heart rate readings for the purpose of traini...

Page 15: ...to the structural components from sweat and perspiration Please ensure all sweat residue is wiped from any contact points or framework with a damp cloth using a suitable PH neutral detergent in water to avoid salt and corrosion deposits on your equipment Failure or neglect to maintain and clean sweat residue from the bike frame may affect any frame warranty implied Frame and Pedals Check all nuts ...

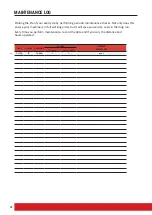
Page 16: ...s Not only does this ensure your machine is in full working order but it will save you service costs in the long run Every time you perform maintenance record the date and if you can the distance and hours operated DATE HOURS DISTANCE FRAME SERVICE COMMENTS Cleaned Seat Pedals 01 06 15 16 5km none ...

Page 17: ...ear Frame 1 Year Parts and Labour The following conditions are not under warranty range A As a result of abuse neglect accident or unauthorized modification B The damage due to incorrect adjustment of the machine Repair and Maintenance Service Please contact our Elite Fitness Service Department at eliteservice elitefitness co nz or visit www elitefitness co nz for any service related issues or adv...

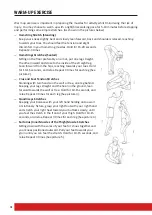
Page 18: ...seconds and relax Repeat 3 times for each leg See picture 2 Crus and Feet Tendon Stretches Standing with two hands on the wall or tree one leg behind Keeping your legs straight and the heel on the ground lean forward towards the wall or tree Hold for 10 15 seconds and relax Repeat 3 times for each leg See picture 3 Quadriceps Stretches Keeping your balance with your left hand holding onto a wall o...

Page 19: ...e measured by using the radial wrist or carotid neck pulse using your index and middle fingers counting the beats for 10 seconds and multiplying by 6 Alternatively the use of a Wireless Telemetry Heart Rate strap and watch will give you an accurate Beats Per Minute BPM reading 220 AGE TMHR Theoretical Maximum Heart Rate TMHR x 85 Upper Training Limit BPM TMHR x 65 Lower Training Limit BPM Note Con...

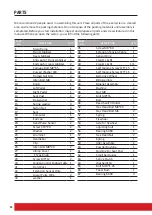
Page 20: ...1 18 Computer 1 19 End cap 2 20 Hand Pulse Sensor 2 21 Screw ST4 20 2 22 Washer 2 23 Grommet 1 24 Handlebar 1 25 Clip 1 26 Allen Bolt M8 20 2 27 Clamp Cover 1 28 T Type Knob 1 29 Screw M5 12 2 30 Tension Control Knob w cable 1 31 Front Post 1 32 Extension Sensor Wire 1 33 Lower Pulse Wire 2 34 washer 1 35 Screw M6 40 1 36 Extension Tension Cable 1 37 Sensor Wire 1 38 Crank L R 1 39 Crank L R 1 1 4...

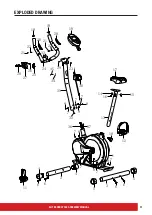
Page 21: ...21 ELITE EXERCYCLE ASSEMBLY MANUAL EXPLODED DRAWING 1 2 3 4 5 7 10 11 12 7 7 7 9 13 17 14 15 16 19 20 23 25 26 29 30 32 4 5 6 6 6 6 7 7 8 8 8 9 9 19 20 31 21 22 21 22 27 28 24 33 7 8 36 37 18 ...

Page 22: ... visit www elitefitness co nz Copyright 2015 Elite Fitness Elite Fitness 11 George Bourke Drive Mt Wellington Auckland New Zealand 0800 243 834 www elitefitness co nz Keep up to date with the latest products competitions and equipment follow us on our social media sites EliteFitnessNZ EliteFitnessTV ...

Reviews: