background image


QUICK INSTALLATION GUIDE   


RiTa EasyGo– LPR System 


Technical Documentation – All Rights Reserved 

1


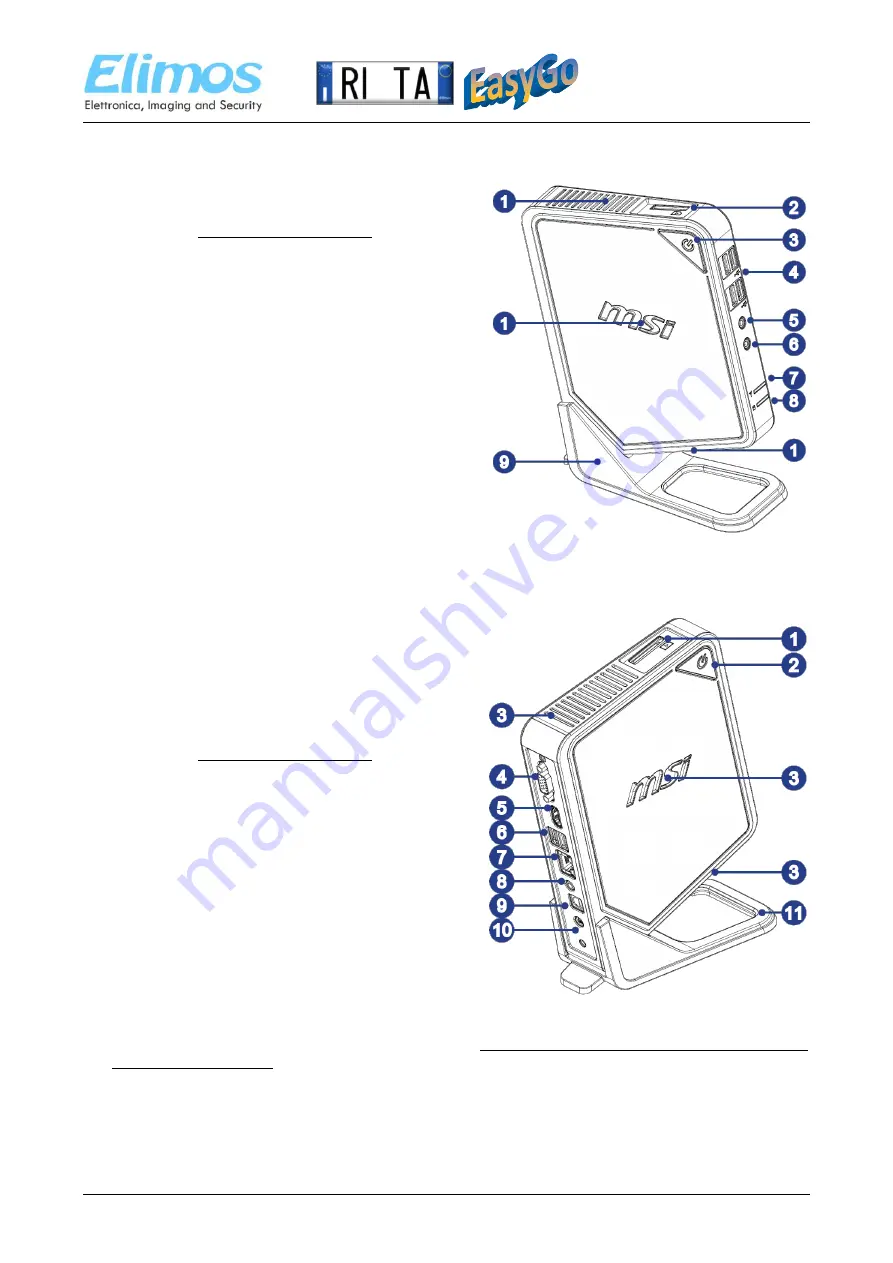
Hardware Overview – EasyGo Control Unit 

Front View 

1.


Ventilator

:  The  ventilator  on  the  enclosure  is  used  for 

air  convection  and  to  prevent  the  equipment  from 
overheating. Do not cover the ventilator. 

2.


Card Reader Drive


3.


Power Button/ LED

: Press the power button to turn the 

system  on  and  off.  The  power  LED  glows  when  the 
system  is  turned  on  and  goes  off  when  the  system  is 
shut down. 

4.


USB 2.0 Port

: The USB (Universal Serial Bus) port is for 

attaching  USB  devices  such  as  keyboard,  mouse,  or 
other USB-compatible devices. 

5.


Headphone Jack

: This is a connector for headphones. 

6.


Microphone Jack

: This is a connector for microphones. 

7.


WLAN LED


8.


HDD LED

: It flashes when the system is accessing data 

on  the  HDD  and  remains  off  when  no  disk  activity  is 
detected. 

9.


Stand

: Use this stand to position your system on a flat 

and  stable  surface.  Another  way  to  position  your 
system without stand is to lay your system horizontally on the surface with the Power Button faces up to 
the top. 

Rear View 

1.


Card Reader Drive 


2.


Power Button/ LED

: Press the power button to turn the 

system  on  and  off  .  The  power  LED  glows  when  the 
system  is  turned  on  and  goes  off  when  the  system  is 
shut down. 

3.


Ventilator

:  The  ventilator  on  the  enclosure  is  used  for 

air  convection  and  to  prevent  the  equipment  from 
overheating. Do not cover the ventilator. 

4.


VGA-Out  Port

:  The  DB15-pin  female  connector  is 

provided for monitor. 

5.


HDMI-Out Port

: HDMI supports all TV format, including 

standard,  enhanced  or  high-definition  video,  plus 
multi-channel digital audio on a single cable. 

6.


USB 2.0 Port

: The USB (Universal Serial Bus) port is for 

attaching  USB  devices  such  as  keyboard,  mouse,  or 
other USB-compatible devices. 

7.


RJ-45  LAN  Jack

:  The  standard  RJ-45  LAN  jack  is 

provided  for  connection  to  the  Local  Area  Network 
(LAN). You can connect a network cable to it. 

8.


Speaker Jack

: This is a connector for speakers. 

9.


Optical S/PDIF-Out Jack 


10.


Power Jack

: The AC/DC adapter converts AC power to DC power for this jack. Power supplied through 

this  jack  supplies  power  to  your  personal  computer.  To  prevent  damage  to  the  PC,  always  use  the 
supplied power adapter. 

11.


Stand

: Use this stand to position your system on a flat and stable surface. Another way to position your 

system without stand is to lay your system horizontally on the surface with the Power Button faces up to 
the top. 


Summary of Contents for RiTa EasyGo

Page 1: ...rieste Italy Tel Fax 39 040 375 5356 E mail info elimos it Http www elimos it P IVA C F R I Trieste 01098690322 Cap soc Euro 50 000 00 i v R Ri iT Ta a L LI IC CE EN NS SE E P PL LA AT TE E R RE EA AD...

Page 2: ...Countries and other countries with separate collection systems This marking shown on the product or its literature indicates that this product must not be disposed of with other household waste at the...

Page 3: ...iew EasyGo Control Unit 4 1 1 LPR Camera EpCAM 6 1 1 1 Install the EpCAM camera 7 1 1 2 Power Specifications 7 1 1 3 Environmental conditions 7 1 1 4 EpCAM connection cables 8 1 1 5 Power and I O conn...

Page 4: ...tton LED Press the power button to turn the system on and off The power LED glows when the system is turned on and goes off when the system is shut down 3 Ventilator The ventilator on the enclosure is...

Page 5: ...ropean Country plates and complete all in one RiTa SW suite in EasyGo version High performance and low power less than 40W One lane access control system with on fly plate reading no HW trigger needed...

Page 6: ...yGo LPR System Technical Documentation All Rights Reserved 6 1 1 LPR Camera EpCAM Sunshield Green status LED Wall bracket Infrared LEDs Camera optics Infrared LEDs Camera with bracket Bracket Red stat...

Page 7: ...OTE Do not over tighten the screws Attention Use appropriate screws for installation according to the mountable surface Damage to the product caused during installation may void the warranty 1 1 2 Pow...

Page 8: ...d this could be irreparably damaged 1 1 5 Power and I O connections Description Color 1 DC in Black 2 DC in Red 3 Opto in Brown 4 Opto out Red 5 Opto out Grey 6 Opto in Orange 7 Serial TX White 8 Seri...

Page 9: ...n until you reach the proper size If the distance is too short it may happen that a part of the plate is over the camera s field of view when the vehicle is near to the side of the lane or the plate i...

Page 10: ...et network EasyGo ONE Lane RiTa System EpCAM or FreeCAM Optional Overview Surveillance Camera EasyGo 1 Lane Control Unit Remote Operator Console Optional up to 1 Optional I O module To motorized barri...

Page 11: ...erved 11 4 Default IP Addressing The installation default IP addressing is configured as follows Device IP Address Notes Control Unit 192 168 125 100 LAN Port 1 LPR Camera 1 192 168 125 101 Surveillan...

Page 12: ...R System Technical Documentation All Rights Reserved 12 Notes ELIMOS S r l AREA Science Park Padriciano 99 34149 Trieste Tel Fax 39 040 3755356 Sales Office Tel Fax 39 0523 498236 E mail info elimos i...

Reviews: