background image

-6-

LOGO

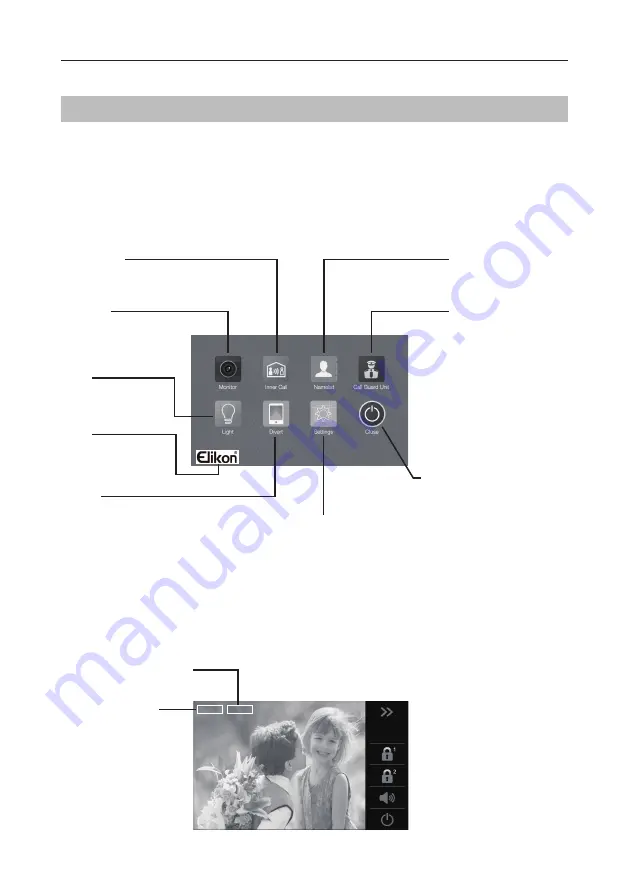
Touch it to view Device 

infos.The logo can be 

customized.

Screen

The Main menu is your starting point for using all the applications on your monitor. You can cus-
tomize your Main menu to display your logo.
Touch anywhere of the screen on monitor in standby mode, the Main menu will appear as follow:

CLOSE

Touch it to turn off the screen 

and make the monitor in standby 

mode.

SETTINGS

Touch it to enter 

setup page.

DIVERT

Touch it to setup the divert 

number if activate  the Divert 

function.

Displays which door station 

is calling.

Displays talking time.

LIGHT

Touch it to light up the 

staircase light via RLC.

INNER CALL

Touch it to activate inner call.

MONITOR

Touch it to view 

outdoor condition.

NAMELIST

Touch it to select the user 

you want.

CALL GUARD UNIT

Touch it to call Guard Unit 

Monitor.

Main Menu

While talking with a door station

00:10    DS-1

Summary of Contents for EVD2-40IN

Page 1: ...fully before using the product you purchase and keep it well for future use Please note that images and sketch maps in this manual may be different from the actual product 1 2 3 4 EJikon 2 WIRE INTERCOM SYSTEM USER MANUAL EVD2 401N ...

Page 2: ...ence vibration And not allow be impacting knocking and dropping For clean the LCD screen using hands or wet cloth is forbidden Please do the cleanness with soft cotton cloth please do not use the organic or chemical detergent If necessary please use pure water or dilute soap water to clean the dust Image distortion may occur if the video door phone is mounted too close to magnetic field e g Microw...

Page 3: ...volume 9 Door release 10 Calling other monitors 10 Monitoring 11 Openning staircase light 12 Transferring call 12 Monitor settings 13 Ring setting 14 Changing the display language 14 Restoring to default setting 15 Entering installer setup 15 Screen calibration 19 Specification 19 ...

Page 4: ... missed call 4 Unlock button Press to release the door 5 Talk Mon button Press to communicate hands free with visitor Press to view the outdoor condition in standby mode 6 MENU button Press to display the menu 7 Microphone Transmit audio from one station to other stations 8 Mounting hook Use to hang up the monitor 9 Speaker Send out sounds of ring tones audios and alarms 10 Connection port Bus ter...

Page 5: ...g Terminal description Mounting screw x 2 included The unit Mounting bracket 2 wire cable SW SW RING GND NC 1 2 3 4 5 6 ON DIPS L1 L2 SW SW RING GND NC 1 2 3 4 5 6 ON DIPS L1 L2 L1 L2 Bus line terminal SW SW Extra door bell call but ton connection port Ring GND Extra buzzer connection port NC Undefined DIP switches Total 6 bits can be configured Bit1 Bit5 User Code setting Bit6 Set to ON if the mo...

Page 6: ...urn off the screen and make the monitor in standby mode SETTINGS Touch it to enter setup page DIVERT Touch it to setup the divert number if activate the Divert function Displays which door station is calling Displays talking time LIGHT Touch it to light up the staircase light via RLC INNER CALL Touch it to activate inner call MONITOR Touch it to view outdoor condition NAMELIST Touch it to select t...

Page 7: ... While communicating with the visitor unlock the door capture images videos and adjust screen volume are available More details please refer to the following descriptions Note If nobody answers the phone the screen will be turned off automatically after 40 seconds It s available to adjust image scale while being called Total 2 image modes can be selected Follow the steps Adjusting image scale whil...

Page 8: ...ing with a door station 2 Receiving a call while talking with other monitors Other door stations calling is forbidden Conclude current talking to answer the new call in The talking will stop immediately call tone sounds in normal The video image from the door station is displayed on the screen talking unlock capture images videos adjust screen volume are available Compare the difference of these 2...

Page 9: ...lume can be adjusted at any time Adjusting range 0 9 Adjust the contrast of the screen the range is 0 9 Touch or to change the level Adjust the brightness of the screen the range is 0 9 Touch or to change the level Adjust the color of the screen the range is 0 9 Touch or to change the level Touch or to reach desired level 00 10 DS 1 00 10 DS 1 Normal 00 10 DS 1 5 5 5 5 Note The adjustments have no...

Page 10: ...f monitor all other monitors in the same room will ring at the same time whichever monitor answers the call conversation is started other monitors will stop ringing at once Calling ends automatically after 30 seconds if nobody answers the call 00 10 DS 1 1 Touch either or icon on the screen or press UNLOCK button on panel to release door The door lock is released for the set door release time if t...

Page 11: ... 40 seconds if nobody answers the call You can monitor the entrance at any time via the monitor 1 Touch anywhere of the screen or press the MENU button on the panel in standby mode 2 Touch MONITOR icon on main menu page to enter Monitor select page Note Press TALK MON button on panel in standby mode to monitor the master door station in shortcut Monitoring door stations cameras DS1 4 and CAM1 4 ca...

Page 12: ...t the number by touching the digital keypad Opening staircase light Note The staircase light should be connected on the system and this function should be sup ported by EVD2 2RLC Please refer to EVD2 2RLC user instruction in detail Touch Light icon on main menu page or touch icon during monitoring or talking to open the staircase light the staircase light will be turned off automatically after 60 ...

Page 13: ...e call at this time diverted will conclude at once 2 If No Answer If nobody answers the call in 30s when receives call from door station diverts the call to the phone At this mode the monitor will shut off the screen after diverting successfully but you can still use it in normal Monitor settings You can set the quantity of door station and camera monitor time at any time by following the procedur...

Page 14: ...ettings will perform immediately Note Touch icon to exit and return to main menu page 5 6 7 8 4 4 30 sec The default language can be customized But you can change it to the language you need at any time Follow the steps On main menu page touch Settings icon Language Touch desired language and select to save the setting If the target language is not found in the window touch icon to scroll next pag...

Page 15: ...enter About page Touch icon to restore to default Restoring to default setting 00 00 AUTO 00 01 00 On main menu page touch Logo icon to enter About page When the screen stay in About page press UNLOCK button on front panel and hold for 2 seconds A keypad is shown Refer to the followings Entering installer setup 00 00 AUTO 00 01 00 _ ...

Page 16: ...owings With a tool to Toggle one of the DIP to open Address Setting menu Refer to the followings Entering Address setting page INSTALLER SETUP _ SW SW RING GND NC 1 2 3 4 5 6 ON DIPS L1 L2 01 00 Master Code Setting Item Code Setting Item 2412 Reset To Default Setting 8016 8017 Bypass Enable Disable 2499 Restore Factory Settings 8401 8499 Unlock Time 8000 Master Monitor 8018 8020 Video Display Stan...

Page 17: ...n Address setting page select DIP Switcher Set Address setting mode firstly then touch icon total 32 DIP codes will be displayed DIP Switcher Set Address The DIP switches are used to set the user code for each monitor Total 6 bits can be configured Bit 1 to Bit 5 are used for user code setting The value range is from 0 to 31 which have 32 different codes for 32 apartments When multi monitors need ...

Page 18: ...ser code and the master slave mode should be set on the monitor Details refer to the section of Setting Slave Monitor 1 On Address setting page select Manual Input Address setting mode then touch icon a keypad will be displayed 2 Input the code by touching the digital number 3 Touch key to save code setting complete 4 Touch key to delete Cursor Edit box Delete the last character Save setting Exit ...

Page 19: ...ital color LCD Display Resolutions 800 3 R G B x 480 pixels Video signal 1Vp p 75Ω CCIR standard Wiring 2 wires non polarity Dimension 125 H 225 W 23 D mm In standby mode press UNLOCK button on front panel and hold for 3 seconds Screen calibration menu is shown Click to complete the calibration Refer to the followings 1 2 3 4 1 2 3 4 1 2 3 4 OK ...

Page 20: ...The design and specifications can be changed without notice to the user Right to interpret and copyright of this manual are preserved EVD2 40IN ...

Reviews: