37
Use
Extraction version
In this case the fumes are conveyed outside of the building by
means of a special pipe connected with the connection ring
located on top of the hood.
CAUTION
!
The exhausting pipe is not supplied and must be purchased
apart.
Diameter of the exhausting pipe must be equal to that of the
connection ring.
CAUTION
!
If the hood is supplied with active charcoal filter, then it must
be removed.
Connect the hood and discharge holes on the walls with a
diameter equivalent to the air outlet (connection flange).
Using the tubes and discharge holes on walls with smaller
dimensions will cause a diminution of the suction performance
and a drastic increase in noise.
Any responsibility in the matter is therefore declined.
!
Use a duct of the minimum indispensable length.
!
Use a duct with as few elbows as possible (maximum
elbow angle: 90°).
!
Avoid drastic changes in the duct cross-section.
Filtration version
The aspirated air will be degreased and deodorised before
being fed back into the room.
In order to use the hood in this version, you have to install a
system of additional filtering based on activated charcoal.
Mounting
This type of cooker hood must be fixed to the ceiling.
Very heavy product; hood handling and installation must
be carried out by at least two persons.
Before beginning installation:
•
Check that the product purchased is of a suitable size for
the chosen installation area.
• Remove the charcoal (*) filter/s if supplied (see also
relative paragraph). This/these is/are to be mounted only
if you want lo use the hood in the filtering version.
• Check (for transport reasons) that there is no other
supplied material inside the hood (e.g. packets with
screws (*), guarantees (*), etc.), eventually removing
them and keeping them.
Expansion wall plugs are provided to secure the hood to most
types of walls/ceilings. However, a qualified technician must
verify suitability of the materials in accordance with the type of
wall/ceiling. The wall/ceiling must be strong enough to take
the weight of the hood.
Do not tile, grout or silicone this appliance to the wall.
Surface mounting only.
Operation
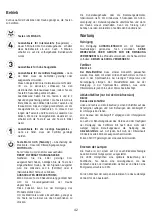
To select the functions of the hood just touch the commands.
Light key ON/OFF
Intensive speed selection key
(suction power) -
duration 5 minutes
:
the hood sets this power and
at the end of the 5 minutes returns to the previous
setting.
High-speed selection key
(suction power).
Medium-speed selection key
(suction power) -
when flashing it indicates the need to wash or
replace the carbon filter. This signal is normally
deactivated. To activate the alarm, disable the
electronic by pressing the
0
button for 3 seconds.
Next, simultaneously press buttons
1
and
2
for 3
seconds; at first, only button
1
will flash, then both
buttons
1
and
2
will flash to indicate activation.
Repeat the procedure to deactivate the alarm; at
first buttons
1
and
2
will flash and subsequently
only button
1
to indicate deactivation.
Low-speed selection key
(suction power) –
when flashing it indicates the need to wash the
fats filter.
Motor key OFF
(stand by) – excludes the
electronics – reset wash/replace filters signals.
MOTOR OFF
Press briefly to switch the motor off.
RESET FILTERS SIGNALS
In functioning mode, after carrying out filter
maintenance, press the key until hearing the
sound signal. The flashing LED
1
(grease filter) or
2
(carbon filter) stops flashing.
EXCLUDING THE ELECTRONICS
Press the key for 3 seconds. The hood command
electronics will be excluded.
This function can be useful during the product
cleaning operations.
Just repeat the operation to reinsert the
electronics.
If the hood fails to operate correctly, briefly disconnect it from
the mains power supply for almost 5 sec. by pulling out the
plug. Then plug it in again and try once more before
contacting the Technical Assistance Service.
Summary of Contents for IKONA
Page 3: ......
Page 4: ...1 L1 310mm min 70mm min 50mm L1 max 890mm L1 min 550mm L1 max 795mm L1 min 510mm L1 310mm ...
Page 5: ...1x 2 ...
Page 6: ...6x Ø mm 3 4 5 Ø6x30mm 6x L N L N ø6X70mm 4x 1cm Ø 16cm V Hz V Hz ...
Page 7: ...4x 4x 6 1 2 3 1 L2 L2 L1 70mm 8x 4x ...
Page 8: ...7 ...
Page 9: ...1x 8 1 2 1 1 1 ...
Page 10: ...9 1 8x 2 40mm ...
Page 11: ...10 1x ...
Page 12: ...12 11 2 2 1 ...
Page 13: ...14 1x 13 ...
Page 14: ...15 16 2x Ø3 5x9 5mm 2 1 ...
Page 15: ...17 ...
Page 16: ...18 1 2 4x ...
Page 17: ...19 ...
Page 18: ...6x 2 3 4 20 1 ø6X70mm 2x ...
Page 19: ...6x 1x ø2 9x9 5mm N L 4 5 N L 3 N L V Hz 21 2x Ø3 5x9 5mm FRONT 2 1 FRONT V Hz 1 ...
Page 20: ...22 2x 2x 1 3 2 4 23 ø2 9x9 5mm 4x FRONT 2 1 ...
Page 21: ...24 Ø 150 mm ...
Page 22: ...3 6x 1x ø2 9x9 5mm 2x Ø3 5x9 5mm FRONT N L 5 6 1 FRONT N L 4 N L V Hz 25 2 V Hz ...
Page 23: ...2x 26 27 Ø 150 mm ...
Page 24: ...28 350mm ...
Page 25: ...1x 29 V Hz ...
Page 26: ...8x Ø3 5x9 5mm 1 2 2 31 x1 x1 30 2x 2x 250mm ...
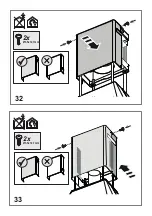
Page 27: ...32 Ø3 5x12 7mm 2x Ø3 5x12 7mm 2x 33 ...
Page 28: ...34 x2 35 Ø3 5x12 7mm 2x ...
Page 29: ...3 3 2 2 37 1 x1 x1 36 4x8mm 2x 2x Ø3 5x12 7mm 2x 2x 250mm ...
Page 30: ...39 38 1 1 2 2 ...
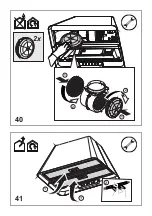
Page 31: ...2x 40 41 1 1 2 2 2 1 1 ...
Page 149: ......
Page 150: ......
Page 151: ......
Page 152: ...LIB0165063 Ed ...


