background image


27  


5.10.3 CHECKING VALVE TIGHTNESS


When the welder is on, the working pressure must be approximately, (1.0- 1.2 Bar). Then, after turning 

off the welder, check that the pressure reading on the pressure gauge drops to the approx. 0.5 Bar, 
over 5-6 minutes. If the pressure drop is greater than 0.5 Bar, replace the valve (see. 5.10.4). 


                                                           ATTENTION 


If is very important that the valve is tight, since this enables the machine to maintain a 

minimum pressure of approx. 0.3 Bar inside the tank, even after several hours. Keep in mind 
that when the machine is not working, the tank cools down causing a pressure drop. If for 
some reason there is a total lack of pressure, the methyl alcohol contained in the Booster 
Tank would be sucked in, thus contaminating the electrolyte. 


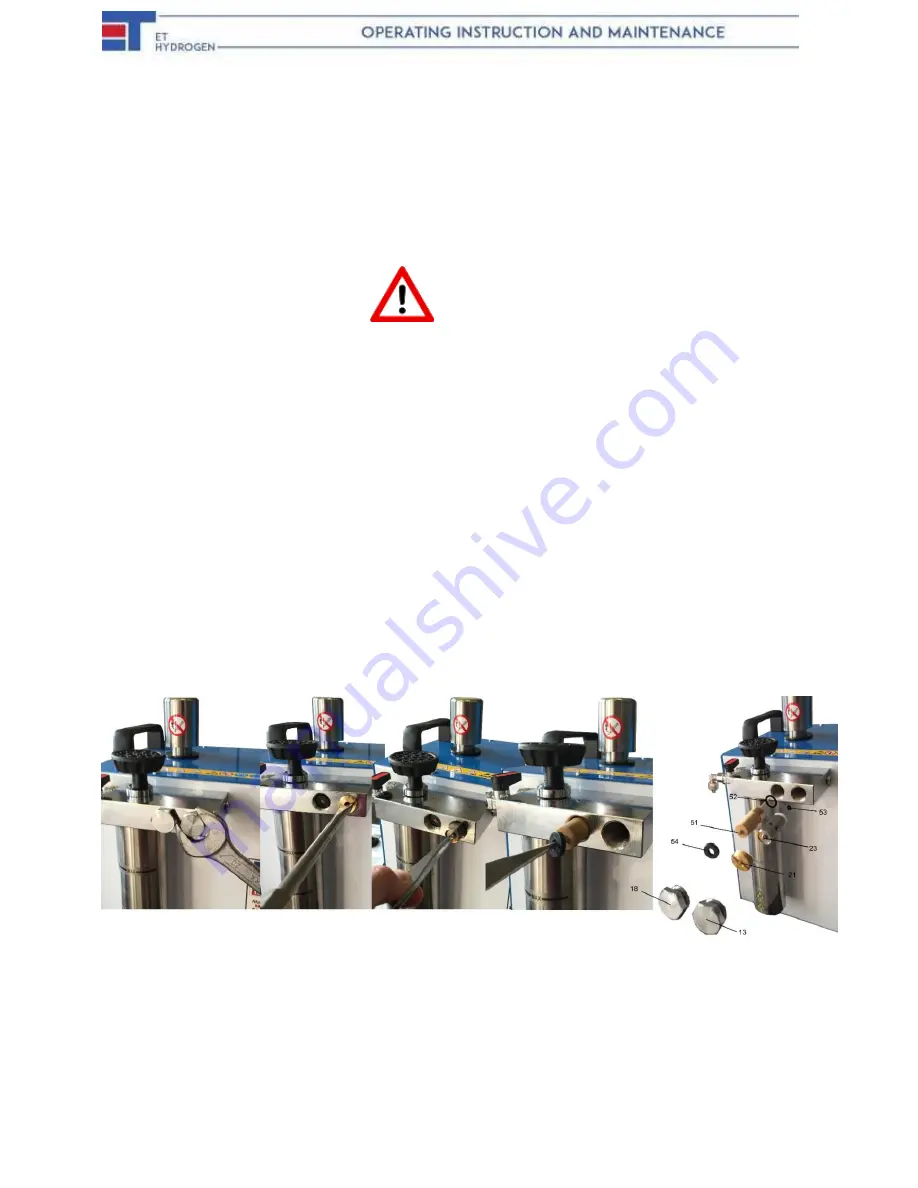
5.10.4 REPLACING THE VALVE  

1)  Turn off the welder and remove the pressure 

gauge or safety cap (Fig.5 # 2). 


2)  Unscrew the check valve cap (A Fig. 4 # 13) 


3)  Unscrew the threaded disk (B Fig. 4). 


4) 

Remove the valve and relevant “OR” from the seat (C Fig. 4). 


5) 

Install the new valve and relevant “OR” (C Fig. 4) 23. 


6)  Tighten the threaded disk 21, the cap 13, and safety cap. 


7)  Check pressure (sec. 5.10.3). 


FIG 4 

– CHECK VALVE AND BACK FLAME FILTER REPLACEMENT  


Summary of Contents for L/160

Page 1: ...1 ...

Page 2: ...2 ...

Page 3: ... 6 Hazardous operations 16 4 7 Starting the machine 16 4 8 Stopping the machine 17 4 9 Backfire 17 4 10 Safety device 18 4 11 Refilling deoxidizer liquid 18 4 12 Refilling distilled or demineralized water 18 SECTION 5 Maintenance 5 1 Generalities 19 5 2 Every six months 19 5 3 Once per year 19 5 4 Every four years 20 5 5 Putting the machine out of service 20 5 6 Scrapping 20 5 7 Disposing of the e...

Page 4: ...ch have the necessary specialized personnel Or directly to the Manufacturer who is at your complete disposal to ensure fast and complete technical assistance and anything else that can promote improved operation and optimum performance by the machine DANGER This Manual must be kept in a safe place at the disposal of the operator and service engineer for consultation at any time during the machine ...

Page 5: ...t due to installation of non original spare parts the machine has been changed and the damage was caused by this changes If the instructions given in this manual were not followed correctly Exceptional events Damage caused by negligence lack of care improper and bad use of the machine or incorrect maneuvering by the operator shall also cause this warranty coverage to be null and void ATTENTION Rem...

Page 6: ...ver of this manual and should always be specified when ordering spare parts or requesting Technical Assistance FIG 1 WELDER AND COMPONENTS Legend Fig 1 1 Three position switch 2 Safety cap 3 Filling neck 4 Power control knob 5 Minimum level indicator light yellow 6 Maximum level indicator light red 7 Booster tank 8 Handle knob 9 Booster holder 10 Torch 11 Burner tip nozzle 12 ON indicator light gr...

Page 7: ...aration of Conformity annexed to each machine 1 5 1 DESCRIPTION The ET Hydrogen Welder L 160 can be used in craftwork or industrial workshop with a minimum volume of 30 m and provided with natural ventilation by means of suitable openings to the outside in compliance with the regulations in force in the user s country This machine is mainly used for soft and hard brazing applications in the fields...

Page 8: ... be of proven ability and capable of reading and understanding the instructions given in this manual The operator must also use the machine in accordance with the ruling accident prevention standards operating conditions and characteristics of the machine DANGER THE USE OF THE MACHINE FOR ANY OTHER PURPOSE THAN THAT DESCRIBED IN THIS MANUAL RELIEVES THE MANUFACTURER ANY RESPONSIBILITY FOR DAMAGES ...

Page 9: ...9 FIG 2 MACHINE LAYOUT H2 O2 Gas production It h 160 Water consumption cc h 82 Alcohol consumption cc h 30 Booster tank capacity cc 282 Maximum power Watt 100 Electrolyte It 3 Weight Kg 45 ...

Page 10: ...n the manual 2 1 1 GENERAL SAFETY REGULATIONS ATTENTION The failure to comply with the information described in Section 2 Safety and Prevention and the mishandling of the safety devices relieves the Manufacturer from any responsibility in the event of accidents damage or machine malfunctions General rules The user undertakes to entrust the machine to a qualified and trained personnel only The user...

Page 11: ...ich it has not been possible to eliminate completely under certain operating conditions This risks have been highlighted on the machine with adhesive warning symbols that indicate the various situations if reduced safety or danger ATTENTION Keep the safety stickers clean and replace them immediately if they are peeling away or damaged The following warnings refer to Figure 3 Read them carefully an...

Page 12: ... the protections reassembled The spare parts must correspond with those stipulated by the Manufacturer Use only original spare parts During maintenance operations and repairs protective clothing must be worn i e protective eyewear gloves for preventing cuts and mask for respiratory tract protection Do not use water jets to dean the machine SECTION 3 Transport and Installation 3 1 PACKAGING The wel...

Page 13: ...G Set the welder on a solid and stable surface away from heat sources Allow for at least 50 cm free space for the cooling louvres on the machine sides for proper air circulation 3 5 STORING When the welder is in storage the tank must be filled with electrolyte Fig 5 50 and the machine must be started for a few minutes at least every 15 20 days Avoid storing in humid places ...

Page 14: ...chine tank It MUST be prepared in a plastic container prior to putting in the tank Fig 5 50 DANGER AVOID SPILLS ALLOW FOR COOLING TIME ABOUT 15 MINUTES OR MORE THE ELECTROLYTE IS HIGHLY CAUSTIC AND CAN CAUSE SERIOUS SCALDS TO THE SKIN AND HUMAN BODY WHEN HANDLING THIS PRODUCT ALWAYS MAKE SURE THAT A CONTAINER FULL OF WATER AND VINEGAR IS WHITHIN REACH IN ORDER TO BE ABLE TO WASH IMMEDIATELY ANY PA...

Page 15: ...xidizer this is to be avoided if before approaching the Booster Tank while on its seat you touch for a moment with the other hand the Booster Tank holder Fig 1 9 Repeat this operation each time you perform the Booster Tank filling deoxidizer 4 Place the Booster Tank back into place Fig 1 7 and tighten the handle knob Fig 1 8 just enough Do not over tighten 4 5 PREPARING FLUX DEOXIDIZER LIQUID DANG...

Page 16: ...or special torch and then put the burner tip into the torch cone by rotating and pushing it into place until it is tight enough Fig 1 10 11 3 Set the power control knob at ZERO Fig 1 4 Turn on the welder pressing the mark at the three point position switch Fig 1 1 The green and red lights will be on Fig 1 12 6 4 Turn rotate and set the knob Fig 1 4 until the point of the gas supply indicator Fig 1...

Page 17: ...on is performed slowly it can result in backfire 2 Slide the switch Fig 1 1 to the 0 position off ATTENTION After turning off the machine and throughout the necessary cooling time approx 5 hours do not unscrew the safety cap If this should happen tighten it back and start the machine for 30 seconds with the power control knob Fig 1 4 set on the maximum value ATTENTION 4 9 BACKFIRE Backfire can occ...

Page 18: ...rformed after 6 8 working hours when you see that the flame is fading and getting shorter replace it 1 Put out the flame 2 Turn off the welder 3 Unscrew the handle knob Fig 1 8 and remove the Booster Tank Fig 1 7 4 Pour liquid deoxidizer into the Booster Tank until it reaches the maximum level marked on the outside 5 Reassemble the Booster Tank and tighten the handle knob Do not over tighten 6 We ...

Page 19: ...ath the Booster Holder We recommend to replace every six months the booster gasket and the handle knob O ring Fig 5 22 24 For the cleaning of eventual encrustations on the bottom of the Booster Tank and inside the torch proceed as follows 1 Remove the liquid deoxidizer from the Booster Tank soaking it horizontally together with the torch in a container filled with about 6 cm of water 2 Provide boi...

Page 20: ...olyte and rinse the tank 2 Empty the liquid deoxidizer from the Booster Tank 3 Disassemble the machine components and store them separately according to the material they are made of 5 6 SCRAPPING Hand the materials that can be salvaged to companies specializing in recycling raw materials 5 7 DISPOSING OF THE ELECTROLYTE Neutralize it to PH7 by adding hydrochloric acid and small part of albite in ...

Page 21: ...te sec 5 10 5 1 Check the tightness of the valve sec 5 10 3 2 Replace the check valve if necessary sec 5 10 4 3 Flame is shortened and the reading of the gas supply indicator Fig 1 20 is normal Obstructions due to scales or there is a gas leakage in the pneumatic channels see par 5 2 Gas leakage Do not depressurize the machine and remove the power cable Start with a brush spread soapy water all ov...

Page 22: ...stop nut underneath using dynamometric wrench set from 0 25 to 0 32 Kgm 5 On starting the machine the fuse blows out Fig 5 37 Power circuit board is short circuited One of the rectifier diode is short circuited Short circuit inside the tank Fig 5 50 due to accidental introduction of a metal object Short circuit of the tank cover Fig 5 46 with the tank due to over compression of the cover OR Fig 5 ...

Page 23: ...49 is mounted correctly and that the isolators Fig 5 45 are inserted in such a way that the anode is not in contact with the cathode 4 If the transformer is short circuited substitute the item 5 Change the ventilator if needed 6 6 Verify that the internal cables are isolated or that there is no Short circuit caused by the liquid consumed internally if so clean with demineralized water removing con...

Page 24: ...kage repeat steps REMEDY 3 above a before opening flame wait approx 2 minutes to verify the gas comes out of the burner tip b Consult Table 2 c Always turn flame off before turning machine off d Turn flame off before removing booster tank or safety cap e In case of gas leakage repeat steps REMEDY 3 above 8 The Flame appears Red or fluctuates a Flux deoxidizer is consumed b Liquid levels are above ...

Page 25: ...SSIBLE SOLUTIONS Adjust the power control knob FIG 1 4 or change the diameter of the needles as indicated in TABLE 2 TABLE 2A Of operating instruction manual 1 Adjust the Power Control Knob Fig 1 4 or change diameter of the needles as indicated in Table 2 Table 2A of the User Manual 2 Replace the flame arrester or rinse the check valve with tap water or replace the check valve 3 Immerse the booste...

Page 26: ... Tighten the four nuts first manually and subsequently using a wrench tighten uniformly and securely 7 Connect the hose to the fitting Fig 5 41 connect the level sensors Fig 5 47 48 and the two copper conductors Fig 5 59 8 Refill the tank Fig 5 50 with electrolyte 5 10 2 CONTROLLING PRESSURE ADJUSTING THE VALVE 1 Turn off the machine and remove the safety cap Fig 5 2 2 Fit the pressure gauge on th...

Page 27: ...veral hours Keep in mind that when the machine is not working the tank cools down causing a pressure drop If for some reason there is a total lack of pressure the methyl alcohol contained in the Booster Tank would be sucked in thus contaminating the electrolyte 5 10 4 REPLACING THE VALVE 1 Turn off the welder and remove the pressure gauge or safety cap Fig 5 2 2 Unscrew the check valve cap A Fig 4...

Page 28: ...nformation Machine Model Serial Number Year of Fabrication Ordering Code Number for the part required description of the part and the number required Shipping Instructions If this is not specified by Manufacturer even though doing its utmost to offer this service as efficiently as possible cannot and it will not be liable for any shipping delays caused by force majeure events Transportation costs ...

Page 29: ...29 ...

Page 30: ...Ring 23 1325 Check valve 24 556 Booster rubber gasket 26 141 Level circuit board 27 445 Rectifier diodes 28 811 250 k rheostat 29 455 Aluminum base plate 30 3476 Front panel 31 1930 75 1931 Power cord I USA D 32 1877 Cover 33 485 Rubber ring 34 645 Handle 35 680 690 Fan motor 230 V 115 V 36 2608 Rear panel 37 1397 Fuse 10 A 230 V 20 A 115 V 38 1111 Fuse older plug 39 1220 1225 Resistor 3X10 k 230 ...

Page 31: ...31 ...

Page 32: ...32 ...

Page 33: ...Ø 0 7 mm N 70 black 60 150 4 Ø 0 7 mm black 80 160 1 Ø 0 8 mm green 30 60 2 Ø 0 8 mm green 60 120 3 Ø 0 8 mm N 80 green 90 160 4 Ø 0 8 mm green 120 160 1 Ø 0 9 mm yellow 40 80 2 Ø 0 9 mm N 90 yellow 80 160 3 Ø 0 9 mm yellow 120 160 1 Stainless steel Ø 1 mm 50 90 2 Ø 1 mm N 100 100 160 3 tip Ø 1 mm 150 160 1 Ø 1 1 mm N 110 ocher 70 110 2 Ø 1 1 mm ocher 140 160 1 Ø 1 2 mm N 120 pink 80 160 ...

Page 34: ...r dual tip with the standard torch no adaptor is needed TABLE 2 A for welder mod L 160 SPECIAL TORCH with one nozzle HOW TO ADJUST THE POWER ACCORDING TO NEEDLE TIP SIZE TABLE 2 A Adjust the Power Con trol Knob and simultaneously check the gas sup ply indicator ac cording to Min and Max L h see Table 2A ...

Page 35: ...sh the flame Close by a quick movement the shut off valve 16 Tab 6 Subsequently reopen back the shut off valve Back fire The back fire causes the permanent shut off of the flame arrester 51 Tab 6 and interrupts the gas output from the torch The power supply will be cut off and the gas supply indicator Fig 1 20 will move back to zero The flame arrester must be replaced Replacement of the flame arre...

Page 36: ...per separated collection of the released equipment and thus the initiation of the successive treatment operations with compatible dismantling facilitates and permits avoiding potential negative effects to the surroundings the environment human health all while recycling and recovering of such materials its components and sub components The abusive dismantling of the product on behalf of the user c...

Page 37: ...37 ELETTRONICA TODESCATO S r l 36057 Arcugnano Vicenza Italia Via A Volta 9 A C Tel 39 0444 289227 Fax 39 0444 299229 www elettronicatodescato com info elettronicatodescato com ...

Reviews: