Installation Instructions
5
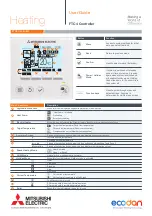
Note
After the finished floor covering has been laid perform the following tests:
• Insulation resistance test
• Heating cable resistance test
• Floor sensor resistance test
Record your findings in the test & commission form enclosed in the box.
Step 5
Perform the following tests: insulation resistance test, a heating cable resistance
test and a floor sensor resistance test (see page 7), record your findings in the test &
commission form enclosed in the box.
Remove the securing tape from your eFlex roll and position at the start of your eFlex
plan with cold tail (power cable) at the electrical back box. Ensure the separate
thermostat floor sensor cable is inserted in to the pre-installed 10mm flexible tube
and returned to the low level electrical back box. The cold tail joint must be positioned
in the floor area.
Step 6
Once the eFlex cold tail (power cable) and thermostat floor sensor probe have been
positioned you can now start to lay your heating cable. Following your previously drawn
layout and spacing, continue to lay and secure your eFlex heating cable onto the
double-sided adhesive tape using the eGauge for guidance
. Continue laying cable until
total floor area is covered. All heating cable must be used, any excess heating cable must
be reconfigured into the floor area by adjusting your cable spacing. Ensure all heating
cables are evenly spaced across the floor area.
• Do not cut any surplus heating cable.
• Do not leave any excess heating cable spooled
or coiled in the floor area.
• Ensure all heating cable is used and spaced evenly across the floor.
Step 7
Lay the eMesh onto the double sided tape to secure the heating cables. Further
lengths of eMesh can be used to secure the heating cable between the double-sided
tapes, if required.
Step 8
With the eFlex laid and secure, it can now be covered with either a flexible tile
adhesive or flexible self levelling compound.
Ensuring there are no air pockets, carefully spread the flexible tile adhesive or self
levelling compound until all heating cables are covered. You may tile directly over the
eFlex, carefully applying your flexible tile adhesive with a notched trowel ensuring
each tile is securely fixed and all cable areas are completely covered with flexible tile
adhesive.
Register your warranty online at: www.electricunderfloorheating.co.uk/warranty