background image


User Manual V3.1 

Element14 | element14.com/minode 


15 


Function  

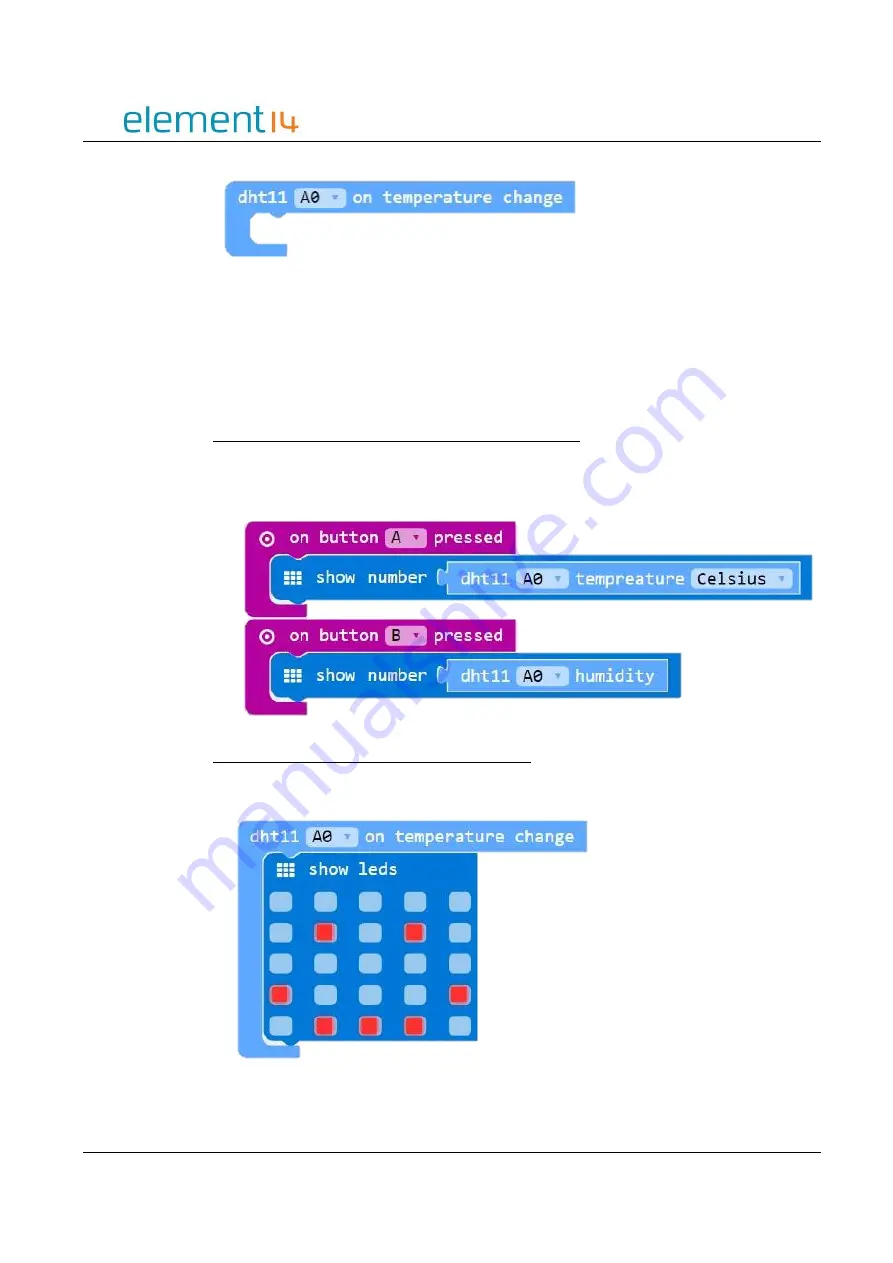
onDHTEvent(connName: ConnName, body: () => void): void; 

Parameters 

‘ConnName’ is the analog connector's name. 

EXAMPLE: 

Pressing Buttons to Display Temperature and Humidity 

This example shows you how to use Buttons A and B to obtain the temperature and 
humidity of the surrounding environment. When Button A is press the screen will show 
the current temperature. When Button B is pressed, it will show the humidity


Temperature Change Notification – Smiley Face 

Display a smiley face on the LED screen when the temperature changes. 


Summary of Contents for mi:node

Page 1: ...User Manual V3 1 Element14 element14 com minode 1 mi node User Manual...

Page 2: ...tegrated Circuit 7 2 4 Pin Mapping 7 3 Usage 8 3 1 Programming Using mi node 8 3 2 Working With mi node Libraries 8 3 3 Working Without mi node Libraries 11 3 4 Module Usage API Reference 11 a Light S...

Page 3: ...ect data and exchange information With this kit there is no need for soldering just connect and use The construction of a working circuit can be easily completed in less than one minute 1 2 Features I...

Page 4: ...devices up to a maximum of 250V 8 Rotary Angle 1 Analog Input A switch with a 0 300 degree dial used to control voltage output from 0V to maximum 9 PIR Motion Sensor 1 Digital Input Senses motion usu...

Page 5: ...sor modules It converts the BBC micro bit edge connector into several e brick connectors The sensor modules can then easily be attached to it using the provided e brick cables Image 2 1 mi node Connec...

Page 6: ...licate of Pin No 1 described above Note Usually only one communication pin is required for most sensors 3 Red Vcc Power connection 4 Black Gnd Ground connection Table 2 2 E Brick Connector Pin Out 2 3...

Page 7: ...ires two signals a data signal and a clock signal It allows information to be sent in packages on what is called a bus to and from the BBC micro bit and any attached sensor modules It also allows you...

Page 8: ...python In this document we will focus on using the Microsoft PXT editor 3 2 Working With mi node Libraries The mi node has pre created libraries that you can utilize for free Working with these libra...

Page 9: ...the search button You can also enter the following project URL https github com minodekit pxt minode before selecting the search button Both options will pull up the mi node library package Select the...

Page 10: ...User Manual V3 1 Element14 element14 com minode 10 Image 3 2c mi node packed added Refer to the example code or API reference and drag the library blocks you want to use into your project space...

Page 11: ...or Board from the table you can see that this connector corresponds to pin12 on the micro bit Connector Type Connector Name micro bit Pin Name Digital IO D12 pin12 pin13 3 4 Module Usage API Reference...

Page 12: ...e divides brightness into five distinct levels 1 5 with one being the brightest and five being the most dull Function LightSensorGetLevel connName AnalogConnName number Parameters ConnName is the anal...

Page 13: ...t level changes b Temperature and Humidity Sensor DHT11 This sensor module features a temperature humidity sensor with a calibrated digital signal output It can measure temperature and humidity in the...

Page 14: ...ius or Fahrenheit Function DHTGetTemperature connName ConnName style DHTTemStyle number Parameters ConnName is the connector s name style is the format of the temperature You can choose Celsius or Fah...

Page 15: ...isplay Temperature and Humidity This example shows you how to use Buttons A and B to obtain the temperature and humidity of the surrounding environment When Button A is press the screen will show the...

Page 16: ...Frequency range 100 10000 Hz Sensitivity 50 dB Block API Obtain the Sound Level The sound level is divided into five levels 1 5 where one represents the quietest lowest level and five represents the...

Page 17: ...ample shows you how to obtain the current sound level and display it as a number on the LED screen Sound Level Change Notification When the sound level changes the word Change is displayed on the LED...

Page 18: ...Rotary Position Determine the current rotary position the percentage of how much the rotary dial has been rotated from its zero position Function RotaryGetPercentage connName AnalogConnName number Pa...

Page 19: ...play Rotary Angle Percentage This example shows you how to get the current rotary angle percentage and display it on the LED screen Controlling the LED Screen Smiley Face When the rotary percentage is...

Page 20: ...s stationary no LEDs will be lit on screen e Mini Fan Module The mini fan module is designed to be used with the DC motor and Orbit Fan The speed of the motor can be controlled according to different...

Page 21: ...anControl_1 connName AnalogConnName speed number void Parameters ConnName is the analog connector s name Speed is the velocity of the motor where 0 is used to stop the motor and 100 is the fastest spe...

Page 22: ...efault the speaker is connected through pin P0 of the micro bit therefore it is important to connect the speaker module to Connector A0 Image 3 4f Speaker Module Module Connect Type Available Connecto...

Page 23: ...ital IO D12 D13 D14 D15 Electrical Characteristics Parameter Min Typical Max Unit Detection angle solid angle 110 Detection range 7 m Delay time of high level 2 5 s Block API Check the PIR status Chec...

Page 24: ...nnName ConnName body void void Parameters ConnName is the connector s name EXAMPLE Detecting Movement Smiley Face When the PIR detects a moving object the LED screen will show a smiley face When there...

Page 25: ...Module Connect Type Available Connectors RGB LED Digital IO D12 D13 D14 D15 Block API Choose a Pre Coded Color The color the RGB LED displays can be selected Function RGBChooseColor connName ConnName...

Page 26: ...ranging from 0 to 255 green is the greyscale value of green ranging from 0 to 255 blue is the greyscale value of blue ranging from 0 to 255 EXAMPLE Use Button A and B to Display Pre Coded Colors When...

Page 27: ...le The switch module can used to switch between two options ie on off Image 3 4i Switch Module Module Connect Type Available Connectors Switch Module Digital IO D12 D13 D14 D15 Block API Check the swi...

Page 28: ...the associated code block whenever the switch is either opened or closed as selected Function onSwitchEvent connName ConnName event SwitchEvent body void void Parameters ConnName is the analog connect...

Page 29: ...Display Switch Status In this example we use the switch event to display the status of the switch whether it is open or closed When the switch is open the led screen will display the word Open When t...

Page 30: ...is NOT necessary to connect a real appliance A clicking sound can be heard when the relay switches ON OFF Image 3 4j Relay Module Module Connect Type Available Connectors Relay Module Digital IO D12...

Page 31: ...Element14 element14 com minode 31 EXAMPLE Control the Relay using Button A and B In this example pressing Button A will set the relay to the open position Pressing Button B will set the relay to the...

Page 32: ...Microsoft MakeCode Home https makecode microbit org Reference https makecode microbit org reference MakeCode PXT Documentation https makecode com docs 4 2 Support Website https www element14 com comm...

Reviews: