8
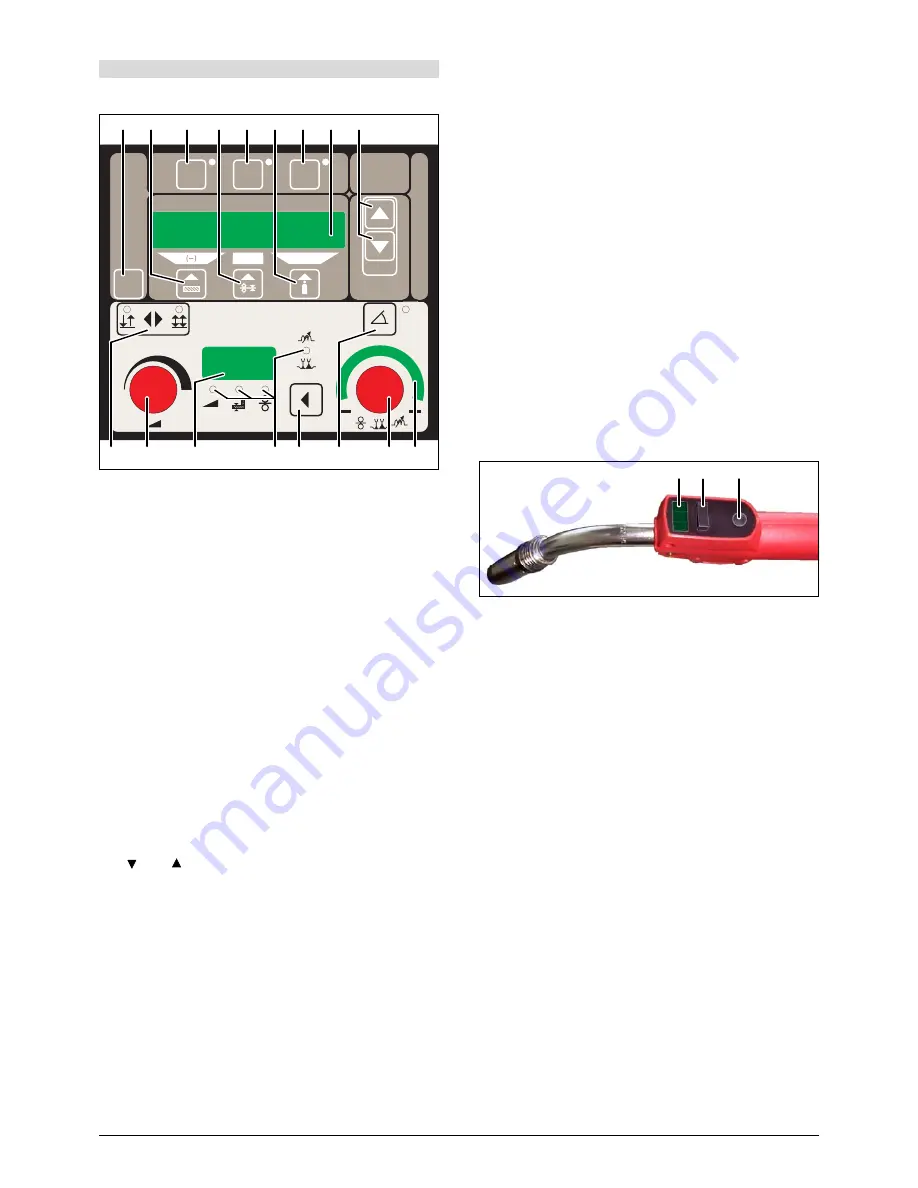
DP 20 operating panel
43
“Mode” push-button
For switching between the operation modes Normal,
Pulse, TwinPulse and Electrode.
44
“Material” push-button
For selection of the material to be welded. The push-but-
ton is also used for the “Decrementing” (-) function, e. g.,
to reduce the value of a secondary parameter.
45
“TT Save” push-button (Tiptronic)
For storage of a job.
46
“Welding wire diameter” push-button
For diameter selection of the wire to be welded. The
push-button is also used for the “End” function, with
which you can switch back to the display of the previous
menu level.
47
“TT Enter” push-button (Tiptronic)
For acknowledgement when saving a job.
48
“Gas type” push-button
For selection of the gas to be used. The push-button is
also used for the “increment” (+) function, e. g., to in-
crease the value of a secondary parameter.
49
“Tiptronic” push-button
For switching the Tiptronic mode on or off.
50
Multi-function display
For indication of all parameter values and messages.
51
and push-buttons (Enter)
For switching between the individual secondary param-
eters. Pressing both push-buttons at the same time is
used for acknowledgement (Enter).
52
“2-stroke / 4-stroke” push-button
For switching between 2-stroke and 4-stroke operation
mode. A lit LED indicates the currently selected operat-
ing mode.
53
Rotary pulse encoder for welding current / material thick-
ness
The rotary pulse encoder is used for adjustment of the
required welding current and material thickness. The ad-
justment range can be limited, depending on the select-
ed material-wire-gas combination.
54
Digital multifunction display
For indication of the primary parameters such as welding
current, material thickness (in mm), wire feed speed (in
m/min) or arc length correction.
55
“Primary parameter” LEDs
These show which primary parameter is currently indi-
cated in the multifunction display
54
.
56
“Primary parameter” push-button
For switching between welding current, material thick-
ness, wire feed speed and arc length, as indicated in the
digital multifunction display
54
.
57
“Downslope” push-button
Switches the downslope function on or off. A lit LED next
to the push-button indicates that the downslope is on.
58
“Arc length / wire speed correction” rotary pulse encoder
For correction of the arc length or wire speed (depend-
ent on setting menu extra “arc lenght control“). Up to +/-
40 % of the characteristic value can be corrected.
59
“Arc length / wire speed correction” LED indication
Indicates the degree of the correction. When the upper-
most center LED is lit, the programmed arc length/wire
speed remains unchanged; “0” is indicated in the multi-
function display
54
. Turn the rotary pulse encoder
58
left
to reduce the arc length/wire speed; turn the rotary pulse
encoder
58
right to enlarge the arc length/wire speed
.
60
Torch display
Indicates the current welding power, material thickness,
wire feed speed or arc length correction (identical with
the digital multifunction display
54
). In Tiptronic mode,
the current job set and the current job number are indi-
cated.
61
Torch rocker
For changing the welding power, material thickness or
arc length (depending on which value is being indicated
in the digital multifunction display
54
).
In Tiptronic mode, the rocker can be used to switch be-
tween the active jobs or job sets.
62
Torch “Modus” push-button
Has the same function as the “Primary parameter” push-
button
56
on the DP20 operation panel.
In Tiptronic mode this push-button can be used to switch
between job selection and job-set selection.
Current / voltage display
The actual welding voltage and welding current values are in-
dicated during the welding. After the welding procedure, the
“Hold” LED lights up and the last welding voltage and welding
current values are indicated. When the operator changes cer-
tain welding adjustments (e. g. level, program, job), the “Hold”
LED goes out and the reference values for current and volt-
age are indicated.
11 Setting into operation
TT
Save
Enter
Tiptronic
(END)
(+)
TT
Enter
Mode
mm
43 44
45 46 47 48 49 50 51
52 53
54
55 56
57
58 59
60
62
61
Summary of Contents for MULTIMIG 400puls
Page 2: ...2 5 5 6 10 8 9 6 7 12 15 14 11 10 ...
Page 19: ...19 Appendix mounting torch holder ...
Page 20: ...326601 06 05 ...


