background image

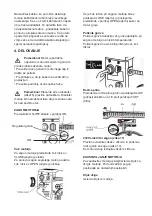
spark plug after every 50 hours of operation.  
Recommended spark plugs: F7RTC or other 
equivalents. 

An incorrect spark plug can cause engine 
damage. 

• Disconnect the spark plug cap, and remove 

any dirt from around the spark plug area. 

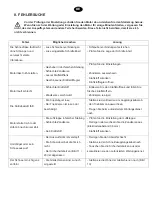
• Remove the spark plug with a spark plug 

wrench. 

• Inspect the spark plug. Rep

lace it if the 

electrodes are worn, or if the insulator is 
cracked or chipped. 

• Measure the spark plug electrode gap with a 

suitable gauge. 

• The gap should be 0.70 

- 0.80 mm (0.028 -

0.031 in). Correct the gap, if necessary, by 
carefully bending the side electrode 

• Install the spark plug carefully, by hand, to 

avoid cross-threading. 

• After the spark plug seats, tighten with a spark 

plug wrench to compress the water. 

• If reinstalling the used spark plug 

tighten 1/8 

- 1/4 turn after the spark plug seats. If installing 
a new spark plug, tighten 1/2 turn after the 
spark plug seats. 

• Attach the spark plug cap.

5%+-+-68/*/4+7/-18>

The sediment cup prevents dirt and water that 
may have gotten into the fuel tank from entering 
the carburetor. If the engine has not been run 
for a long time, the sediment cup should be 
cleaned before use. 

• Turn the fuel valve to the off position.
• Remove the sediment cup using a 10 mm 

wrench. 

• Remove the o

-ring and filter. 

• Clean each of the parts in a high flash

-point 

solvent. 

• Reinstall the filter, o

-ring, and sediment cup. 

Tighten with 10 mm wrench to secure. 

• Return the fuel valve to the ON position and 

check for leaks. 


5%+-+-6%5[85/1'5

• Loosen the carburetor drain screw.
• Allow gasoline to drain completely i

nto

suitable container. 

• Retighten drain screw.

1'5%6/5/>%5%1+'-

Proper storage preparation is essential for 
keeping your snow thrower trouble free and 
looking good. The following steps will help to 
keep rust and corrosion from impairing your 
snow 

thrower’s function and appearance, and will 

make the engine easier to start after storage. 

*/%-+-6

If the engine has been running, allow it to cool 
for at least half an hour before cleaning. Clean 
all exterior surfaces, touch up any damaged 
paint, and coat other areas that may rust with a 
light film of oil. 

•Using a garden hose or pressure washing 

equipment can force water into the air cleaner 
or muffler opening. Water in the air cleaner will 
soak the air filter, and water that passes 
through the air filter or muffler can enter the 
cylinder, causing damage. 

•Water contacting a hot engine can cause 

damage. If the engine has been running, allow 
it to cool for at least half an hour before 
washing. 

8/*

Gasoline will oxidize and deteriorate in storage. 
Old gasoline (more than 3 months old) will 
cause hard starting, and it leaves gum deposits 

EN

Summary of Contents for STEm 13070 E Industrie Line

Page 1: ...DE EN SI BEDIENUNGSANLEITUNG OPERATING INSTRUCTION STEm 13070 E Industrie Line DE EN SI STEm 14076 ET Industrie Line ...

Page 2: ......

Page 3: ......

Page 4: ......

Page 5: ......

Page 6: ......

Page 7: ......

Page 8: ... ...

Page 9: ...HEITSHINWEISE 2 TEILE DER MASCHINE 3 MONTAGE 4 BETRIEB 5 WARTUNG 6 LAGERUNG 7 ENTSORGUNG 8 FEHLERSUCHE 9 TECHNISCHE DATEN 10 EG KONFORMITÄTSERKLÄRUNG 11 GARANTIESCHEINE 12 VERTRIEBSHÄNDLER UND REPARATURWERKSTÄTTEN DE ...

Page 10: ... Schnee zu räumen Bei der Arbeit Einstellen oder Reparatur tragen Sie immer Schutzgläser oder einen Augenschutzschild um die Augen vor ausgeworfenen Fremdkörpern zu schützen die aus der Maschine in irgendeine Richtung ausgeworfen werden Führen Sie niemals Hände und Füße an oder unter drehende Teile Halten Sie sich immer von der Auswurfsöffnung fern Passen Sie besonders auf wenn Sie die Maschine an...

Page 11: ... niemals in Gebäuden betanken Vor dem Auftanken warten Sie wenigstens zwei Minuten damit die Maschine abkühlt Wartung und Lagerung Prüfen Sie regelmäßig die Sicherheitsbolzen Motorträgerschrauben usw ob Sie richtig festgeschraubt sind um so die Betriebssicherheit der Maschine festzustellen Das Gerät niemals mit Kraftstoff im Tank in einem Raum lagern in dem Zündquellen wie Heißwasserspeicher Heizg...

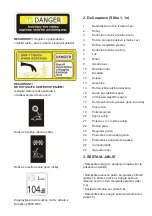
Page 12: ...e in die Messer oder den Auswurfkanal wenn die Maschine läuft GEFAHR Vermeiden sie Verletzungen mit drehenden Messern Hände Füße und Kleidung fernhalten GEFAHR BEI ROTATION NICHT ANFASSEN Stellen Sie den Motor ab bevor sie mit der Befreiung des Auswurfsrohres beginnen Fahrhebel rechter Hebel Schneideeinheitsteuerung linker Hebel Garantierter Schalleistungspegel nach der Richtlinie 2000 14 EG 2 Tei...

Page 13: ...ht mehr drehen sollen Sie die Bowdenzüge kürzen wie oben angeführt 4 BETRIEB Wichtig Vor dem Starten müssen Sie den Motor mit Motoröl und Kraftstoff füllen Prüfen Sie den Kraftstoff und Motorölpegel und füllen Sie nach Bedarf auf Prüfen Sie ob der Kabelschuh an der Kerze fest aufsitzt Überprüfen sie den Bereich um die Schneefräse Wichtig Prüfen Sie ob die Gleitschienen Bild 13 richtig eingestellt ...

Page 14: ...erzeugen Sie sich dass sich keine Personen oder Tiere vor der Schneideeinheit oder im Schneeauswurfbereich befinden Achtung Die Schneeauswurfweite kann bis zu 15 m reichen Mit dem Gangwahlhebel stellen Sie die notwendige Arbeitsgeschwindigkeit erster Gang langsam bis sechste Gang schnell Es gibt auch zwei Rückwärtsgänge R1 langsam und R2 schnell Verwenden Sie niedrigere Gänge 1 bis 2 für tiefen od...

Page 15: ...tung können beim Betrieb schwere Körperverletzungen verursachen oder gar den Tod zu Folge haben Deshalb beachten Sie immer die Wartungsempfehlungen und Pläne in diesem Handbuch Zur Durchführung der Wartungsarbeiten an Ihrem Motor finden Sie auf folgenden Seiten den Wartungsplan die Prüfverfahren und einfache Wartungsverfahren mit Hilfe von Handwerkzeug Sie sollten anspruchsvollere Reparaturen bei ...

Page 16: ...dhabung von Kraftstoff können sie Verbrennungen oder ernste Verletzungen erleiden Motor abschalten und keine Wärmequellen Funken oder Feuer in der Nähe zulassen Den Kraftstoff nur draußen handhaben Jedes Ausfließen sofort abwischen Den Kraftstoff nur in gut durchlüfteten Räumen vor dem Start des Motors zutanken Wen der Motor schon lief werten Sie bis er abkühlt Verfahren Sie vorsichtig um Ausfließ...

Page 17: ...eutender Faktor für die Leistung und Standzeit des Motors Verwenden sie Synthetisches Öl für Viertaktmotoren Wir empfehlen Öl mit SAE 5W 30 für allgemeine Verwendung Andere Viskosität sind in der Zeichnung dargestellt und könne bei der richtigen Temperatur in angegebenen Bereich verwendet werden SAE Viskosität Stufen UMGEBUNGSTEMPERATUR SA Ölviskosität und Serviceklassifikation steht auf dem AHOI ...

Page 18: ... hohem Flammpunkt Setzen Sie den Filtereinsatz und den O Ring wieder ein und den Kraftstofffilter wieder zusammen Festschrauben mit dem 10 mm Schlüssel Öffnen Sie den Kraftstoffhahn und prüfen Sie ob der Kraftstoff irgendwo durch leckt Vergaser entleeren Lösen Sie die Auslassschraube am Vergaser Lassen Sie das Benzin in ein entsprechendes Behälter auslaufen Schrauben Sie die Auslassschraube zu 6 L...

Page 19: ...gaser und stecken Sie einen Trichter hinein um den Kraftstoff nicht zu verschütten Entfernen Sie die Ablassschraube aus dem Vergaser und ziehen Sie das Rohr in den Trichter Nachdem der ganze Kraftstoff abgeflossen ist montieren Sie wieder das Rohr und die Abflussschraube Ziehen Sie sie fest an Lagerungssicherheitsmaßnahmen Wechseln Sie das Motoröl Entfernen Sie die Zündkerze Gießen sie ein Löffel ...

Page 20: ...en Stabilisator zumischen 2 Monate bis 1 Jahr Maschine mit frischen Benzin füllen und den Stabilisator dazu mischen Den Kraftstoff aus dem Vergaser herauslassen Den Kraftstofffilter reinigen 1 Jahr und mehr Den Tank entleeren Den Kraftstoff aus dem Vergaser auslassen Den Kraftstofffilter reinigen Die Zündkerze entfernen Eine Löffel Öl in den Zylinder einfließen Den Motor mit dem Starterzug langsam...

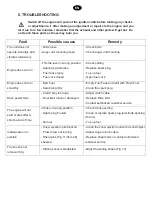
Page 21: ... Zündkerze verschmutzt Entleeren Sie den Kraftstofftank und füllen Sie frisches Kraftstoff ein Zündkerze reinigen Die Antriebskraft fällt Die Kupplung ist lose Der Triebriemen ist lose oder beschädigt Stellen sie den Bowden am Kupplungskabel ein den Triebriemen auswechseln Fragen Sie beim autorisiertem Wartungsdienst nach Motor startet nicht oder stirbt ab nach kurzer Zeit Die Luftklappe in falsch...

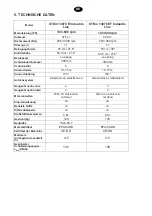
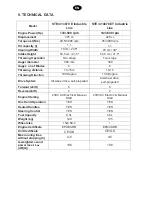
Page 22: ...ezahl 6 6 Auswurfweite 10 15 m 10 15 m Auswurfrichtung 190 º 190 º Antriebssystem Allrad Antrieb selbstfahrend Allrad Antrieb selbstfahrend Gangzahl nach vorne 6 6 Gangzahl nach hinten 2 2 Motoranwerfen 230V AC elektrisch mit Hand 230V AC elektrisch mit Hand Einarmbedienung JA JA Beheizte Griffe JA JA Differentialsperre JA JA Kraftstofftankvolumen 6 5L 6 5L Gewicht kg 120 135 Radgröße 15x6 50 7 Mo...

Page 23: ... EN ...

Page 24: ...rts Keep clear of discharge opening at all times Exercise extreme caution when operating on or crossing gravel drives walks or roads Stay alert for hidden hazards or traffic Do not carry passengers After striking a foreign object stop the engine remove wire from spark plug and thoroughly inspect the snow thrower for any damage Repair the damage before restarting and operating the snow thrower If t...

Page 25: ...iod Maintain or replace safety and instruction labels as necessary Run machine a few minutes after throwing snow to prevent freeze up of auger impeller Never over fill fuel tank Fill tank to no more than 13 mm below bottom of filler neck to provide space for fuel expansion Replace gasoline cap and tighten securely Never store the machine or fuel container inside where there is an open flame park o...

Page 26: ...ine 9 Discharge chute 10 Auger unit 11 Sliding shoes 12 Wheels 13 Tracks 14 Function shift lever 15 230V electric starter START button 16 230V electric starter plug 17 Track direction control lever Left Right 18 Choke lever 19 Primer 20 Ignition key 21 Starter grip recoil starter 22 Throttle lever 23 Fuel valve lever 24 Fuel filler cap 25 Oil filler cap dipstick 26 Shear pins 27 Heated handles Ass...

Page 27: ...ound the snow thrower 7 51 19 Check that sliding shoes Fig 13 are correctly adjusted Sliding shoes should be adjusted so that the auger unit is just above ground level Move the On Off switch to the ON position 6 To start a cold engine move the choke lever to the CLOSE position To restart a warm engine leave the choke lever in the OPEN position If the choke lever has been moved to the CLOSE positio...

Page 28: ...2nd and a higher speed for light powdery snow 3rd to 4h Select 5th and 6th gear for transport only Press the left hand control lever Fig 1 Item 3 downwards to engage the auger unit which will then start to rotate The auger unit on the snow thrower is secured to the drive shaft using shear pins Fig 11 Item 26 These will break if the auger unit strikes any hard objects and will thus protect the snow...

Page 29: ... 48 1 Y 5 7 8 To help you properly care for your engine the following pages include a maintenance schedule routine inspection procedures and simple maintenance procedures using basic hand tools Other service tasks that are more difficult or require special tools are best handled by professionals and are normally performed by a technician or other qualified mechanic 0 12 5 3 81 Make sure the engine...

Page 30: ...tank cap and check the fuel level Refill the tank if the fuel level is low 6 2 0 77 4 8 3 85 4 5 5 8 2 85 4 Y 4 6 08 1 1 6 4 1 5 4 0 7 Y 2 4 08 2 814 5 8 77 4 1 2 Refuel in a well ventilated area before starting the engine If the engine has been running allow it to cool Refuel carefully to avoid spilling fuel Do not fill above the fuel strainer shoulder After refueling tighten the fuel tank cap se...

Page 31: ...er edge of the oil filler hole with the recommended oil Screw in the filler cap dipstick securely 6 3 77 4 1 Oil is a major factor affecting performance and service life Use 4 stroke automotive detergent oil SAE 5W 30 is recommended for general use Other viscosities shown in the chart may be used when the average temperature in your area is within the recommended range SAE Viscosity Grades AMBIENT...

Page 32: ...m wrench Remove the o ring and filter Clean each of the parts in a high flash point solvent Reinstall the filter o ring and sediment cup Tighten with 10 mm wrench to secure Return the fuel valve to the ON position and check for leaks 5 6 5 85 1 5 Loosen the carburetor drain screw Allow gasoline to drain completely into suitable container Retighten drain screw 1 5 6 5 5 1 Proper storage preparation...

Page 33: ...oline Add fuel stabilizer following the manufacturer s instructions After adding a fuel stabilizer run the engine outdoors for 10 minutes to be sure that treated gasoline has replaced the untreated gasoline in the carburetor Stop the engine and move the fuel valve to the OFF position 5 6 1 8 4 5 85 1 5 Place an approved gasoline container below the carburetor and use a funnel to avoid spilling fue...

Page 34: ...ting If the cylinders were coated with oil during storage preparation the engine may smoke briefly at startup This is normal 1 5 6 7 5 5 1 8 Less than 1 month No special preparation is required 1 to 2 months Fill with fresh gasoline and add a gasoline conditioner 2 months to 1 year Fill with fresh gasoline and add a gasoline conditioner Drain fuel from carburetor Clean fuel sediment cup 1 year or ...

Page 35: ...y Empty Fuel Tank and refill with Fresh Fuel Clean the spark plug Drive power falls Clutch play too large Drive Belt loose or damaged Adjust clutch cable Replace Drive Belt Contact authorized customer service The engine will not start or dies after a short period of time Choke in wrong position Spark plug Fouled No fuel Check Choke setting Clean or replace spark plug electrode spacing 0 6 mm Top u...

Page 36: ... 4 6 6 5 Y 6 4 1 3 10 15m 10 15 5 Y 6 5 31 190 Degree 190 Degree 5 2 1 7 All wheel drive self propelled All wheel drive self propelled 5Y 54 01 6 6 5 01 2 2 6 1 51 6 230V AC Electric Manual Start 230V AC Electric Manual Start 4 5 1 YES YES 1 4 4 YES YES 1 5 6 15 YES YES 8 3 12 6 5L 6 5L 6 1 6 120 135 _ 15x6 50 7 6 51 0 3 1 EPA CARB EPA CARB 1 51 0 3 1 CE GS CE GS 58 6 1 7 Y 1 81 1 6 4 5 4 5 XY 6 1...

Page 37: ...NAPOTKI 2 DELI NAPRAVE 3 SESTAVLJANJE 4 DELOVANJE 5 VZDRŽEVANJE 6 SKLADIŠČENJE 7 ODLAGANJE ODPADKOV 8 ODPRAVLJANJE TEŽAV 9 TEHNIČNI PODATKI 10 ES IZJAVE O SKLADNOSTI 11 GARANCIJSKI LISTI 12 DISTRIBUTERJI IN SERVISNI CENTRI ...

Page 38: ...o naprave na ali med prečkanjem prodnih poti Bodite previdni pred skritimi nevarnostmi ali prometom Ne prevažajte potnikov na napravi Če zadanete tujek zaustavite motor odstranite kabel s svečke in podrobno preglejte ali je naprava poškodovana Popravite morebitno poškodbo pred ponovnim zagonom in uporabo snežne freze Če se snežna freza začne prekomerno tresti zaustavite motor in nemudoma preverite...

Page 39: ...otrebi Pustite napravo da deluje nekaj minut po uporabi da bi preprečili zmrznitev snega v ohišju Nikoli ne napolnite rezervoarja do vrha Napolnite rezervoar do 13 mm pod gladino dna vratu polnilne odprtine zaradi omogočanja prostora za širjenje bencina Postavite pokrov rezervoarja goriva in ga varno privijte Nikoli ne hranite naprave ali posode z gorivom v zaprtem prostoru v bližini odprtega ognj...

Page 40: ...na cev 10 Rezilna enota 11 Drsalniki 12 Kolesa 13 Gosenice 14 Ročica izbire načina delovanja 15 Gumb za električni zagon 16 Vtičnica za električni zagon 17 Ročici za kontrolo gosenic leva in desna 18 Čok ročica 19 Potisnik goriva 20 Ključ za vžig 21 Potezna vrv z ročico za vžig 22 Ročica plina 23 Regulator goriva 24 Pokrovček rezervoarja goriva 25 Pokrovček za olje merilna palica 26 Varnostni zati...

Page 41: ...no tal ZAGON MOTORJA Premaknite ON OFF stikalo v položaj ON Čok motorja Za zagon motorja premaknite čok ročico v CLOSE zaprto položaj Za ponovni zagon segretega motorja pustite čok ročico v OPEN odprto položaju Če je čok ročica pri zagonu motorja bila v položaju CLOSE zaprto jo postopoma premaknite v položaj OPEN odprto kakor se motor greje Potisnik goriva Potisnik goriva dobavlja več goriva uplin...

Page 42: ...za vklop rezilne enote ki se bo začela vrteti Rezilna enota je pritrjena na pogonsko gred z varnostnimi zatiči slika 11 26 Ti se bodo zlomili če rezilna enota udari v trd predmet in bo tako zaščitila snežno frezo pred težjimi poškodbami Rezervna varnostna zatiča se nahajata na kontrolnem panelu slika 11 snežne freze za zamenjavo NE ZAMENJUJTE VARNOSTNIH ZATIČEV Z NAVADNIMI VIJAKI Stisnite desno ko...

Page 43: ...edovanja in enostavni postopki vzdrževanja s pomočjo ročnega orodja Ostala popravila ki so zahtevnejša in zahtevajo posebna orodja je najbolje če jih opravijo profesionalci in jih izvajajo pooblaščeni in za to osposobljeni serviserji Varnostni ukrepi Prepričajte se da je motor izklopljen preden se lotite kakršnihkoli popravil ali vzdrževalnih del S tem se boste izognili večim nevarnostim Nepraviln...

Page 44: ...n preverite raven goriva Če je raven nizka dolijte gorivo Bencin je izjemno vnetljiv in eksploziven Lahko se opečete ali resno poškodujete pri ravnanju z gorivom Zaustavite motor in ne približujte se z viri toplote iskrami ali ognjem Uporabljajte bencin samo na odprtem Takoj obrišite razlitja Dolivajte gorivo v dobro prezračevanih prostorih pred zagonom motorja Če je motor deloval počakajte naj se...

Page 45: ...dprtine za dolivanje olja Previdno in varno privijte pokrovček merilno palico nazaj Priporočila za motorno olje Motorno olje je pomemben dejavnik ki vpliva na zmogljivost in življensko dobo motorja Uporabljajte sintetično olje za štiritaktne motorje SAE 5W 30 je priporočeno olje za splošno uporabo Druge viskoznosti prikazane na risbi se lahko uporabljajo kadar je povprečna temperatura na vašem obm...

Page 46: ... vse dele v topilu z visokim plameniščem Vrnite filter tesnilo in posodo za usedline Privijte z 10 mm ključem Odprite regulator goriva in preverite ali kje pušča gorivo Praznjenje uplinjača Odvijte odtočni vijak uplinjača Pustite da ves bencin izteče v primerno posodo Privijte odtočni vijak 6 SKLADIŠČENJE Priprava skladiščenja Pravilna priprava skladišča je ključnega pomena za ohranitev brezhibnos...

Page 47: ...or goriva Praznjenje rezervoarja in uplinjača Postavite odobreno posodo za gorivo pod uplinjač in uporabite lijak da bi preprečili razlivanje goriva Odstranite odtočni vijak z uplinjača in povlecite cev do lijaka Po iztekanju vsega goriva v posodo vrnite cev in odtočni vijak Trdno ju privijte Skladiščni varnostni ukrepi Zamenjajte motorno olje Odstranite svečke Zlijte žlico 5 10 cc čistega motorne...

Page 48: ... leta Napolnite s svežim bencinom in dodajte stabilizator Izpraznite gorivo iz uplinjača Očistite posodo za usedline goriva 1 leto in več Izpraznite rezervoar Izpraznite gorivo iz uplinjača Očistite posodo za usedline goriva Odstranite svečko Nalijte žlico motornega olja v valj Počasi zavrtite motor s potegom zaganjalne vrvi za ravnomeren nanos olja po valju Vrnite svečko Zamenjajte motorno olje 7...

Page 49: ...rivo Odprite regulator goriva Motor ne deluje tekoče Slabo gorivo Umazana svečka Izpraznite rezervoar in napolnite s svežim gorivom Očistite svečko Moč pogona pada Sklopka ohlapna Ohlapen ali poškodovan prenosni jermen Namestite kabel sklopke Zamenjajte prenosni jermen Kontaktirajte pooblaščenega serviserja Motor se ne zažene ali se ugasne po kratkem času Čok v napačnem položaju Slaba svečka Ni go...

Page 50: ...il 6 6 Razdalja metanja 10 15m 10 15m Smer metanja 190 º 190 º Pogonski sistem Pogon na vsa kolesa samohodna Gosnični pogon samohodna Št prestav naprej 6 6 Št vzvratnih prestav 2 2 Zagon motorja Električni 230V in ročni Električni 230V in ročni Enoročno upravljanje DA DA Ogrevane ročke DA DA Diferencial pogona DA DA Prostornina rezervoarja za gorivo 6 5L 6 5L Teža kg 120 135 Velikost koles 15x6 50...

Page 51: ...o o o o o o o o ost st st st s s st st st st s s st s s s s s s s s st st st s s st st s s st st s st st st t t st st t t t t t t t t t t tja ja ja ja ja ja ja ja jja ja jja jja ja ja ja ja ja ja ja ja ja jja ja a a a a ja a ja a ja a a ja ja ja ja ja ja ja ja ja a a a a a a a ja a jjjja ja a a a a a a a a ja jjja a a a jjj n n n n n n n n n n n n n n n n n n n n n n n n n n n n n n n n n n n n n ...

Page 52: ...a a ja ja ja ja ja ja ja ja ja a a a a a a a ja a jjjja ja a a a a a a a a ja jjja a a a jjj n n n n n n n n n n n n n n n n n n n n n n n n n n n n n n n n n n n n n n n n n n n n n n n n n n n n n n n n n n n n n P P P P P P P P P P P P P P P P P P P P P P P P P P P P P P P P P P P P P P P Geschäftsführer Edvard F eral man chäfts s s s s s s s s s s s s s s sf f f f f füh d d d d d dv v v v v v ...

Page 53: ... a a a a ja a jjjja ja a a a a a a a a ja jjja a a a jjj n n n n n n n n n n n n n n n n n n n n n n n n n n n n n n n n n n n n n n n n n n n n n n n n n n n n n n n n n n n n n P P P P P P P P P P P P P P P P P P P P P P P P P P P P P P P P P P P P P P P Geschäftsführer Edvard F eral man chäfts s s s s s s s s s s s s s s sf f f f f füh d d d d d dv v v v v v va a a a a a ar r r r r r rd d d d d...

Page 54: ...hinen GmbH Österreich Laafeld 151 A 8490 BAD RADKERSBURG EU Rheinland Elektro Maschinen Group eje pri Komendi 110 SI 1218 Komenda EU General manager Bostjan P Bo Bo o Bo B Bo Bo Bo B B Bo B B Bo B Bo B B B B Bo Bo Bo B Bo B B B Bo Bo Bo Bo Bo Bo B B B B Bo Bo B Bo o B B Bo B B B B B B Bo B Bo o o Bo Bo Bo o o o o o o o o o Bo Bo Bo B B B Bo o o o o o o o ost st st st s s st st st st s s st s s s s...

Page 55: ...s s s s s s s s s s s sf f f f f füh d d d d d dv v v v v v va a a a a a ar r r r r r rd d d d d d F Q Vyhlásenie CE Týmto vyhlasujeme že alej ozna ený stroj zodpovedá na základe jeho koncepcie a konštrukcie a takisto vyhotovenia ktoré sme dodali príslušným základným požiadavkám na bezpe nost a ochranu zdravia uvedeným v smerniciach EÚ Pri zmene stroja ktorá nebola nami odsúhlasená stráca toto pre...

Page 56: ...___________________ ___________________________________________ ___________________________________________ ___________________________________________ ___________________________________________ ___________________________________________ ___________________________________________ ___________________________________________ ___________________________________________ ...

Page 57: ...WUDQVSRUWRP SR QDãL L URþLWYL 9 SULPHUX GD MH ELO L GHOHN SUHREUHPHQMHQ ýH MH Y L GHOHN SRVHJDOD QHSRREODãþHQD RVHED ýH VR RNYDUH PHKDQVNH R IL LþQH ýH MH NXSHF QHVWURNRYQR DOL PDORPDUQR UDYQDO L GHONRP ýH QL SRWUMHQ JDUDQFLMVNL OLVW LQ SULORåHQ RULJLQDOQL UDþXQ D GHOH NL VR SRGYUåHQL VWDOQL REUDEL 0679 1 67 1 9 85 Ĉ BBBBBBBBBBBBBBBBBBBBBBBBBBBBBBBBBBBBBB 7 3 85 Ĉ BBBBBBBBBBBBBBBBBBBBBBBBBBBBBBBBB...

Page 58: ...HORYH NRML VX SRGORåQL VWDOQRP KDEDQMX Q ȽȺɊȺɇɌȿɇ ɅɂɋɌ ɂɦɟ ɧɚ ɚɪɬɢɤɥɨɬ BBBBBBBBBBBBBBBBBBBBBBBBBBBBBBBBBBBB Ɇɨɞɟɥ BBBBBBBBBBBBBBBBBBBBBBBBBBBBBBBBBBBB ɋɟɪɢɫɤɢ ɛɪɨʁ ɧɚ ɚɩɚɪɚɬɨɬ BBBBBBBBBBBBBBBBBBBBBBBBBBBBBBBBBBBB Ⱦɚɬɭɦ ɧɚ ɩɪɨɞɚɠɛɚ BBBBBBBBBBBBBBBBBBBBBBBBBBBBBBBBBBBB ɉɟɱɚɬ ɢ ɩɨɬɩɢɫ ɧɚ ɩɪɨɞɚɜɚɱɨɬ BBBBBBBBBBBBBBBBBBBBBBBBBBBBBBBBBBBBBBBBBB Ƚɚɪɚɧɬɟɧ ɩɟɪɢɨɞ ɦɟɫɟɰɢ Ʉɨɩɢʁɚ ɧɚ ɝɚɪɚɧɬɧɢɨɬ ɥɢɫɬ ɧɟ ɫɟ ɢɡɞɚɜ...

Page 59: ...ɂɈɇɇȺ ɄȺɊɌȺ ȺɊɌɂɄɍɅ BBBBBBBBBBBBBBBBBBBBBBBBBBBBBBBBBB ɆɈȾȿɅ BBBBBBBBBBBBBBBBBBBBBBBBBBBBBBBBBB ȾȺɌȺ ɇȺ ɉɊɈȾȺɀȻȺ BBBBBBBBBBBBBBBBBBBBBBBBBBBBBBBBBB ɉɨɞɩɢɫ ɢ ɩɟɱɚɬ ɧɚ ɩɪɨɞɚɜɚɱɚ BBBBBBBBBBBBBBBBBBBBBBBBBBBBBBBBBBBBBBBBB ɋɟɪɢɟɧ ɧɨɦɟɪ ɧɚ ɦɚɲɢɧɚɬɚ BBBBBBBBBBBBBBBBBBBBBBBBBBBBBBBBBBBBBBBBB Ƚɚɪɚɧɰɢɨɧɟɧ ɫɪɨɤ ɦɟɫɟɰɚ Ⱦɭɛɥɢɤɚɬ ɧɚ ɝɚɪɚɧɰɢɨɧɧɚɬɚ ɤɚɪɬɚ ɧɟ ɫɟ ɢɡɞɚɜɚ Ɋɚɡɹɫɧɟɧɢɹ Ƚɚɪɚɧɰɢɹɬɚ ɫɟ ɩɪɢɡɧɚɜɚ ɡɚ ɞɟɮɟɤɬɢ ɧ...

Page 60: ...adu s platnými právními p edpisy opraveno bude prodejcem za ízení bezplatn nahrazeno jiným nebo bude zákazníkovi vrácena kupní cena V p ípad záru ní opravy delší než jeden kalendá ní den dochází k prodloužení záru ní doby o trvání opravy Záru ní lh ta za íná dnem prodeje za ízení koncovému zákazníkovi a musí být stvrzena originálním záru ním listem a dokladem o koupi Ditributor nenese žádnou za zo...

Page 61: ...a 1000 Skopje Tel 389 2 3173 058 e mail service makweld com mk url www makweld com mk Dilex d o o Žeje pri Komendi 110 1218 Komenda Tel 0305 668113 e mail servis dilex si url www dilex si SLOVENSKO Rheinland Elektro Maschinen Bulgaria Ltd Bul Car Boris III 136 B Sofia Tel 359 0 2 955 92 33 url www rem maschinen com Stamet Obchodná 18 902 03 Pezinok Tel 421 33 640 71 21 url www stamet sk ÖSTERREICH...

Page 62: ... ESKÁ REPUBLIKA INTERNOVA CZ GmbH spol s r o 26 dubna 245 68801 Uherský Brod Tel 420 572 633 464 e mail servis elektromaschinen cz url www rem maschinen cz CZ Authorised Service Centres ...

Page 63: ......

Page 64: ...KWWS ZZZ UHP PDVFKLQHQ FRP 9HU y 14 ing Yip Commercial Centre µ y 4 15 3 7 1 55 3 4 15 3 5 8 ...

Reviews: