background image

8

7a

7b

5

6

4

1

2

3

12

13

11

8

9

10

English

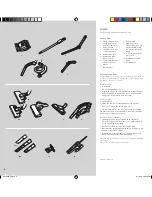
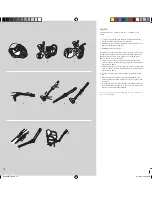
GETTING  THE  BEST  RESULTS

Hard floors:

 Use the carpet/hard floor nozzle with the left pedal 

in position (1).

Carpets:

 Use the carpet/hard floor nozzle with the left pedal in 

position (2). 
Reduce suction power for small carpets.
If you have a carpet/hard floor nozzle with two pedals – press 
the pedal on the right (3) to vacuum up animal hair, etc. more 
effectively.

Upholstered furniture:

 Use the combination nozzle as shown in 

(4).

Curtains, lightweight fabrics, etc.:

 Use the combination nozzle as 

shown in (4). Reduce suction power if necessary.

Frames, bookshelves, etc.:

 Use the combination nozzle as 

shown in (5) or feather duster (6 – certain models only).

Crevices, corners, etc.:

 Use the crevice nozzle (7b).

On certain models, the crevice nozzle can be extended (7a). 
Extend the crevice nozzle using a finger to push out the extend-
ing section. When the extending section is in its outermost posi-
tion, a retaining button locks it in position. Press this retaining 
button and push the crevice nozzle together before placing it 
back in the accessory holder.

Using the power nozzle (certain models only)
8

  Attach the nozzle to the tube.

9

  Connect the power nozzle to the socket on the vacuum 

cleaner.

10

 Use the clips to secure the cable along the tubes and hose.

11

 The power nozzle starts operating when the vacuum cleaner 

is switched on.

Using the turbo nozzle (certain models only)
12

 Attach the nozzle to the tube.

13

 Adjust the suction power by opening or closing the air vent.

Note: Do not use the power or turbo nozzle on skin rugs, rugs with 

long fringes or a pile depth exceeding 15 mm. To avoid damaging the 

carpet, do not keep the nozzle stationary whilst the brush is rotating. 

Do not pass the nozzle across electric cables, and be sure to switch off 

the vacuum cleaner immediately after use.

7a

7b

6

5

4

2

1

3

2

1

11

0

1

9

8

10

8

7a

7b

5

6

4

1

2

3

12

13

11

8

9

10

English

GETTING  THE  BEST  RESULTS

Hard floors:

 Use the carpet/hard floor nozzle with the left pedal 

in position (1).

Carpets:

 Use the carpet/hard floor nozzle with the left pedal in 

position (2). 
Reduce suction power for small carpets.
If you have a carpet/hard floor nozzle with two pedals – press 
the pedal on the right (3) to vacuum up animal hair, etc. more 
effectively.

Upholstered furniture:

 Use the combination nozzle as shown in 

(4).

Curtains, lightweight fabrics, etc.:

 Use the combination nozzle as 

shown in (4). Reduce suction power if necessary.

Frames, bookshelves, etc.:

 Use the combination nozzle as 

shown in (5) or feather duster (6 – certain models only).

Crevices, corners, etc.:

 Use the crevice nozzle (7b).

On certain models, the crevice nozzle can be extended (7a). 
Extend the crevice nozzle using a finger to push out the extend-
ing section. When the extending section is in its outermost posi-
tion, a retaining button locks it in position. Press this retaining 
button and push the crevice nozzle together before placing it 
back in the accessory holder.

Using the power nozzle (certain models only)
8

  Attach the nozzle to the tube.

9

  Connect the power nozzle to the socket on the vacuum 

cleaner.

10

 Use the clips to secure the cable along the tubes and hose.

11

 The power nozzle starts operating when the vacuum cleaner 

is switched on.

Using the turbo nozzle (certain models only)
12

 Attach the nozzle to the tube.

13

 Adjust the suction power by opening or closing the air vent.

Note: Do not use the power or turbo nozzle on skin rugs, rugs with 

long fringes or a pile depth exceeding 15 mm. To avoid damaging the 

carpet, do not keep the nozzle stationary whilst the brush is rotating. 

Do not pass the nozzle across electric cables, and be sure to switch off 

the vacuum cleaner immediately after use.

English

8228395-04.indd   10

11/15/06   2:43:45 PM

Summary of Contents for OXYGEN classic

Page 1: ...8228395 04 indd 1 11 15 06 2 43 36 PM ...

Page 2: ...gueira e do bocal substituição das pilhas 31 Resolução de problemas e informação ao consumidor 33 English Thank you for choosing an Electrolux Oxygen vacuum cleaner These Operating Instructions cover all Oxygen models This means that with your specific model some accessories may not be included Accessories and safety precautions 6 Before starting 8 Getting the best results 10 Oxygen saves your bac...

Page 3: ... en Electrolux Oxygen støvsuger Denne brugervejledning gælder for alle Oxygen modeller Det betyder at noget tilbehør eventuelt ikke er inkluderet i den model du har valgt Tilbehør og sikkerhedsforanstaltninger 21 Inden start 23 Hvordan man opnår de bedste resultater 25 Skån ryggen med Oxygen Easy Reach system 27 Udskiftning af støvsugerposen s bag 29 Udskiftning af motorfilter og udsugningsfilter ...

Page 4: ...соари могат да отсъстват Аксесоари и инструкции за безопасност 63 Преди да започнете 65 Как да постигнем максимален резултат 67 Oxygen запазва вашият гръб Easy Reach system 69 Смяна на торбичката за прах s bag 71 Смяна на филтъра на двигателя и филтъра на изпускателна тръба 71 Почистване на маркуча и накрайника смяна на батерията 73 Потребителска информация и отстраняване на проблеми 75 Česky Děku...

Page 5: ... değiștirilmesi 85 Hortum ve ucun temizlenmesi pil değiștirme 87 Sorun giderme ve tüketici bilgileri 89 Magyar Köszönjük hogy az Electrolux Oxygen porszívót választotta Ez az üzemeltetési tájékoztató az összes Oxygen típushoz készült Ez azt jelenti hogy egy konkrét típusnál néhány tartozék hiányozhat Tartozékok és biztonsági előírások 77 Üzembe helyezés előtt 79 A legjobb eredmények elérése 81 Az ...

Page 6: ...rly check that the cable is not damaged Never use the vacuum cleaner if the cable is damaged All service and repairs must be carried out by an authorised Electrolux service centre Always keep the vacuum cleaner in a dry place 1 s bag s bag Classic s bag Clinic s bag Anti odour dust bags 2 Telescopic tube 3 Easy Reach system telescopic tube 4 a b Hose 5 Hose handle with remote control 6 a b Carpet ...

Page 7: ...e fixation d accessoires Contient un combiné petit suceur brosse meubles et un suceur long télescopique pour fentes 10 Suceur long pour fentes larges 11 Suceur long pour fentes a b b télescopique 12 Combiné petit suceur brosse meubles 13 Plumeau Français ACCESSOIRES ET PRÉCAUTIONS DE SÉCURITÉ Accessoires Suivant les modèles Advertencias de seguridad Sólo personas adultas deberían utilizar Oxygen y...

Page 8: ...odel are fitted with an automatic cable winder Autoreverse Pull out the cable and plug it in Move the control forwards to roll the cable in and out as required Move it backwards to lock the cable in position once it has been rolled out 7 Press the On Off button with the foot to start the vacuum cleaner 8 Adjust suction power using the suction control on the vacu um cleaner or the suction control o...

Page 9: ...ueur voulue déplacer la commande vers l arrière pour verrouiller sa position 7 Appuyer sur la pédale marche arrêt avec le pied pour mettre en marche l aspirateur 8 Régler la puissance d aspiration en actionnant le variateur de puissance de l aspirateur ou à l aide du réglage de débit d air sur la poignée du flexible 9 Avec un aspirateur équipé d une télécommande suivant les modèles appuyer sur les...

Page 10: ...sure to switch off the vacuum cleaner immediately after use 7a 7b 6 5 4 2 1 3 2 1 11 0 1 9 8 10 8 7a 7b 5 6 4 1 2 3 12 13 11 8 9 10 English GETTING THE BEST RESULTS Hard floors Use the carpet hard floor nozzle with the left pedal in position 1 Carpets Use the carpet hard floor nozzle with the left pedal in position 2 Reduce suction power for small carpets If you have a carpet hard floor nozzle wit...

Page 11: ... y asegúrese de que apaga la aspiradora inmediatamente después del uso 9 Deutsch BESTMÖGLICHE RESULTATE ERZIELEN Hartböden Die Düse für Teppiche und harte Böden mit dem linken Pedal in Stellung 1 verwenden Teppiche Die Düse für Teppiche und harte Böden mit dem lin ken Pedal in Stellung 2 verwenden Die Saugleistung bei kleinen Teppichen verringern Drücken Sie bei einer Düse für Teppiche und harte B...

Page 12: ... the catch clicks to engage Remove it by pushing in the catch and pull ing the pieces apart 5 Fit the hard floor nozzle to the telescopic tube until the catch clicks to engage Remove it by pushing in the catch and pull ing the pieces apart 6 Use the telescopic tube in this position for general vacuum ing 7 Extend or shorten the telescopic tube by pulling the lock sleeve towards the nozzle and pull...

Page 13: ...ée du flexible jusqu à ce que le cliquet s enclenche Pour retirer le tube télescopique appuyer sur le cliquet et séparer les éléments 5 Introduire le suceur pour sols durs dans le tube télescopique jusqu à ce que le cliquet s enclenche Pour retirer le suceur pour sols durs appuyer sur le cliquet et séparer les éléments 6 Utiliser le tube télescopique dans cette position pour les aspirations classi...

Page 14: ... bag Clinic or s bag Anti odour Replacing the motor filter Ref No EF54 Replace the filter for every 5th replacement of the s bag 5 Remove the old filter 6 Insert a new filter in the groove 6a To make replacement easier open the container by pressing on it as shown in 6b 7 Replace the filter and close the lid Cleaning the washable HEPA filter Ref No EFH13W When the indicator lamp comes on or for ev...

Page 15: ...vement les sacs à poussière originaux Electrolux s bag Classic s bag Clinic ou s bag Anti odour Remplacer le filtre du moteur Réf EF54 Remplacer le filtre tous les cinq remplacements du sac s bag 5 Retirer l ancien filtre 6 Insérer un nouveau filtre dans la rainure 6a Pour faciliter la mise en place ouvrir le porte filtre en appuyant dessus comme le montre la figure 6b 7 Remettre en place le filtr...

Page 16: ...er objects that may be entangled Use the crevice nozzle to clean the wheel axles Replace the wheels by pressing them into position 7 Larger objects can be removed by taking off the connecting tube press in the small catches and remove the tube 8 Remove the object and replace the connecting tube Cleaning the power nozzle certain models only 9 Disconnect from the mains and remove entangled threads e...

Page 17: ...s éléments Utiliser le suceur long pour fentes pour nettoyer les axes de roues Remettre les roues en place en les clipant sur leur axe 7 Retirer le tube de raccordement pour ôter les objets de plus grande taille appuyer sur les petits cliquets et retirer le tube 8 Retirer l élément puis remettre en place le tube de raccorde ment Nettoyer la brosse électrique suivant les modèles 9 Débrancher l aspi...

Page 18: ... caused by the penetration of water is not covered by the warranty Consumer information Electrolux decline all responsibility for all damages arising from any improper use of the appliance or in cases of tampering with the appliance This product is designed with the environment in mind All plas tic parts are marked for recycling purposes For details see our web site www electrolux com If you have ...

Page 19: ...est conçu dans le plein respect de l environnement Toutes les pièces en plastique sont marquées pour faciliter leur recyclage Pour plus de détails visiter notre site Internet www electrolux fr Si vous avez des commentaires ou des remarques à propos de votre aspirateur si vous rencontrez des difficultés pour l achat des sacs à poussière ou des filtres ou si vous souhaitez con naître l adresse du Ce...

Page 20: ... tätä tuotetta ei saa käsitellä talousjätteenä Tuote on sen sijaan luovutettava sopivaan sähkö ja elektro niikkalaitteiden kierrätyksestä huolehtivaan keräyspisteeseen Tämän tuotteen asianmukaisen hävittämisen varmistamisella autetaan estämään sen mahdolliset ympäristöön ja terveyteen kohdistuvat haittavaikutukset joita voi aiheutua muussa tapauksessa tämän tuotteen epäasianmukaisesta jätekäsitte ...

Page 21: ...or pentru reciclarea echipamentelor electrice şi electronice Asigurându vă că aţi eliminat în mod corect produsul ajutaţi la evitarea potenţialelor consecinţe negative pentru mediul înconjurător şi pentru sănătatea persoanelor consecinţe care ar putea deri va din aruncarea necorespunzătoare a acestui produs Pentru mai multe informaţii detaliate despre reciclarea acestui produs vă rugăm să contacta...

Page 22: ...tivt kul Syntetiskt materiale som filtrerer dobbelt så godt som en normal papirpose og holder længere s bag Long Performance Den nye generationen af fuldsyn tetiske poser med en uovertruffen funktionalitet Sugeeffekt og luftgennemstrømning bibeholdes under hele posens levetid Høj filtreringsevne takket være det specielle syntetiske materiale som tilbageholder op til 99 af støvpartiklerne Holdbar o...

Page 23: ...innerhalb von 2 Werktagen ist die bestellte Ware bei Ihnen AEG Electrolux Serviceline 01805 30 60 80 aus dem Festnetz der Deutschen Telekom Euro 0 12 Min Web shop www electrolux de Fax 0911 323 49 1930 E Mail service kleingeraete aeg hausgeraete de UK For those living in United Kingdom Electrolux makes it easy to buy exactly what you want In order for you to get the most out of your vacuumcleaner ...

Page 24: ...8228395 04 Electrolux Thinking of you Share more of our thinking at www electrolux com 8228395 04 indd 108 11 15 06 2 46 54 PM ...

Reviews: