26
•
After a few minutes, 3 beeps indicate the end of the
cleaning cycle and “END” flashes on the display:
•
Switch off the dishwasher by pressing the button
“A” (Table 2).
•
Turn off the electrical switch ahead of the equip-
ment.
•
Turn off the water supply tap.
•
Refit the filter and the overflow.
•
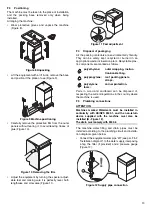
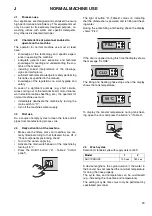
Unscrew the ring nuts “H” and remove the header units “C”.
Figure 25 Wash jet removal
•
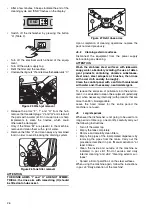
Release the arms “F”, “I” and “O” from the hub,
remove the threaded plugs “L” and “Q” and clean all
the parts with a water jet. Do not use tools or sharp
implements to clean the nozzles, which could
otherwise be damaged.
•
Only if the filters “M” are present in the machine,
remove and clean them with a jet of water.
•
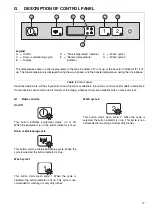
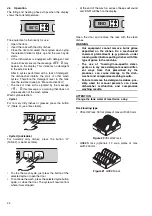
Remove the filter “Z” and clean away any remained
food in order to avoid blocking the draining system.
Figure 26 Tank filter removal
ATTENTION
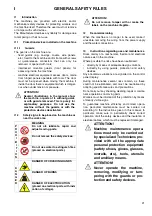
THE RINSE ARMS “I” and “O” ARE NOT SYMME-
TRICAL; the rinse arm with raised ring (O) should
be fitted onto hub socket.
Figure 27 Refit rinse arms
Upon completion of cleaning operations, replace the
parts removed previously.
J8.2
Cleaning exterior surfaces
Disconnect the equipment from the power supply
before doing any cleaning.
ATTENTION
Wash the stainless steel surfaces with lukewarm
soapy water, absolutely avoiding the use of deter-
gent products containing abrasive substances,
steel wool, steel scrapers or brushes, then rinse
with a wet cloth and dry thoroughly.
Clean the control panel with a soft cloth moistened
with water and, if necessary, neutral detergent.
To reduce the emission of pollutants into the environ-
ment, it is advisable to clean the equipment (externally
and, when necessary, internally) with products that are
more than 90% biodegradable.
Leave the hood raised for the entire period the
machine is not used.
J9
Long idle periods
Whenever the dishwasher is not going to be used for a
long period of time (e.g. one month), carefully carry out
the following instructions.
•
Turn off the water tap.
•
Empty the tank completely.
•
Remove and carefully clean filters.
•
Empty the pipes of the incorporated dispensers by
removing the pipes from the tanks. Carry out the
procedure described in par. “Manual activation” at
least 3 times.
•
Clean the inside and outside of the machine as
indicated in par. J8.1 “End of service and daily
internal cleaning” and J8.2 “Cleaning exterior sur-
faces”.
•
Spread a film of paraffin oil on the steel surfaces.
When using the machine again, follow the instructions
in par. J4 “Daily activation of the machine”.
END
M
M
H
C
O
I
Q
L
F
Z
1
2
O
I


