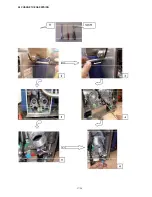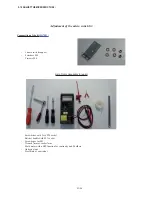
15/38
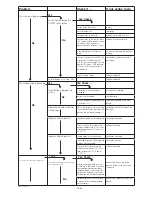
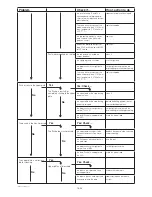
Problem
Check if …
If not, action to do
the top heating element is absor-
bing current with the Multimeter
(approx. 4amps)
replace the upper plate kit
cabling between terminal block
and the board (connector 5) is
connected
connect the wires
the board is not giving power to the
heating elements through the relay
(voltmeter in connector 5 of the
board, 208 V - 230V for CE version)
replace the board
The bottom plate temperature is not
reaching the temperature setting
cabling of the bottom plate to the
board, connector 4 is connected on
position 4 on the power board.
connect the wires
the probe connector INF is connected
in position INF on the board ( lum-
berg black connector.
Connect the connector INF on the
board
the bottom heating element is ab-
sorbing current with the Multimeter
(approx. 4amps)
replace the heating element of the
bottom plate
the board is not giving power to
the heating elements through the
relay (voltmeter in connector 4 of
the board)
replace the board
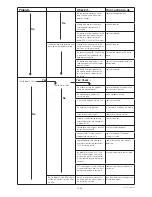
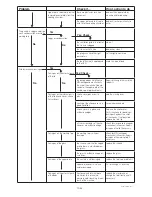
The lid doesn’t latch
The lid never latch
the handle reaches the right posi-
tion to the electromagnet
remove all obstacles and/or check
for mechanical frictions
the electromagnet and/or the
washer are dirty
make a proper cleaning
if the handle magnets are in place
replace the handle
the handle pins are blocked
try to unblock or replace the handle
screw of the washer is tight
readjust the latching system
cables of the electromagnet and
magnetic detectors are connected
(Connector 10)
connect the wires
electromagnet is working by a continuity
test from the connector 10
change the electromagnet
from connector 10 there is nominal
voltage when closing the lid
replace the board if the power
supply is suitable
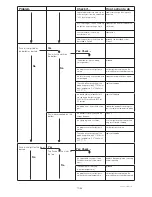
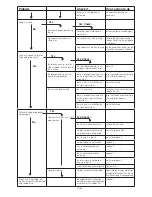
magnetic detectors are working by
a continuity test from the connectors
14/15 (by closing the lid)
readjust or change the magnetic
detectors
the bimetallic sensors (CLK1 and
CLK2) are working by a continuity
test from the pins of the connector
3 (from the two left and the two right
contacts)
change the bimetallic sensor failed
KS1 is working by visually checking
if the indicator move from the initial
position and the power coming in
reconnect the wires or replace the
contactor
the lid doesn’t latch after some
cycles but restart to latch after
a while
there is enough free clearance for
the airfl ow from the exhaust pipes in
the rear of the machine
give the clearance according to the
installation diagram
HSPP tech GB 03 09
No
No
No
Yes
Yes: Check ...
No
Summary of Contents for HSG Panini
Page 1: ...Service Manual GB 07 2009 HSG Panini Service manual ...
Page 2: ...2 2 50mm 50mm 7 5 190mm ...
Page 3: ......
Page 4: ......
Page 11: ...7 38 Explanation on software settings EU Version U207 ...
Page 12: ...8 38 Explanation on software settings US Version U202 U208 ...
Page 28: ...24 38 HSPP tech GB 03 09 ADJUST THE SPRINGS ...
Page 29: ...25 38 HSPP tech GB 03 09 ...
Page 30: ...26 38 ...
Page 31: ...27 38 5 9 CHANGE THE GAS SPRING ...
Page 32: ...28 38 ...
Page 33: ...29 38 ...
Page 41: ...37 38 ...
Page 43: ......
Page 49: ...Vue éclatée Couvercle Cover exploded view Explosionszeichnung Haube F HSPP FR 03 09 ...
Page 51: ...Esploso coperchio Despiece tapa Sprängskiss lock H HSPP FR 03 09 ...
Page 53: ...Vue éclatée Articulation Hinge exploded view Explosionszeichnung Gelenk J HSPP FR 06 09 ...
Page 55: ...Esploso articolazione Despiece articulación Sprängskiss Rotation L HSPP FR 06 09 ...
Page 59: ...Vue éclatée Electrique Electric exploded view Explosionszeichnung Elektrik P HSPP FR 03 09 ...
Page 61: ...Esploso elettronica Despiece electricidad Sprängskiss elektronik R HSPP FR 03 09 ...
Page 64: ......


