background image

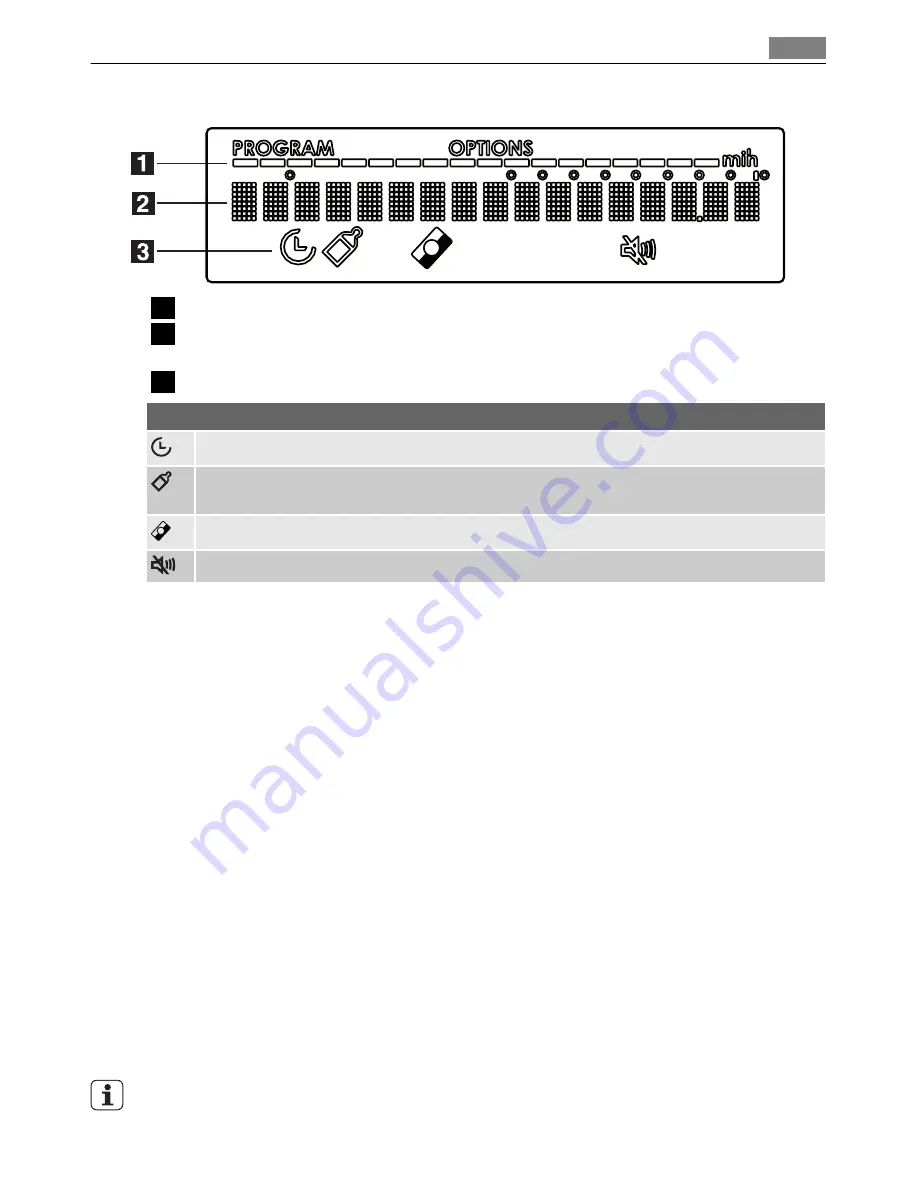
Display

1

The small bars show the progress of the washing programme.

2

Messages: washing programmes, optional functions and related programme phases

show in this part of the display.

3

Symbols

Symbols

DELAY START - comes on when the delay start is set and while the countdown operates.

EXTRA HYGIENE - comes on when the related function and/or the INTENSIV PRO washing

programme are set.
MULTITAB - comes on when the function is set.

SOUND VOLUME - comes on when the audible signals are off (level 0).

Use of the appliance

Switch on for the first time - set the display language

1. Switch on the appliance.

2. When the display shows LANGUAGE ENGLISH and the word ENGLISH flashes, you can

confirm or change the language.
– Press the OK/Start button to confirm.

– Press one of the scroll buttons to select a different language and press the OK/Start

button to confirm.

3. Press the cancel button to exit from the menu.
Refer to the instructions for each step of procedure:

1. Make a check if the adjustment of the water softener agrees with the water hardness

in your area. If necessary, adjust the water softener.

2. Fill the salt container with dishwasher salt.

3. Fill the rinse aid dispenser with rinse aid.

4. Load cutlery and dishes into the appliance.

5. Set the correct washing programme for the type of load and soil.

6. Fill the detergent dispenser with the correct quantity of detergent.

7. Start the washing programme.
If you use the combi detergent tablets ('3 in 1', '4 in 1', '5 in 1'), refer to 'Multitab function'.

Use of the appliance

9

Summary of Contents for Favorit 99000

Page 1: ...Favorit 99000 User manual Dishwasher ...

Page 2: ...t time set the display language 9 Setting the water softener 10 Manual adjustment 10 Electronic adjustment 10 Use of dishwasher salt 11 Use of detergent and rinse aid 12 Use of detergent 12 Use of rinse aid 12 Adjust the rinse aid dosage 12 Multitab function 13 Loading cutlery and dishes 13 Hints and tips 13 Washing programmes 14 Select and start a washing programme 15 Select and start a washing p...

Page 3: ... dishwasher detergent to prevent burns to eyes mouth and throat Do not drink the water from the appliance Detergent residue can stay in your appliance Always close the door after you load or unload the appliance to prevent injury and to prevent someone falling on an open door Do not sit or stand on the open door Use The appliance is only for domestic use Do not use the appliance for commercial and...

Page 4: ...e maintenance of the appliance This to prevent the risks of structural damage or physical injury Make sure that the mains plug is disconnected from the mains socket during installation Do not drill into the sides of the appliance to prevent damage to hydraulic components and electrical components Frost precautions Do not install the appliance where the temperature is below 0 C The manufacturer is ...

Page 5: ...e mains cable to disconnect the appliance Always pull the mains plug The appliance is supplied with a 13 amp mains plug attached If it is necessary to change the fuse in the mains plug use a 13 amp ASTA approved BS 1362 fuse Internal light This appliance has an internal light that comes on when you open the door and goes off when the door is closed WARNING Visible led radiation do not look directl...

Page 6: ...s contact immediately your regional poisons centre and a doctor If the detergent gets into the mouth contact immediately your regional poisons centre and a doctor If the detergent gets into the eyes contact immediately a doctor and wet the eyes with water Keep dishwasher detergents in a safe area and out of children touch Do not keep the appliance door open when there is detergent in the detergent...

Page 7: ...mme in the washing programme menu select options in the option menu Option button Use this button to select options To select an option 1 Switch on the appliance 2 Press the option button the display shows the menu of available options 3 Press one of the scroll buttons to go through the menu and select the necessary option 4 Press the OK Start button to confirm or to go into the submenu 5 Press on...

Page 8: ...ion is available with all washing pro grammes but does not have an effect on some pro grammes Refer to Washing programmes MULTITAB ON OFF The multitab function is for combi detergent tablets Refer to Multitab function SETTINGS LANGUAGE ENGLISH You can set the language of the messages in the dis play Different languages are available WATER HARDNESS You can adjust the level of the water softener Ref...

Page 9: ...LISH flashes you can confirm or change the language Press the OK Start button to confirm Press one of the scroll buttons to select a different language and press the OK Start button to confirm 3 Press the cancel button to exit from the menu Refer to the instructions for each step of procedure 1 Make a check if the adjustment of the water softener agrees with the water hardness in your area If nece...

Page 10: ...ess Water hardness adjustment dH TH mmol l Clarke manually electronically 51 70 91 125 9 1 12 5 64 88 2 1 10 43 50 76 90 7 6 9 0 53 63 2 1 9 37 42 65 75 6 5 7 5 46 52 21 8 29 36 51 64 5 1 6 4 36 45 21 7 23 28 40 50 4 0 5 0 28 35 21 6 19 22 33 39 3 3 3 9 23 27 21 51 15 18 26 32 2 6 3 2 18 22 1 4 11 14 19 25 1 9 2 5 13 17 1 3 4 10 7 18 0 7 1 8 5 12 1 2 4 7 0 7 5 12 12 1 Factory position 2 No use of ...

Page 11: ...lt container 2 Fill the salt container with 1 litre of water only with the first operation 3 Use the funnel to fill the salt container with salt 4 Remove the salt around the opening of the salt container 5 Turn the cap clockwise to close the salt container It is correct that water comes out from the salt container when you fill it with salt When the salt container is empty the display shows a mess...

Page 12: ...brands of detergent dissolve in different times Some detergent tablets do not have the best cleaning results during short washing programmes Use long washing pro grammes when you use the detergent tablets to fully remove the detergent Use of rinse aid Rinse aid makes it possible to dry the dishes without streaks and stains The rinse aid dispenser automatically adds rinse aid during the last rinsin...

Page 13: ...start of a washing programme You cannot activate the multitab function when the programme operates To activate the multitab function Go to the option menu and activate the multitab function Refer to Control panel To deactivate the multitab function and use separately detergent salt and rinse aid 1 Go to the option menu and deactivate the multitab function Refer to Control panel 2 Fill the salt con...

Page 14: ...e Dry Yes with effect 30 MINUTES 2 Normal or light soil Crockery and cutlery Main wash 60 C Rinse Yes with effect INTENSIV PRO Heavy soil Crockery cut lery pots and pans Prewash Main wash 70 C 1 middle rinse Last rinse Dry This washing pro gramme includes the EXTRA HY GIENE function It is not necessary to set the function ENERGY 3 Normal soil Crockery and cutlery Prewash Main wash 50 C 1 middle ri...

Page 15: ...for test institutes Refer to supplied leaflet for test data 4 This washing programme operates with a low level of noise The pump works at a very low speed to decrease the level of noise of 25 compared to the declaration programme Because of the low level of noise the programme has a very long time duration Set this washing programme in times when the power rate is more economical Consumption value...

Page 16: ...ng programme continues from the point of interruption How to cancel a washing programme or a delay start If a washing programme or a delay start has not started you can change the selection When a washing programme or a delay start operate it is not possible to change the selection It is necessary to cancel the washing programme or the delay start When you cancel the delay start this automatically...

Page 17: ...ore quickly than the dishes Care and cleaning To remove and clean the filters Dirty filters decrease the washing results Although the maintenance is very low with these filters we recommend that you make a check at intervals and if necessary clean them 1 To remove filter A turn it counterclock wise and remove it out from filter B 2 Filter A has 2 parts To disassemble the filter pull them apart 3 F...

Page 18: ...ads or solvents e g ace tone What to do if The appliance does not start or stops during operation First try to find a solution to the problem refer to the chart If not contact the service centre Malfunction Fault code Possible cause Possible solution The appliance does not fill with water An audible signal operates The display shows the message OPEN THE TAP The water tap is closed Open the water t...

Page 19: ...se the water tap and contact the serv ice centre The programme does not start The appliance door is open The display shows the message PLEASE CLOSE DOOR Close the door correct ly The mains plug is not connected in Put in the mains plug Blow out fuse in the household fuse box Replace the fuse The delay start is set If you want to cancel the delay start refer to Select and start a washing programme ...

Page 20: ...e salt container with dish washer salt Incorrect water softener ad justment Adjust the water softener The salt container cap is not closed correctly Make sure that the salt con tainer cap is closed correctly There are streaks milky stains or a bluish layer on glasses and dishes Rinse aid dosage is too high Decrease the rinse aid dosage Dry water drop stains on glasses and dishes Rinse aid dosage i...

Page 21: ...sehold waste Instead it should be taken to the appropriate collection point for the recycling of electrical and electronic equipment By ensuring this product is disposed of correctly you will help prevent potential negative consequences for the environment and human health which could otherwise be caused by inappropriate waste handling of this product For more detailed information about recycling ...

Page 22: ...er the kitchen worktop Do not squash or bend the water hoses during the installation To adjust the level of the appliance A correct level of the appliance lets the door to close and seal correctly With an incorrect appliance level the door does catches on the sides of the cabinet Loosen or tighten the adjustable feet to make the appliance level Water drain connection Connect the water drain hose t...

Page 23: ...t be smaller than the diameter of the hose If you connect the water drain hose to a trap spi got under the sink remove the plastic membrane A If you do not remove the membrane remain ing food can cause a blockage in the drain hose spigot A safety device impedes the dirty water to go back into the appliance If the spigot of the sink has a non return valve this can cause the appliance to drain incor...

Page 24: ...www electrolux com To buy accessories consumables and spare parts at our online shop please visit www aeg electrolux co uk 117946640 B 072010 ...

Reviews: