background image

Installation Requirements

To ensure correct operation this appliance
must not be located where the temperatures
will fall below 10°C (50°F) or rise above 32°C
(90°F).

Avoid the following locations: unheated
kitchen, outhouse, conservatory, garage.

For correct operation this appliance must be
installed:  

Ÿ

In a dry atmosphere.

Ÿ

Out of direct sunlight. 

Ÿ

Away from extreme temperature (not next to a
cooker or other sources of heat).

Ÿ

Your appliance will be heavy when loaded
with food and must therefore be stood on a
strong firm floor.  

Ventilation Requirements

Ÿ

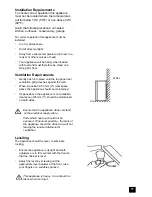
Gently push into place until the top panel rear
ventilation grille touches against the wall.  

Ÿ

When in position a 50 mm (2") clear space
above the appliance should be maintained.  

Ÿ

If space above the appliance is not available,
clearance of 25mm (1") should be maintained
on both sides.

Ensure that the appliance does not stand

on the electrical supply cable.

Parts which heat up should not be 
exposed.  Whenever possible , the back of
the appliance should be close to a wall but
leaving the required distance for 
ventilation.

Levelling

The appliance should be level, to eliminate
rocking:  

Ÿ

Ensure the appliance is upright and both
adjusters are in firm contact with the floor so
that the cabinet is level.

Ÿ

Adjust the level by screwing out the
appropriate level adjuster at the front, (use
your fingers or a suitable spanner).  

This appliance is heavy.  Care should be
taken when moving it.

17

WALL

Summary of Contents for EU 6047T

Page 1: ...I N F O i INSTALLATION AND INSTRUCTION MANUAL FREEZER EU 6047T EU 6047T GR EU 6047T BU EU 6047T YE ...

Page 2: ...re guidance in the use of the appliance or require further information please contact our Customer Care Department Customer Care Department ELECTROLUX PO Box 47 Newbury Berkshire RG14 5XL Tel 01635 522799 2 Guide to use the instruction book The following Symbols will be found in the text to guide you through the instructions Safety Instructions Hints and Tips Step by step instructions Environmenta...

Page 3: ...he controls or play with the product During Use This appliance is designed for domestic use only specifically for the storage of edible foodstuffs only Frozen food should not be refrozen once it has thawed out Do not place carbonated or fizzy drinks in the freezer Ice lollies can cause frost freezer burns if consumed straight from the freezer Do not remove items from the freezer if your hands are ...

Page 4: ... Saving Advice 9 In the Event of a Power Failure 9 Maintenance and Cleaning 10 Internal Cleaning 10 External Cleaning 10 To Defrost the Freezer 10 When the Appliance is Not in Use 10 What Happens if Something Goes Wrong 11 Service and Spare Parts 12 Service Centres 13 For the Installer Installation Instructions 15 Technical Information 15 Electrical Connections 16 Electrical Requirements 16 Instal...

Page 5: ...ontrol Panel 5 Description of the Appliance Control Housing Freezing Storage Shelf Storage Baskets Defrost Spout Level Adjusters Heat Resistant Top Freezer Calendar INDICATOR LIGHTS THERMOSTAT FASTFREEZE ...

Page 6: ...e and switch on at the mains supply 3 Turn the thermostat control to the required setting A midway setting is usually suitable for normal operation see thermostat control 4 Leave the appliance for approximately 4 hours for the correct temperature to be reached before placing food inside Thermostat Control The thermostat control situated in the control panel regulates the temperature of the freezer...

Page 7: ...y out to indicate that everything is in order It will come on if the freezer temperature rises unduly for instance after opening the freezer door or placing food inside the cabinet but the light should go out again when the temperature returns to normal Amber Indicator Light Fast Freeze With the fast freeze on the Amber Indicator light will come on and stay on as a reminder FAST FREEZE FACILITY Th...

Page 8: ...e items can be stored by removing the upper basket Frozen food should not be refrozen once it has thawed out Do not remove items from the freezer if your hands are damp wet as this could cause skin abrasions or frost freezer burns For safety reasons the freezer baskets are fitted with stops but are readily removed by pulling them forward to the stop then lifting the front and pulling all the way o...

Page 9: ...inet are not obstructed Avoid unnecessary frosting in the cabinet by packing all foodstuffs into airtight packages before placing them in the freezer Always leave warm food to cool down to room temperature before placing in the fridge or freezer Food which is to be frozen when cool should be placed in the fridge before being transferred to the freezer Thaw frozen food in the fridge This will ensur...

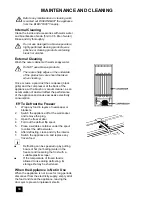
Page 10: ...the performance of the appliance and cause excessive electricity consumption To Defrost the Freezer 1 Wrap any food in layers of newspaper or blankets 2 Switch the appliance off at the wall socket and remove the plug 3 Open the freezer door 4 Fold out the defrost flip spout 5 Place a suitable container under the spout to collect the defrost water 6 After defrosting clean and dry the interior 7 Swi...

Page 11: ... equalise The compressor runs continuously Adjust the thermostat to give correct temperature control See page 6 Check that the door is closed Large quantities of food have recently been placed in the cabinet and or door is frequently opened Check that air ventilation is not obstructed Excessive frost and ice has built up Ensure the door is not left open Check that nothing is preventing the door fr...

Page 12: ...centre can be found on the following pages and also in your local telephone directory Before contacting your local Service Force Centre make a note of the model and serial number together with the date of purchase The service department will require this information The model and serial number can be found on the rating plate situated inside the cabinet 12 ...

Page 13: ...N SALES Leask Electrical Harlsdale Symbister Whalsay Shetland ZE2 9AA NORTHERN IRELAND BELFAST M27 Owenmore House Kilwee Industrial Estate Upper Dunmury Lane Belfast BT17 0HD WALES CARDIFF M28 Guardian Industrial Estate Clydesmuir Road Tremorfa Cardiff CF2 2QS CLYWD M14 Unit 6 7 Coed Parc Abergele Road Rhuddlan Clwyd Wales LL18 5UG OSWESTRY M17 Plas Ffynnon Warehouse Middleton Road Oswestry SY11 2...

Page 14: ...d Letchworth Herts SG6 1LA MAIDENHEAD M60 Reform Road Maidenhead Berkshire SL6 8BY MOLESEY M61 10 Island Farm Avenue West Molesey Surrey KT8 2UZ NEWBURY M24 PO Box 5627 Newbury Berkshire RG14 5GF IPSWICH M48 Unit 2B Elton Park Business Centre Hadleigh Road Ipswich IP2 0DD NORWICH M52 2b Trafalgar Street Norwich NR1 3HN SUNBURY M63 Unit 1a The Summit Hanworth Road Hanworth Ind Estate Sunbury on Tha...

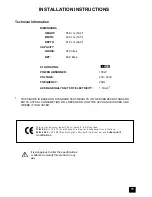
Page 15: ...ANDARD TEST RESULTS IN THE EUROPEAN STANDARD EN153 ACTUAL CONSUMPTION WILL DEPEND ON HOW THE APPLIANCE IS USED AND WHERE IT IS LOCATED INSTALLATION INSTRUCTIONS This appliance complies with the following E E C Directives 73 23 EEC of 19 2 73 Low Voltage Directive and subsequent modifications 89 336 EEC of 3 5 89 Electromagnetic Compatibility Directive and subsequent modifications It is dangerous t...

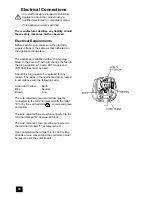
Page 16: ...he fuse in the plug supplied a 13 amp ASTA approved BS1362 fuse must be used Should the plug need to be replaced for any reason The wires in the mains lead are coloured in accordance with the following code Green and Yellow Earth Blue Neutral Brown Live The wire coloured green and yellow must be connected to the terminal marked with the letter E or by the earth symbol or coloured green and yellow ...

Page 17: ...lle touches against the wall When in position a 50 mm 2 clear space above the appliance should be maintained If space above the appliance is not available clearance of 25mm 1 should be maintained on both sides Ensure that the appliance does not stand on the electrical supply cable Parts which heat up should not be exposed Whenever possible the back of the appliance should be close to a wall but le...

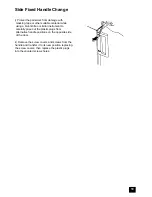
Page 18: ...uster 6 Remove the foot hinge assembly B by removing screws marked C 7 Remove the door by lifting it slightly and carefully sliding it down off the top hinge pin F by removing screw G and transfer to the opposite side 8 Refit the door by carefully sliding it onto the upper hinge pin F Take the bottom hinge foot assembly B and transfer it over to the opposite side of the cabinet being careful to re...

Page 19: ...blunt knife or similar instrument to carefully prise out the plastic plugs from alternative handle positions on the opposite side of the door ii Remove the screw covers and screws from the handle and transfer it to its new position replacing the screw covers then replace the plastic plugs into the vacated screws holes 19 ...

Page 20: ...ncurred for calls to put right an appliance which is improperly installed or calls to appliances outside the United Kingdom l Appliances found to be in use within a commercial environment plus those which are subject to rental agreements l Products of Electrolux manufacture which are not marketed by Electrolux European Guarantee If you should move to another country within Europe then your guarant...

Page 21: ......

Page 22: ...22 FREEZER EU6047T W GR BU YE 822020587 00 ...

Page 23: ......

Page 24: ...9 97 822020587 00 ...

Reviews: