background image

13 electrolux 

Maintenance

EN

Replacing the Charcoal Filter

This filter cannot be washed or regener

-

ated, and must be replaced when the 

F


touch control starts to flash, or at least 

once every 4 months. The alarm is only 

triggered when the motor is on.

• Remove the metal grease filters.

• Remove  the  saturated  charcoal  filter, 

turning the fasteners provided.

• Fit the new filter and fasten it its cor

-

rect position.

• Put  the  metal  grease  filters  in  their 

seats. 

Light replacement

20 W halogen light.

• Remove  the  snap-on  lamp  cover  by 

levering  it  from  under  the  metal  ring, 

supporting it with one hand.

• Remove  the  halogen  lamp  from  the 

lamp holder by pulling gently.

• Replace the lamp with a new one of 

the same type, making sure that you 

insert  the  two  pins  properly  into  the 

housings on the lamp holder.

• Replace the snap-on lamp cover.

Summary of Contents for EFC60246

Page 1: ...USER MANUAL EFC60246 EFC90246 ...

Page 2: ...We were thinking of you when we made this product ...

Page 3: ...electrolux 3 RECOMMENDATIONS AND SUGGESTIONS 5 CHARACTERISTICS 6 INSTALLATION 8 USE 11 MAINTENANCE 12 EN DE EMPFEHLUNGEN UND HINWEISE 14 CHARAKTERISTIKEN 15 MONTAGE 17 BEDIENUNG 20 WARTUNG 21 ...

Page 4: ...de a superior User Experi ence delivering Ease of Mind Good luck EN Willkommen bei Electrolux Wir möchten uns bedanken dass Sie sich für ein erstklassiges Produkt von Electrolux entschieden haben welches Ihnen sicherlich viel Freude bereiten wird Es ist unser Bestreben eine breite Vielfalt von Qualitätsprodukten anzubieten die helfen Ihr Leben etwas komfortabler zu machen Sie finden einige Beispie...

Page 5: ... in operation Adjust the flame intensity to direct it onto the bottom of the pan only making sure that it does not engulf the sides Deep fat fryers must be continuously monitored during use overheated oil can burst into flames Do not flambè under the range hood risk of fire This appliance is not intended for use by persons including children with reduced physical sensory or mental capabilities or ...

Page 6: ...Characteristics electrolux 6 EN Dimensions CHARACTERISTICS ...

Page 7: ...sing 2 1 1 Upper Section 2 2 1 Lower Section 9 1 Reducer Flange ø 150 120 mm 14 1 2 Air Outlet Connection Extension 15 1 Air Outlet Connection Ref Q ty Installation Components 7 2 1 2 Upper Chimney Section Fixing Brackets 7 3 1 Air Outlet Connection Support 11 6 Wall Plugs 12a 6 Screws 4 2 x 44 4 12c 6 Screws 2 9 x 9 5 Q ty Documentation 1 Instruction Manual ...

Page 8: ... fixing holes leaving a gap of 5 6 mm between the wall and the head of the screw Wall drilling and bracket fixing Wall marking Draw a vertical line on the supporting wall up to the ceiling or as high as practical at the centre of the area in which the hood will be installed Draw a horizontal line at 650 mm above the hob Place bracket 7 2 1 on the wall as shown about 1 2 mm from the ceil ing or upp...

Page 9: ...ied To install a ø 120 pipe To install a ø 120 mm air exhaust con nection insert the reducer flange 9 on the hood body outlet Fix the pipe in position using sufficient pipe clamps not supplied Remove any activated charcoal filters Connection in Recycling Version Insert the connection extension pieces laterally 14 1 in connec tion 15 Insert the Connector 15 into the Support bracket 7 3 and fix it w...

Page 10: ...pper Chimney Slightly widen the two sides of the upper flue and hook them behind the brackets 7 2 1 making sure that they are well seated Secure the sides to the brackets by using the 4 screws 12c 2 9 x 9 5 supplied Make sure that the outlet of the exten sions pieces is aligned with the chim ney outlets Lower Chimney Slightly widen the two sides of the flue and hook them between the upper flue and...

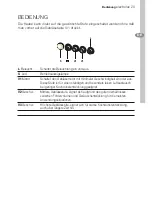
Page 11: ... Motor running led V1 Motor Switches the extractor motor on and off at low speed Used to provide a contin uos and silent air change in the presence of light cooking vapours V2 Speed Medium speed suitable for most operating conditions given the optimum treated air flox noise level ratio V3 Intensive Maximum speed used for eliminating the highest cooking vapour emission including long periods ...

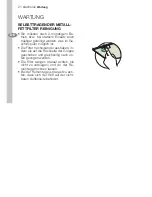
Page 12: ...g them lateraly and simultaneously pull ing downwards Any kind of bending of the filters has to be avoided when washing them Before fitting them again into the hood make sure that they are completely dry The colour of the filter surface may change throughout the time but this has no influence to the filter effi ciency When fitting the filters into the hood pay attention that they are placed in cor...

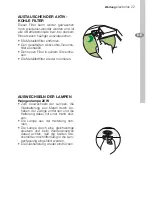
Page 13: ...oal filter turning the fasteners provided Fit the new filter and fasten it its cor rect position Put the metal grease filters in their seats Light replacement 20 W halogen light Remove the snap on lamp cover by levering it from under the metal ring supporting it with one hand Remove the halogen lamp from the lamp holder by pulling gently Replace the lamp with a new one of the same type making sure...

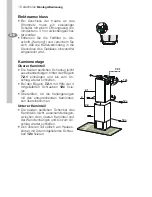
Page 14: ...Recycling dieses Produkts erhalten Sie von Ihrem Rathaus Ihrer Müllabfuhr oder dem Geschäft in dem Sie das Produkt gekauft haben MONTAGE Das Gerät darf nur vom Fachpersonal an geschlossen werden Der Hersteller haftet nicht für Schäden die auf eine fehlerhafte und unsachgemäße Montage zurückzuführen sind Der minimale Sicherheitsabstand zwi schen Kochmulde und Haube muss 650 mm betragen Prüfen ob di...

Page 15: ...15 electrolux Charakteristiken DE CHARAKTERISTIKEN Platzbedarf ...

Page 16: ...s 2 1 1 oberer Kaminteil 2 2 1 unterer Kaminteil 9 1 Reduzierflansch ø 150 120 mm 14 1 2 Verlängerung Luftaustritt An schlussstück 15 1 Luftaustritt Anschlussstück Pos St Montagekomponenten 7 2 1 2 Befestigungsbügel oberer Kamin teil 7 3 1 Bügel für Anschlusshalter 11 6 Dübel 12a 6 Schrauben 4 2 x 44 4 12c 6 Schrauben 2 9 x 9 5 St Dokumentation 1 Bedienungsanleitung ...

Page 17: ...ren Bügel einzuhalten ist X Höhe des jeweiligen oberen Kaminteils den Mittelpunkt Einschnitte auf die verti kale Bezugslinie ausrichten Die Mitte der Bügellöcher an der Wand markieren Wie beschrieben einen Bezugspunkt 116 mm von der vertikalen Bezugs linie und 306 mm oberhalb der hori zontalen Bezugslinie kennzeichnen Gleichermaßen an der gegenüberlie genden Seite vorgehen Mit einem Bohrer ø 8 mm ...

Page 18: ...rliche Material wird nicht mitgeliefert Anschlussrohres ø 120 Bei Verwendung eines Anschlussrohres ø 120 den Reduzierflansch 9 am Hau benaustritt anbringen Das Rohr mit geeigneten Rohrschellen fixieren Das hierzu erforderliche Material wird nicht mitgeliefert Eventuell vorhandene Aktivkohlefilter entnehmen Anschluss in Umluftversion Die Verlängerungen 14 1 beim Anschluss 15 seitlich einfügen Den A...

Page 19: ...aminteil Die beiden seitlichen Schenkel leicht auseinanderbiegen hinter den Bügeln 7 2 1 einhängen und bis zum An schlag wieder schließen Bei den Bügeln 7 2 1 mit Hilfe der 4 mitgelieferten Schrauben 12c fixie ren überprüfen ob die Verlängerungen mit den entsprechenden Kaminstut zen übereinstimmen Unterer Kaminteil Die beiden seitlichen Schenkel des Kaminteils leicht auseinanderbiegen zwischen dem...

Page 20: ...haltet den Gebläsemotor mit minimaler Geschwindigkeit ein oder aus Diese Stufe ist für einen ständigen und besonders leisen Luftaustausch bei geringer Kochdunstentwicklung geeignet V2 Geschw Mittlere Gebläsestufe eignet sich aufgrund des guten Verhältnisses zwischen Fördervolumen und Geräuschentwicklung für die meisten Anwendungssituationen V3 Geschw Höchste Gebläsestufe eignet sich für starke Koc...

Page 21: ...werden was im Ge schirrspüler möglich ist Die Filter nacheinander aushaken in dem sie auf die Rückseite der Gruppe geschoben und gleichzeitig nach un ten gezogen werden Die Filter reinigen darauf achten sie nicht zu verbiegen und vor der Re montage trocknen lassen Bei der Remontage ist darauf zu ach ten dass sich der Griff auf der sicht baren Außenseite befindet ...

Page 22: ...uen Filter in seinem Sitz einha ken Die Metallfettfilter wieder montieren AUSWECHSELN DER LAMPEN Halogenlampe 20 W Zum Auswechseln der Lampen die Glashalterung aus Metall durch An heben der Zwinge entfernen und die Halterung dabei mit einer Hand stüt zen Die Lampe aus der Halterung neh men Die Lampe durch eine gleichwertige ersetzen und beim Wiedereinsetzen darauf achten daß die beiden Ste ckersti...

Page 23: ......

Page 24: ...www electrolux com 436004798_01 091111 ...

Reviews: