background image

13

ENGLISH

7. 

TIPS AND RECOMMENDATIONS

7.1  Pre-cooling

Selecting the chilling 5, +3, -18 

automatically activates pre-cooling and 

“Pre-cooling done, please insert food 

now” appears on the appliance.

The assisted cooling and freezing cycles 

do not involve pre-cooling.

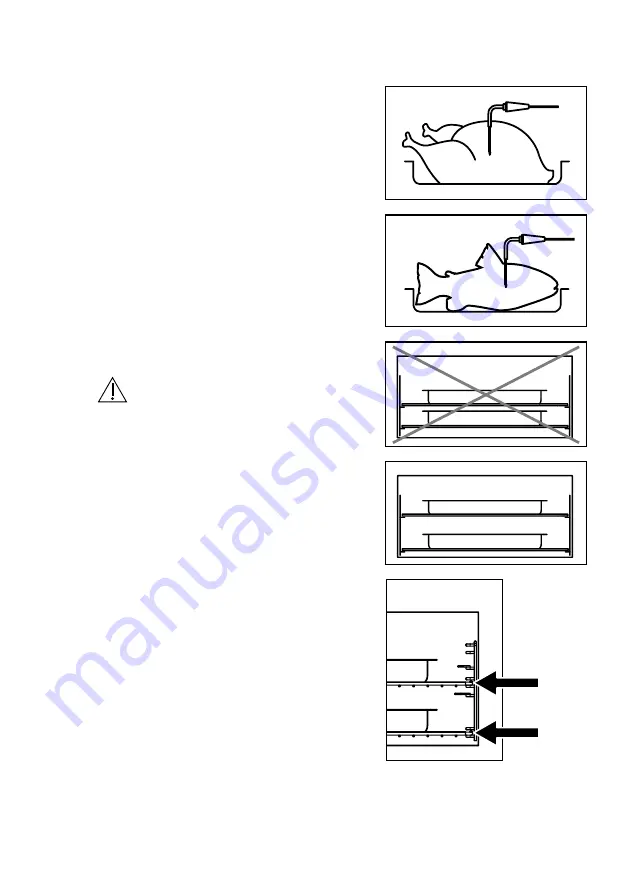
7.2  Loading the machine

To ensure good performance of the 

machine and prevent alteration of the 

food:

•  arrange the products in such a way 

as to favour the circulation of cold air 

throughout the cell;

•  avoid prolonged and frequent opening 

of the doors.

WARNING! 

Make sure that the food items to 

be blast chilled and/or frozen do 

not overlap and are no greater 

than 65 mm in thickness. Do not 

exceed the load recommended by 

the manufacturer (3 kg).

Summary of Contents for EAT1AX

Page 1: ...EAT1AX EN Blast chiller Operating instructions 2 IT Abbattitore di temperatura Istruzioni per l uso 16 DE Kühlzelle Bedienungsanleitungen 30 FR Cellule de refroidissement Mode d emploi 44 ...

Page 2: ...ion Buy accessories consumables and genuine spare parts for your appliance www electrolux com shop CUSTOMER SERVICE AND MAINTENANCE We always recommend the use of original spare parts When contacting the Service Centre make sure you have the following details at hand The information can be found on the data plate Model appliance number PNC and serial number Caution Warning Important Safety informa...

Page 3: ...sks involved Do not allow children to play with the appliance Keep packaging materials out of the reach of children Cleaning and maintenance operations should not be performed by unsupervised children 1 2 General safety warnings The appliance is designed for domestic use and similar purposes for example in country houses shop kitchens offices and other work environments by guests at hotels motels ...

Page 4: ...ake sure that air can circulate freely around the appliance Wait at least 4 hours before connecting the appliance to the mains This allows the oil to flow back into the compressor Do not install the appliance near heaters stoves ovens and hobs The back of the appliance must rest against the wall with duct Do not install the appliance in an area exposed to direct sunlight Do not install this applia...

Page 5: ...objects on the plastic parts of the appliance Do not store flammable liquids and gas in the appliance Do not put or keep liquids or flammable materials or highly flammable objects on inside or near the appliance Do not touch the compressor or condenser These are hot 2 4 Maintenance and cleaning WARNING Risk of injury or damage to the appliance Before performing maintenance always switch off and un...

Page 6: ... intended to be used to chill 3 C and blast freeze 18 C food Raw and cooked foods preserved in this way maintain their organoleptic qualities in the interest of flavour and freshness At the end of each selected cycle the appliance automatically switches to the holding phase keeping the product at the preset temperature for a maximum of 24 hours 1 2 3 4 5 6 3 1 Accessories Wire shelf x 2 Sponge Foo...

Page 7: ...s for 3 seconds to activate or deactivate it when a program is in progress 3 Temperature Used to test the cell temperature for the current program 4 Up key To go up a vertical list or scroll left right 5 Minute minder The user can set a timer alarm 6 OK Confirms an action 7 Down key To go down a vertical list or scroll left right 8 De ice Function for removing ice in the cell 9 Back key Used durin...

Page 8: ...pears Temperature The temperature appears on the display Set temperature The set temperature value appears on the display Food sensor Use of the food sensor appears on the display Duration The required duration of the cycle appears on the display End of cycle The residual time appears on the display Timer The time elapsed since the start of the cycle appears on the display A B C E D Other indicato...

Page 9: ...he mains set the language and time 1 Press and to set the value 2 Press to confirm 6 DAILY USE WARNING It is advisable to use the food sensor to optimise the operating times and consumption of the blast chiller Make sure to insert the food sensor in the middle of the food see figure 6 1 Browsing the menus 1 Switch on the appliance 2 Press and to set the option in the menu 3 Press to go to the sub ...

Page 10: ...ing or freezing with weight Gentle Chilling 5 Blast Chilling 3 Blast Freezing 18 1 5 Kg 0 5 Kg 1 0 Kg 4 Select the quantity and press OK to confirm 4 Modify the temperature as required and press OK to confirm 1 Press the ON OFF key 2 Select the required program and press OK to confirm 3 Select Weight and press OK to confirm 5 The appliance starts the blast chilling cycle The total time and progres...

Page 11: ... L plastic bottle 2 4 6 Assisted freezing Fruit vegetables 18 C 0 5 3 Kg Sashimi Raw fish 20 C 3 Kg Ice cream Desserts Blast freezing of ice cream 20 C Ice cream ready to serve 14 C Ice cubes 0 5 3 Kg WARNING Keep the door closed during every blast chilling or freezing program If the door is not closed the program does not start and a message appears on the screen prompting you to close it If the ...

Page 12: ... chilling Load less than 0 5kg single portion all vegetables even if above 0 5kg desserts liquid foods and sauces vacuum cooking mixtures Blast chilling Load more than 0 5kg single portion meat first courses au gratin puddings whole fish Blast freezing Any food semi frozen desserts ...

Page 13: ...ve pre cooling 7 2 Loading the machine To ensure good performance of the machine and prevent alteration of the food arrange the products in such a way as to favour the circulation of cold air throughout the cell avoid prolonged and frequent opening of the doors WARNING Make sure that the food items to be blast chilled and or frozen do not overlap and are no greater than 65 mm in thickness Do not e...

Page 14: ...efrigeration system After cleaning plug the appliance back into the mains 8 2 Periods of inactivity If the appliance is not to be used for a long period adopt the following precautions unplug the appliance remove all the accessories clean the appliance and all the accessories leave the door open to prevent the formation of unpleasant odours 9 TROUBLESHOOTING WARNING Refer to the chapters on safety...

Page 15: ...ct Incorrect insertion of the food sensor Check the position of the food sensor in the product The food sensor is damaged Use only timed or assisted programs and contact the Service Centre to request a replacement The appliance prompts the user to insert the food sensor when it is in fact already inserted Broken food sensor Contact the technical Service Centre 10 ENVIRONMENTAL CONSIDERATIONS Recyc...

Page 16: ...istration Acquistare accessori materiali di consumo e ricambi originali per la vostra apparecchiatura www electrolux com shop SERVIZIO CLIENTI E MANUTENZIONE Consigliamo sempre l impiego di ricambi originali Quando si contatta l Assistenza accertarsi di disporre dei seguenti dati Le informazioni si trovano sulla targhetta di identificazione Modello numero dell apparecchio PNC numero di serie Avver...

Page 17: ...ll uso dell apparecchiatura e se hanno compreso i rischi coinvolti Non consentire ai bambini di giocare con l apparecchiatura Tenere i materiali di imballaggio al di fuori della portata dei bambini La pulizia e gli interventi di manutenzione non devono essere eseguiti dai bambini senza supervisione 1 2 Avvertenze di sicurezza generali L apparecchiatura è destinata all uso domestico ed usi simili a...

Page 18: ...tamento dell apparecchiatura dato che è molto pesante Indossare sempre guanti di sicurezza Assicurarsi che l aria possa circolare liberamente attorno all apparecchiatura Attendere almeno 4 ore prima di collegare l apparecchiatura all alimentazione Questo serve a consentire all olio di fluire nuovamente nel compressore Non installare l apparecchiatura in prossimità di radiatori fornelli forni o pia...

Page 19: ...recchiatura Non conservare gas e liquidi infiammabili nell apparecchiatura Non appoggiare o tenere liquidi o materiali infiammabili né oggetti facilmente incendiabili sull apparecchiatura al suo interno o nelle immediate vicinanze Non toccare il compressore o il condensatore Sono incandescenti 2 4 Manutenzione e pulizia ATTENZIONE Rischio di lesioni o danni all apparecchiatura Prima di eseguire qu...

Page 20: ...to della temperatura 3 C e alla surgelazione 18 C degli alimenti Gli alimenti crudi e cotti trattati in questo modo conservano inalterate le loro qualità organolettiche preservandone il gusto e la freschezza Alla fine di ogni ciclo selezionato l apparecchiatura passa automaticamente alla fase di mantenimento mantenendo il prodotto alla temperatura preimpostata per un massimo di 24 ore 1 2 3 4 5 6 ...

Page 21: ...attivato o disattivato 3 Temperatura Usato per verificare la temperatura cella nel corrente programma in esecuzione 4 Tasto su Per andare sopra in una lista verticale o sinistra destra in una navigazione orizzontale 5 Contaminuti L utente può impostare timer allarme 6 OK Consente di confermare una azione 7 Tasto giù Per andare sotto in una lista verticale o sinistra destra in una navigazione orizz...

Page 22: ...ra Compare l ora attuale Temperatura Il display mostra la temperatura Temperatura impostata Il display mostra il valore della temperatura impostata Termosonda Il display mostra l utilizzo della termosonda Durata Il display mostra il tempo necessario per il ciclo Fine ciclo Il display mostra il tempo residuo Timer Il display mostra il tempo decorso da inizio ciclo A B C E D Altri indicatori sul dis...

Page 23: ...la lingua e l ora 1 Premere e per impostare il valore 2 Premere per confermare 6 UTILIZZO QUOTIDIANO ATTENZIONE Si raccomanda l utilizzo della termosonda per ottimizzare i tempi di funzionamento ed i consumi dell abbattitore Assicurarsi di posizionare la termosonda al centro dell alimento vedi figura 6 1 Per navigare tra i menù 1 Accendere l apparecchiatura 2 Premere e per impostare l opzione del ...

Page 24: ...azione con peso Abbattimento delicato 5 Abbattimento rapido 3 Surgelazione 18 1 5 Kg 0 5 Kg 1 0 Kg 4 Selezionare quantitativo e confermare con OK Peso Termosonda 4 Se necessario modificare la temperatura desiderata e confermare con OK Abbattimento delicato 5 Abbattimento rapido 3 Surgelazione 18 1 Premere il tasto ON OFF 2 Selezionare il programma desiderato e confermare con OK Peso Termosonda 3 S...

Page 25: ...Bottiglie plastica 1 5 L 2 4 6 Surgelazione assistita Frutta e verdura 18 C 0 5 3 Kg Sashimi Pesce crudo 20 C 3 Kg Gelato Desserts Surgelazione gelato 20 C Gelato da servire 14 C Cubetti di ghiaccio 0 5 3 Kg ATTENZIONE In ogni programma di abbattimento o surgelazione tenere chiusa la porta Se la porta non è chiusa il programma non parte ed appare un messaggio nello schermo che invita a chiuderla S...

Page 26: ...icato Carico inferiore a 0 5kg monoporzione tutte le verdure anche se superiore a 0 5kg dessert alimenti liquidi e salse cotture sottovuoto impasti Abbattimento rapido Carico superiore a 0 5kg multiporzione carne primi piatti gratinati gateau pesci interi Surgelazione Qualunque alimento semifreddi ...

Page 27: ...ssistiti non è presente il preraffreddamento 7 2 Carico della macchina Per ottenere una buona resa della macchina e non avere alterazione degli alimenti sistemare i prodotti in modo da favorire la circolazione dell aria fredda in tutta la cella evitare prolungate e frequenti aperture delle porte ATTENZIONE Fare attenzione che gli alimenti da abbattere e o surgelare non siano sovrapposti e comunque...

Page 28: ... Dopo la pulizia ricollegare l apparecchiatura alla rete elettrica 8 2 Periodi di inutilizzo Se l apparecchiatura non viene utilizzata per un lungo periodo adottare le seguenti precauzioni scollegare l apparecchiatura dalla rete elettrica togliere tutti gli accessori pulire l apparecchiatura e tutti gli accessori lasciare la porta aperta per evitare la formazione di odori sgradevoli 9 RISOLUZIONE ...

Page 29: ...orretta Errato inserimento termosonda Verificare posizionamento termosonda al cuore del prodotto La termosonda è danneggiata Usare solo programmi a tempo o assistiti e chiamare l assistenza per la sostituzione L apparecchiatura richiede di inserire la termosonda con la termosonda già inserita Rottura della termosonda Contattare l assistenza tecnica 10 CONSIDERAZIONI SULL AMBIENTE Riciclare i mater...

Page 30: ... erhalten www electrolux com productregistration Zubehörteile Verbrauchsmaterial und Original Ersatzteile für Ihr Gerät kaufen www electrolux com shop KUNDENDIENST UND WARTUNG Wir empfehlen stets den Einsatz von Original Ersatzteilen Beim Kontaktieren der Kundendienststelle ist stets sicherzustellen über die folgenden Daten zu verfügen Die Informationen sind auf dem Kennschild angegeben Modell Ger...

Page 31: ...Verwendung des Geräts entsprechend angelernt wurden und die damit verbundenen Risiken verstanden haben Achtgeben dass Kinder nicht mit dem Gerät spielen Das Verpackungsmaterial muss stets außer der Reichweite von Kindern sein Reinigungs und Wartungseingriffe dürfen nie von Kindern ohne Beaufsichtigung ausgeführt werden 1 2 Allgemeine Sicherheitshinweise Das Gerät ist für die Verwendung im Haushalt...

Page 32: ...lten Beim Verstellen des Geräts Achtsamkeit anwenden da es sehr schwer ist Immer Sicherheitshandschuhe anlegen Sicherstellen dass die Luft unbehindert um das Gerät zirkulieren kann Mindestens 4 Stunden warten bevor das Gerät an die Stromversorgung angeschlossen wird Dies damit das Öl neuerdings in den Verdichter fließen kann Das Gerät nicht in der Nähe von Heizkörpern Herden Öfen oder Kochfeldern ...

Page 33: ...tikteile des Gerätes legen Gas und entflammbare Flüssigkeiten dürfen nicht im Gerät aufbewahrt werden Entflammbare Flüssigkeiten oder Materialien leicht entzündbare Gegenstände dürfen nicht auf dem Gerät im Gerät oder in unmittelbarer Nähe des Geräts abgestellt oder gehalten werden Den Verdichter oder den Kondensator nicht berühren Sie sind glühend heiß 2 4 Wartung und Reinigung ACHTUNG Risiko von...

Page 34: ...nd zum schnellen Einfrieren 18 C der Lebensmittel bestimmt Rohe und gekochte Lebensmittel die auf diese Weise behandelt werden erhalten ihre organoleptische Qualität und bleiben schmackhaft und frisch Nach Abschluss jedes gewählten Programms schaltet das Gerät automatisch auf die Erhaltung um und hält das Produkt höchstens 24 Stunden lang auf der vorgegebenen Temperatur 1 2 3 4 5 6 3 1 Zubehör Git...

Page 35: ...ie Temperatur der Zelle im gerade ausgeführten Programm zu überprüfen 4 Taste Pfeil nach oben Um eine vertikale Lister nach oben zu scrollen oder zur Links Rechtsverschiebung bei einer horizontalen Navigation 5 Kurzzeit Wecker Der Benutzer kann den Timer Alarm einstellen 6 OK Dient zur Bestätigung einer Handlung 7 Taste Pfeil nach unten Um eine vertikale Lister nach unten zu scrollen oder zur Link...

Page 36: ...splay wird die Temperatur angezeigt Zieltemperatur Am Display wird die Zieltemperatur angezeigt Kerntemperatursensor Am Display wird die Benutzung des Kerntemperatursensors gezeigt Dauer Am Display wird die für das Programm benötigte Zeit angezeigt Ende des Programms Am Display wird die restliche Zeit angezeigt Timer Am Display wird die Zeit angezeigt die ab Beginn des Programms vergangen ist A B ...

Page 37: ... einzustellen 1 Druck auf und um den Wert einzustellen 2 Druck auf zum Bestätigen 6 TÄGLICHE BENUTZUNG ACHTUNG Es wird empfohlen den Kerntemperatursensor zu verwenden um die Betriebszeiten und den Verbrauch der Kühlzelle zu optimieren Darauf achten dass der Kerntemperatursensor in die Mitte des Gerichts positioniert wird siehe Abbildung 6 1 Zur Navigation in den Menüs 1 Gerät einschalten 2 Druck a...

Page 38: ...ieren mit Gewicht Schonendes Kühlen 5 Schnelles Kühle 3 Schnelles Einfrieren 18 1 5 Kg 0 5 Kg 1 0 Kg 4 Menge wählen und mit OK bestätigen 4 Sofern erforderlich die Temperatur ändern und mit OK bestätigen 1 Die Taste ON OFF betätigen 2 Das gewünschte Programm wählen und mit OK bestätigen 3 Gewicht wählen und mit OK bestätigen 5 Das Gerät beginnt das Kühlprogramm Am Display wird die Gesamtzeit und d...

Page 39: ...chen 1 5 L 2 4 6 Gefrierassistent Obst und Gemüse 18 C 0 5 3 Kg Sashimi Roher Fisch 20 C 3 Kg Eiscreme Desserts Schnelles Einfrieren Eiscreme 20 C Eiscreme servierfertig 14 C Eiswürfel 0 5 3 Kg ACHTUNG Während des Ablaufs eines Programms zum Kühlen oder schnellen Einfrieren muss die Tür stets geschlossen sein Bei offenstehender Tür startet das Programm nicht und am Bildschirm wird eine Meldung ein...

Page 40: ...len Ladung unter 0 5 Kg Einzelportion alle Gemüse selbst über 0 5 Kg Dessert flüssige Lebensmittel und Saucen vakuum gekochtes Essen Teig Schnelles Kühlen Ladung über 0 5 Kg Einzelportion Fleisch Gratin Vorspeisen Gateau ganzer Fisch Schnelles Einfrieren Jedes beliebige Lebensmittel Halbgefrorenes ...

Page 41: ...fällt das Vorkühlen aus 7 2 Beladen der Maschine Für eine gute Wirksamkeit der Maschine und Speisen ohne Beeinträchtigung der Qualität Die Produkte so anordnen dass die Luft in der Zelle überall zirkulieren kann längeres und oftmaliges Öffnen der Türen vermeiden ACHTUNG Darauf achten dass die Lebensmittel die gekühlt und oder eingefroren werden nicht übereinander angeordnet sind und eine Dicke von...

Page 42: ...Darauf achten dass der Kältekreis nicht beschädigt wird Nach Abschluss der Reinigungsarbeiten das Gerät an das Stromnetz anschließen 8 2 Stillstandzeiten Falls das Gerät über eine längere Zeit nicht verwendet wird sind folgende Vorsichtsmaßnahmen zu treffen Das Gerät vom Stromnetz abschließen sämtliche Zubehörteile entfernen das Gerät und alle Zubehörteile reinigen die Tür offen lassen um zu verme...

Page 43: ...r Kerntemperatursensor in der Mitte des Produkts steckt Kerntemperatursensor ist beschädigt Ausschließlich zeitgeschaltete oder Assistent Programme verwenden und Kundendienst für den Austausch heranziehen Das Gerät erfragt die Einfügung des Kerntemperatursensors wenn der Kerntemperatursensor bereits eingefügt ist Bruch des Kerntemperatursensors Technischen Kundendienst kontaktieren 10 BERÜCKSICHTI...

Page 44: ... matériels de consommation et des pièces de rechange originales pour votre appareil www electrolux com shop SERVICE CLIENTS ET ENTRETIEN Nous conseillons toujours l emploi de pièces de rechange originales Lorsqu on contacte l Assistance s assurer de disposer des données suivantes Les informations se trouvent sur la plaque d identification Modèle numéro de l appareil PNC numéro de série Mise en gar...

Page 45: ...et s ils ont compris les risques qu il implique Ne pas permettre aux enfants de jouer avec l appareil Conserver les emballages hors de portée des enfants Le nettoyage et les interventions d entretien ne doivent pas être effectués par des enfants sans supervision 1 2 Mises en garde de sécurité générales L appareil est destiné à une utilisation domestique et à des utilisations similaires par exemple...

Page 46: ...ment de l appareil vu qu il est très lourd Porter toujours des gants de sécurité S assurer que l air puisse circuler librement autour de l appareil Attendre au moins 4 heures avant de relier l appareil à l alimentation Cela permet à l huile de couler à nouveau dans le compresseur Ne pas installer l appareil à proximité de radiateurs réchauds fours ou plans de cuisson La surface arrière de l appare...

Page 47: ...es en plastique de l appareil Ne pas conserver de gaz ni de liquides inflammables dans l appareil Ne pas poser ni tenir de liquides ou matériaux inflammables ou d objets facilement inflammables sur l appareil à l intérieur de celui ci ou à proximité Ne pas toucher le compresseur ou condenseur Ils sont incandescents 2 4 Entretien et nettoyage ATTENTION Risque de lésions ou dommages à l appareil Ava...

Page 48: ...idissement 3 C et à la surgélation 18 C des aliments Les aliments crus et cuits traités de cette façon conservent leurs qualités organoleptiques inaltérées en préservant le goût et la fraîcheur À la fin de chaque cycle sélectionné l appareil passe automatiquement à la phase de maintien en maintenant le produit à la température pré configurée pendant un maximum de 24 heures 1 2 3 4 5 6 3 1 Accessoi...

Page 49: ...econdes il est activé ou désactivé 3 Température Utilisée pour vérifier la température de la cellule dans le programme en cours d exécution 4 Touche en haut Pour aller en haut dans une liste verticale ou gauche droite dans une navigation horizontale 5 Minuteur L utilisateur peut configurer time alarme 6 OK Permet de confirmer une action 7 Touche en bas Pour aller en bas dans une liste verticale ou...

Page 50: ... L heure actuelle apparaît Température L écran montre la température Température configurée L écran montre la valeur de la température configurée Sonde à viande L écran montre l utilisation de la sonde à viande Durée L écran montre le temps nécessaire pour le cycle Fin du cycle L écran montre le temps résiduel Timer L écran montre le temps écoulé depuis le début du cycle A B C E D Autres indicateu...

Page 51: ...Presser et pour configurer la valeur 2 Presser pour confirmer 6 UTILISATION QUOTIDIENNE ATTENTION Il est recommandé d utiliser la sonde à viande pour optimiser les temps de fonctionnement et les consommations de la cellule de refroidissement S assurer de positionner la sonde à viande au centre de l aliment voir la figure 6 1 Pour naviguer dans les menus 1 Allumer l appareil 2 Presser et pour confi...

Page 52: ...froidissement ou surgélation avec le poids 1 5 Kg 0 5 Kg 1 0 Kg 4 Sélectionner la quantité et confirmer avec OK 4 Si nécessaire modifier la température souhaitée et confirmer avec OK 1 Presser la touche ON OFF 2 Sélectionner le programme souhaité et confirmer avec OK 3 Sélectionner Poids et confirmer avec OK 5 L appareil commencera le cycle de refroidissement L écran indiquera le temps total et le...

Page 53: ... Canettes 4 8 12 Bouteilles plastique 1 5 L 2 4 6 Surgélation assistée Fruits et légumes 18 C 0 5 3 Kg Sashimi Poisson cru 20 C 3 Kg Glace Desserts Surgélation glace 20 C Crèmes glacées prête à servir 14 C Glaçons 0 5 3 Kg ATTENTION Dans chaque programme de refroidissement ou de surgélation maintenir la porte fermée Si la porte n est pas fermée le programme ne part pas et un message invitant à la ...

Page 54: ...ent doux Chargement inférieur à 0 5kg monoportion tous les légumes même si supérieur à 0 5kg dessert aliments liquides et sauces cuissons sous vide pâtes Refroidissement rapide Chargement supérieur à 0 5kg multiportion viande entrées gratinées gâteau poissons entiers Surgélation Tout aliment crèmes glacées ...

Page 55: ...ésent le pré refroidissement 7 2 Chargement de la machine Pour obtenir un bon rendement de la machine et ne pas avoir d altération des aliments installer les produits de façon à favoriser la circulation de l air froid dans toute la cellule éviter les ouvertures prolongées et fréquentes des portes ATTENTION Faire attention que les aliments à refroidir et ou à surgeler ne soient pas superposés et de...

Page 56: ...ion de ne pas endommager le système réfrigérant Après le nettoyage rebrancher l appareil au réseau électrique 8 2 Périodes d inutilisation Si l appareil n est pas utilisé pendant une longue période adopter les précautions suivantes débrancher l appareil du réseau électrique enlever tous les accessoires nettoyer l appareil et tous les accessoires laisser la porte ouverte pour éviter la formation d ...

Page 57: ...vaise introduction de la sonde à viande Vérifier le positionnement de la sonde à viande au cœur du produit La sonde à viande est endommagée Utiliser seulement des programmes à temps ou assistés et appeler l assistance pour la substitution L appareil demande d introduire la sonde à viande avec la sonde à viande déjà introduite Rupture de la sonde à viande Contacter l assistance technique 10 CONSIDÉ...

Page 58: ...Notes Note Anmerkungen Remarques ...

Page 59: ...Notes Note Anmerkungen Remarques ...

Page 60: ...electrolux com shop 450MD101 ...

Reviews: