background image

26

Operating Instructions

Washer Settings Chart

These temperature, spin speeds, soil levels and options are available with the following cycles:

deep clean sanitize

heavy duty

whites

colors

normal

casual

active wear

fast wash

delicate

hand wash

rinse & spin

specialty cycles

jeans

fast sanitize

stuf

fed toys

pet beds

clean washer

steam pr

etr

eat

kids wear

fast steam

wool

        temperature

  sanitize

9

9

NO OPTIONS A

V

AILABLE WITH THIS CYCLE.

DO NOT LOAD ANY ITEMS IN DRUM DURING SYSTEM CLEAN CYCLE.

  hot

9 9

9

9

9 9

  eco hot

9 9

9

  warm

9 9 9 9 9 9 9 9 9

9

9

  eco warm

9 9 9 9 9 9

9 9

  cold

9 9 9 9 9 9 9 9 9

9

9

  eco cold

9 9 9 9 9 9

9 9 9

       spin speed

  maximum spin

9 9 9 9 9

9

9

9

9

9

  high spin

9 9 9 9 9 9 9

9

9

9

  medium spin

9 9 9 9 9

9 9 9

9

  low spin

9 9 9

9 9 9

9

9

  minimum spin

9 9 9

9 9 9

  no spin

9 9 9

9

       soil level

  maximum soil

9 9 9 9 9

  heavy soil

9 9 9 9 9

9

  medium soil

9 9 9 9 9

9

9

  normal soil

9 9 9 9 9 9 9

9

9

9

9

9

  light soil

9 9 9 9 9 9 9

  minimum soil

9 9 9 9 9 9 9

9

       options

  add steam

9 9 9 9 9 9 9 9

9 9

9

9

  eco friendly

9 9 9 9 9 9

  allergen

9 9

9

9

  extended fresh

9 9 9 9 9 9

9 9

  shrink guard

9 9 9 9 9 9 9

9 9

9

9

  add more water

9 9 9 9 9 9

9 9

  stain pretreat

9 9 9 9 9 9

9

  fresh rinse

9 9 9 9 9 9 9

9 9 9

9

9 9

9

9

  extra spin

9 9 9 9 9 9 9

  prewash

9 9 9 9

9

9

  warm rinse

9 9 9 9 9 9 9 9

9 9

9

9

  delay start

9 9 9 9 9 9 9 9 9 9 9 9 9 9 9

9 9 9 9

9

 = Available selections.     

 = Factory presets.     

 = Non-modifi able presets.

Summary of Contents for 137356900

Page 1: ...137356900 A 1005 Use Care Guide Wave Touch Front Load Washer Guide d utilisation et d entretien Laveuse à chargement frontal Wave TouchMC Guía de uso y cuidado Lavadora de carga frontal Wave TouchMC ...

Page 2: ...hase date Electrolux model number Electrolux serial number Keep a record for quick reference NOTE Registering your product with Electrolux enhances our ability to serve you You can register online at www electroluxappliances com or by dropping your Product Registration Card in the mail Finding information 2 SAFETY 3 5 Features 6 Operating Instructions 7 26 Getting Started 7 Normal Operating Sounds...

Page 3: ...us body harm death or property damage This symbol alerts you to situa tions that may cause bodily injury or property damage Save these instructions for future reference WARNING For your safety the following information in this manual must be followed to minimize the risk of fire or explosion or to prevent property damage personal injury or death Do not store or use gasoline or other flammable vapo...

Page 4: ...ammable vapors or liquids in the vicinity of this or any other appliance Failure to comply with these warnings could result in fire explosion serious bodily injury and or damage to the rubber or plastic parts of the washer PROTECT CHILDREN Do not allow children to play on or in the washer Close supervision of children is necessary when the washer is used near children As children grow teach them t...

Page 5: ... gas resulting in serious injury or death Do not combine laundry products for use in 1 load unless specified on the label Do not mix chlorine bleach with ammonia or acids such as vinegar PREVENT INJURY AND DAMAGE TO THE WASHER To prevent serious personal injury and damage to the washer All repairs and servicing must be performed by an authorized servicer unless specifically rec ommended in this Us...

Page 6: ...hting System Reversible Touch 2 Open Door System Touch 2 Open Latch Indicator Touch 2 Open Door Latch with Safety Lock Touch 2 Open Cycle Selector Touch 2 Open Dispenser Drawer with Luxury Glide Door Striker Cascading Wash Vanes Stainless Steel Wash Drum Adjustable Leveling Legs Dual Stage Wide Angle Door Hinge Multi language LCD Interface Inner glass with small article redistribution ramp ...

Page 7: ...ration of the washer B WATER VALVES DISPENSER As water enters the dispenser system it is common to hear a water flowing sound This normal sound will vary slightly based on the water pressure in your home C DOOR LOCK Your washer is equipped with a door lock with an electric solenoid There will be a clicking sound as the washer door is being locked or unlocked D DRAIN PUMP Your washer is equipped wi...

Page 8: ...ine wash items containing fiber glass Small particles of fiberglass left in the drum may transfer to fabrics in other loads and cause skin irritation or damage to fabrics 2 Prepare items for washing Empty pockets Brush off lint and dirt Shake out rugs and beach towels Close zippers fasten hooks button buttons tie strings and sashes and remove non wash able trims and ornaments Mend rips and tears t...

Page 9: ...items should not be more than half the total wash load Washing single items such as a sweater towel or jeans is inefficient and may cause an out of balance load Add 1 or 2 similar items to help balance the load Wash a single heavy item such as a king sized comforter bedspread or sleeping bag sepa rately The washer can be fully loaded but the items should not be tightly packed The door should close...

Page 10: ...ness load size and soil level NOTE From time to time you may see water in the Main Wash liquid only Pre Wash Liquid Bleach and Fabric Softener chambers This is part of the normal operation of the washer Operating Instructions Use a low sudsing high efficiency detergent to prevent oversudsing in front load washers Look for this symbol on the detergent label For best results OPERATING YOUR WASHER co...

Page 11: ... loads select the prewash option and add the recommended amount of detergent to the Pre Wash deter gent cup NOTE To prevent staining do not overfill the Fabric Softener chamber or pour liquid fabric softener directly on the wash load Operating Instructions Liquid Fabric Softener If desired pour the recommended amount of liquid fabric softener into the chamber labeled Fabric Softener and marked wit...

Page 12: ...o the desired settings Press the scroll up or scroll down buttons under options to scroll through the options menu Press the select button to add or delete options The estimated cycle time will be displayed at the top of the screens Adjustments to a cycle will be remembered and recalled each time that cycle is selected in the future To return to the factory default settings select RESET in set pre...

Page 13: ...r the cycle has begun press pause select the new set tings or options and press start again NOTE If the cycle is interrupted during spin the door lock will not release until the tub has stopped spinning DO NOT force open the door To stop the cycle press cancel When the cycle ends a signal will sound COMPLETE DOOR CAN BE OPENED will be displayed and the drum light will come on Remove items from the...

Page 14: ...d dark or highly dyed fabrics such as cotton which may be suscep tible to dye loss WHITES Use this cycle for white fabrics and lightly colored clothing Refer to fabric care label for use of liquid chlorine bleach HEAVY DUTY Use this cycle for heavily soiled durable garments ex towels sports gear or fabric tote bags For best soil and stain removal use the hottest water safe for the fabrics being wa...

Page 15: ...le is interrupted while the water is heating the final temperature of the wash water may be lower and sanitation may be reduced As a precaution the washer door is locked once the water temperature reaches 130 F 55 C If the cycle is cancelled during the wash phase and the water temperature is greater than 150 F 66 C an automatic cool down and drain will occur before the door can be opened The wash ...

Page 16: ...mble wash action with auto temp cold water medium spin speed to reduce wrinkling and a freshwater rinse to remove excess dirt and detergent FAST SANITIZE Use the FAST SANITIZE cycle to quickly kill 99 9 of bacteria with no carryover of bacteria between loads No bleach or harsh chemicals are needed but higher temperatures are required Please follow fabric care labels to prevent damage NSF Protolcol...

Page 17: ...ou wish to begin the cycle press select when prompted This main tenance cycle uses hot water and two rinses to remove residue that may cause odor See Inside Routine Cleaning Preventative for detailed information about the CLEAN WASHER cycle IMPORTANT Remove as much pet hair as possible with vacuum pet hair roller or brush to prevent clogging washer drain pump IMPORTANT Follow up with a regular del...

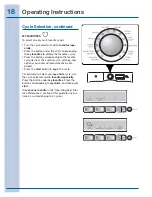
Page 18: ...to the favorite cycle desired The custom cycle settings and options you saved will automatically be dis played Press the start button to begin the cycle For example to select your my shirts cycle turn the cycle selector knob to favorites specialty Press the button under my favorites Press the button corresponding to my shirts and then press start See save as favorite in the Operating User Inter fa...

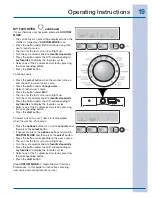
Page 19: ...e selector knob to favorites specialty Press the button under the LCD corresponding to my favorites to display the favorites cycles Select one of the 3 customized cycles by pressing the corresponding button Press the start button To select a user if a user s name is not displayed when the washer is turned on Press the options buttons to scroll to set prefs and then press the select button If neces...

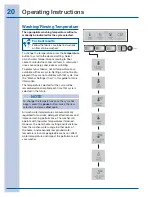
Page 20: ...cle Settings will not be dis played if they are not available with that cycle See the Washer Settings Chart in this guide for more information The temperature selected for the cycle will be remembered and recalled each time that cycle is selected in the future Follow the fabric care label instructions on items to be washed For best results All wash water temperatures are automatically regulated to...

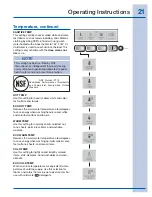
Page 21: ...ormally soiled colorfast cot tons sheets perm press items and washable woolens ECO WARM TEMP Reduces the warm water temperature a few degrees to save energy when washing normally soiled color fast cottons sheets and casual items COLD TEMP Use this setting for lightly soiled brightly colored items knits delicates hand washables and wash able silk ECO COLD TEMP Wash and rinse temperatures are equiva...

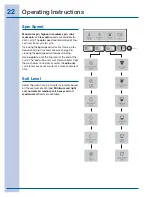
Page 22: ...ds are available for each cycle The spin speed and or duration of final spin vary from cycle to cycle Increasing the spin speed will extract more water decrease drying time and conserve energy De creasing the spin speed will reduce wrinkling Use no spin to omit the final spin at the end of the cycle The load will be very wet Remove items from the wash drum to drip dry or select the spin only cycle...

Page 23: ...y be visible inside drum during a steam wash cycle Steam may not be present during entire steam wash cycle All options selected for the cycle except add steam will be remembered and recalled each time that cycle is selected in the future To prevent unintentional and accidental exposure of delicate material to unexpected steam the add steam option will not be remembered and must be reselected each ...

Page 24: ...ent third party testing and certification organization dedicated to public health safety and environmental protection ADD MORE WATER Increase the water fill level of the agitation portion of any wash cycle STAIN PRETREAT Stain pretreat uses a special 10 minute soak pretreat agitation before the main wash It fills initially with detergent and cold water to prevent protein stains from setting then t...

Page 25: ...o select a wash time convenient to your schedule or during off peak energy hours The start of any cycle can be delayed for 30 min utes to 22 hours Select the delay start option and then press the button under the plus or minus symbols to scroll to the delayed time setting de sired Press the select button and the delay time will be displayed Time will begin counting down when you select start ...

Page 26: ...9 9 9 9 9 9 9 9 9 spin speed maximum spin 9 9 9 9 9 9 9 9 9 9 high spin 9 9 9 9 9 9 9 9 9 9 medium spin 9 9 9 9 9 9 9 9 9 low spin 9 9 9 9 9 9 9 9 minimum spin 9 9 9 9 9 9 no spin 9 9 9 9 soil level maximum soil 9 9 9 9 9 heavy soil 9 9 9 9 9 9 medium soil 9 9 9 9 9 9 9 normal soil 9 9 9 9 9 9 9 9 9 9 9 9 light soil 9 9 9 9 9 9 9 minimum soil 9 9 9 9 9 9 9 9 options add steam 9 9 9 9 9 9 9 9 9 9 9...

Page 27: ...n the installation cycle See SET PREFS in Operat ing User Interface Features for more details USER GUIDES Scroll through this option for the CYCLES GUIDE SETTINGS GUIDE OPTIONS GUIDE and SET PREFS GUIDE for descriptions of the cycles water temperatures spin speeds soil levels cycle options and features for user preferences STAIN GUIDES Scroll through the stain guide to the desired stain category P...

Page 28: ... favorite Press the select button to enter the favorite cycle choice screen Press the button under my favorite 1 See the next page for naming your favorite cycle To name the customized cycle for shirts press my favorite 1 Press the button under ABC to name the favorite cycle alphabetically Use the button under 1A to add numbers foreign language characters or sym bols to the name Rotate the cycle s...

Page 29: ... the button under DELETE to erase incorrect entries There is a blank character between Z and A for inserting spaces in your custom name Pause mo mentarily on this character as you would to insert any other character then continue When the name has been entered press select to save the name To edit names while in CUSTOM MODE turn the washer off by pressing cancel Press any other button to wake the ...

Page 30: ...n If incorrect disconnect hoses and connect to correct inlets according to Installation Instructions CALL SERVICE 877 435 3287 Error can only be corrected by calling a qualified technician 1 877 435 3287 Repeat the INSTALL CYCLE when corrections are completed RESET Press the buttons indicated to restore only cycle set tings reset only factory preferences users language brightness volume etc or res...

Page 31: ...cept the change or press the button under EXIT to return to normal operation without any changes VOLUME Press the button beneath the plus or minus symbols to increase or decrease the volume of the chime Press select to accept the change or press the button under EXIT to return to normal opera tion without any changes LANGUAGE Select English French or Spanish for the display language CYCLE DESCRIPT...

Page 32: ...rum light will come on whenever the door is opened to illuminate the drum during loading and unloading Closing the door turns off the light The drum light will automatically turn off if the door is left open more than 3 minutes To activate the drum light during a cycle press the button under LIGHT The light will stay on during the cycle for 3 minutes To turn it off press the button under LIGHT aga...

Page 33: ...hlorine bleach Dangerous fumes can result Never wash items which have been previously cleaned in washed in soaked in or spotted with gasoline dry cleaning solvents or other flammable or explosive substances because they give off vapors that could ignite or explode Never use highly flammable solvents such as gasoline inside the home Vapors can explode on contact with flames or sparks FOR SUCCESSFUL...

Page 34: ...ain Replace towels under stain frequently Rinse thoroughly Wash using hottest water safe for fabric Ink Some inks may be impossible to remove Washing may set some inks Use prewash stain remover denatured alcohol or nonflammable dry cleaning fluid Mildew scorch Wash with chlorine bleach if safe for fabric Or soak in oxygen bleach and hot water before washing Badly mildewed fabrics may be permanentl...

Page 35: ... could entice children to hang on the door or crawl inside the washer If there are no small children present you may leave the door ajar to prevent mildew and odor build up Immediately follow up with a spin only cycle Select extra rinse on max spin speed with no detergent or bleach to help clear any residual bleach or cleaner left after the CLEAN WASHER cycle For best results If installed remove t...

Page 36: ...OTE Detergent and fabric softener may build up in the dispenser drawer Residue should be removed once or twice a month CLEANING DISPENSER DRAWER AREA Care Cleaning Other Inside Routine Cleaning Preventative Remove the drawer by pulling the drawer out until it stops Reach back into the left rear corner of the drawer cavity and press down firmly on the lock tab Pull out the drawer Remove the insert ...

Page 37: ... be more effectively cleaned by spraying a Bleach Cleaner on a scrub brush soft sponge or towel and scrubbing If odor is still left after bleach cycle s and bleach cleaner open the detergent drawer and pour one 1 pouch of TIDE WASHING MACHINE CLEANER in detergent drawer Select CLEAN WASHER cycle as above and start the washer IMPORTANT Always wear rubber or latex gloves and protect floor and clothi...

Page 38: ...red in an area where freezing can occur or moved in freezing temperatures follow these winterizing instructions to prevent damage to the washer Turn off water supply faucets 1 Disconnect hoses from water supply and drain 2 water from hoses Vacuum out each water sup ply inlet with a waterproof utility vac to ensure water valves are completely drained Damage will occur if water in water inlet valves...

Page 39: ...ips tears and seams cannot be mended Never pour chlorine bleach directly on fabric Check condition of items before washing See Oper ating Your steps 2 and 5 Lint Incorrect sorting Tissues left in pocket Overloading the washer Not enough detergent Undissolved detergent has left a residue resembling lint Static cling is attracting lint Load washed too long Reduce load size Rewash using correct water...

Page 40: ...ciency detergent along with recom mended dosage Remove wash load immediately upon cycle completion Run dehumidifier in laundry room Avoid overfilling detergent and fabric softener com partments of dispenser Dry the inside of washer and gasket after every run Residue stains build up mold or mildew stains in dispenser drawer Moisture in the washer Use of non HE detergent Overdosing detergent Remove ...

Page 41: ...Reset circuit breaker or replace fuse Do not increase fuse capacity If problem is a circuit overload have it corrected by a qualified electrician If problem is a power outage call local electric company Water supply faucets are not turned on Turn on water supply faucets Motor is overheated Washer motor will stop if it becomes overheated It will automatically restart after a cool down period of up ...

Page 42: ...m washer Measure hot water temperature at nearby faucet with candy or meat thermometer Water temperature should be at least 120 F 49 C Adjust water heater as neces sary Hot water is being used elsewhere in the house Avoid using hot water elsewhere before or during washer use There may not be enough hot water avail able for proper cleaning If problem persists your hot water system may be unable to ...

Page 43: ...d to 12 floors cabinets walls etc Damages caused by services performed by unauthorized service companies use of parts other than genuine Elec 13 trolux parts or parts obtained from persons other than authorized service companies or external causes such as abuse misuse inadequate power supply accidents fires or acts of God DISCLAIMER OF IMPLIED WARRANTIES LIMITATION OF REMEDIES CUSTOMER S SOLE AND ...

Page 44: ...44 Notes ...

Reviews: