


3.
1 a
3.
2d
3.
2a
3.
2a
3.
3b
3.
3a
3.
3c
3.
3d
3.
2a
3.
2a
3.
3a
3
XBM10 GB 11 2018
Use, safety
ATTENTION!!
Clean the machine properly prior to its first use
Never introduce the hand into the work zone when the machine is operating: risk of injury. Neutralising or modifying the safety
systems is formally prohibited: Risk of permanent injury!!!!
Check that the safety devices operate correctly each time before using (see paragraph on «safety system adjustments»).
Never put a hand, a hard or frozen object in the appliance
For health and safety reasons, always use a washable or disposable strong head covering that covers the hair completely.
3.1 OPERATION - SAFETY
• The safety of the user is guaranteed by:
- The safety guard which allows the tool to be maintained at a
standardised distance and which stops the motor when it is
raised.
- The machine only starting when the support is in the work
position and the safety guard lowered.
- A time of less than three seconds for the machine to stop
regardless of the speed.
- A no volt release system which means that the B, F or G button
need to be pressed to restart the machine.
- Protection against the motor over-heating, temperature probe.
- Compliance with the instructions given in this manual for using,
cleaning and maintaining the machine.
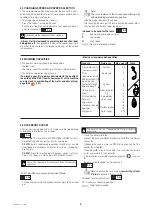
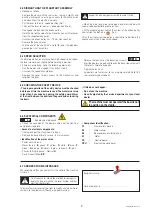
Control panel:
A
STOP button
B
Low speed
C
Decrease timer time
D
Display timer
E
Increase timer time
F
High speed
G
Pulse ON button
• The mixer can only be started normally if the safety guard bowl
cradle assembly is in the work position the bowl is in position
on the cradle.
Always move the safety guard by its handle.
a) Operation:
- Press button
B
or
F
to start at low speed or high speed.
c) Timed operation:
- Use buttons
C
or
E
,
D
showing the time selected and then
press
B
or
F
.
Note:
- To change the time remaining, press key
A
and then
alter it with keys
C
or
E
; restart the cycle by pressing
key
B
or
F.
- The time selected at the start of the cycle is held in memory.
- To stop permanently a cycle in progress, press key A twice.
d) Continuous operation:
1- Selection of «-----» on
E
by pressing and holding down key
C
.
2- Start by pressing key
B
or
F
.
3- Stop by pressing key
A
.
3.2 FITTING THE BOWL AND TOOLS
• Raise the safety guard using the handle, and the cradle will
be lowered automatically.
- Place a tool inside the bowl.
- Push the tool onto the tool holder spindle, then turn it anticlo-
ckwise ( ) to lock it in position.
- Push the safety guard back by means of the handle, and the
bowl will be automatically locked into position.
Note: If the bowl is not fitted correctly, it will not be
possible to close the safety guard completely. Do not
force it: refit the bowl correctly on the 2 pins.
3.3 FITTING - REMOVING THE SAFETY GUARD
• To remove the safety guard, proceed as follows:
1) Raise the safety guard to its upper stop using the handle.
2) Turn the two lateral handles towards the rear so that the two
safety guard rods are aligned with the two holes in the handles.
3) Pull the guard horizontally to remove it.
• To fit the guard:
1) Make sure that the holes in the handles are lined up with the
rod holes.
2) Insert the two guard rods into the handles at the same time.
3) Turn the two handles towards the front to lock the guard into
position.
4) Lower the guard using the handle.
§
5.3
Any other use than that described in this manual will not be consi-
dered normal by the manufacturer.
Do not use the machine without
the bowl.


