background image

Installation manual

43

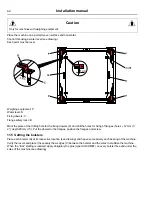
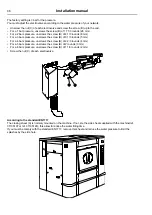
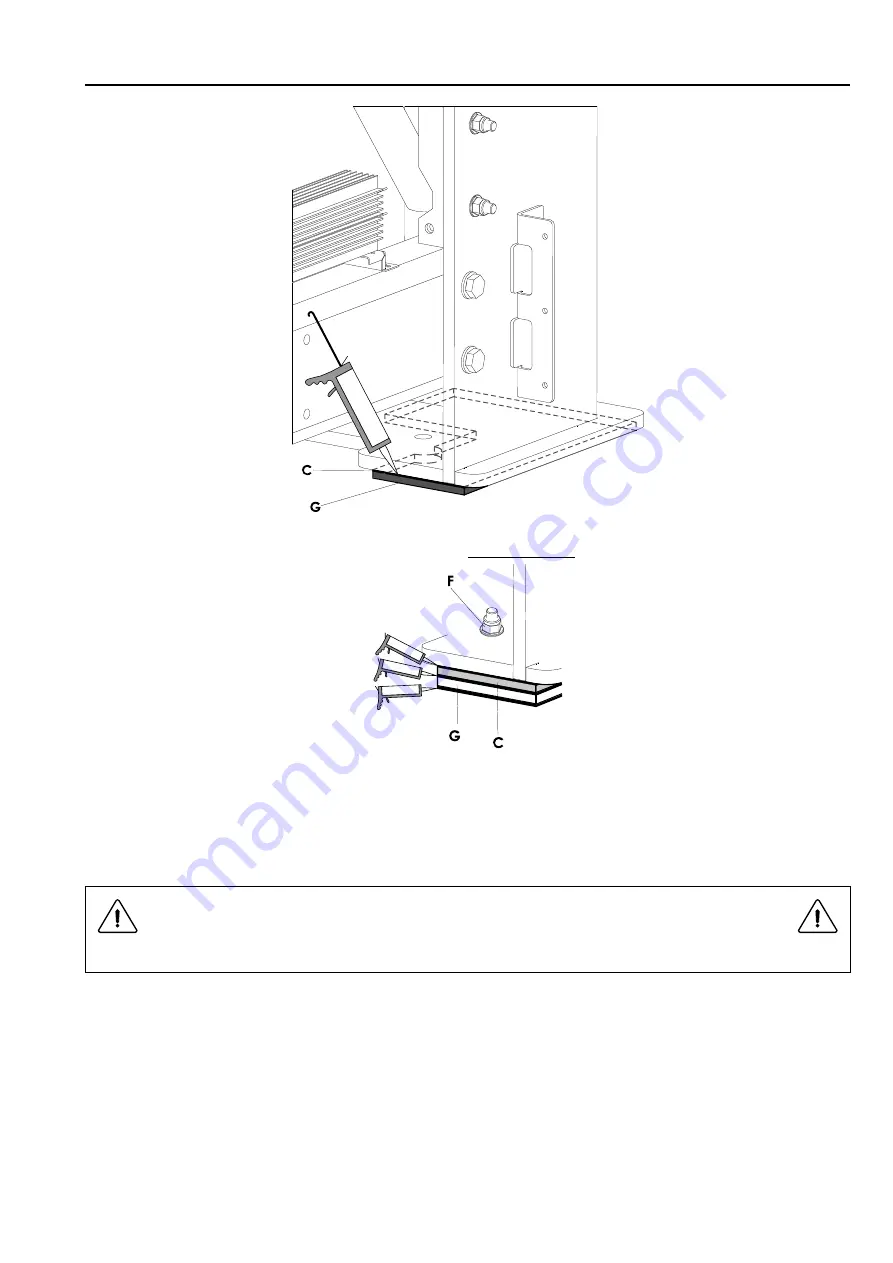
The indicated faces on the drawing must be aligned. Aplly equally glue to each face of the used wedges.
Put the machine in position and secure it with the bolts (F)

without tighten

.

Electrical safety device

: As rubber is a very good electric insulating material, the earthing of the machine is

mandatory.

To displace the machine sealed with bolsters :

You must introduce a flat chisel between the ground and the bol-

sters by heaving the machine; you have to remove them and avoid to pull off the ground.

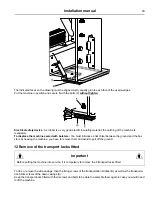
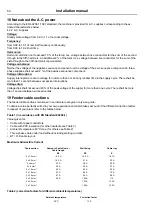
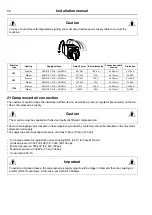
12 Remove of the transport locks fitted

Important

Before putting the machine into service, it is compulsory to remove the 4 transport locks fitted.

To do so, remove the side casings, then the fixing screws of the transportation bridles (B), as well as the transporta-
tion bridle screws of the down casings (A).
Keep the transport locks fitted with their screws and bolts to be able to assemble them again in case you would need
to lift the machine.

Summary of Contents for WP4 1100H

Page 1: ...Installation manual Washer extractors WP4 WPB4 700 900 1100H original instructions 05201052 EN ...

Page 2: ......

Page 3: ...llation 39 11 1 Unpacking 39 11 2 Installation 39 11 3 Installing the shock absorber runners 39 11 4 Instructions for securing the machine on the ground 40 11 5 Setting the bolsters 42 12 Remove of the transport locks fitted 43 13 Drain connection 44 14 Waters connections 45 15 Liquid detergents connection 47 15 1 Connection scheme of liquid detergents 48 15 2 Electrical liquid detergents connecti...

Page 4: ......

Page 5: ...ons CAUTION READ THIS ENTIRE MANUAL BEFORE USAGE This machine should be installed in conformance to the health and safety regulations and only used in a sufficiently aerated area Check the instructions before installing or using the machine ...

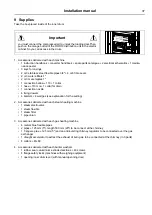
Page 6: ...drum please follow these actions 1 connect compressed air 2 Remove the side housing cabinet 3 Push on the orange button of the D9 D10 distribution unit in the electric cabinet see drawing below 4 Open the loading door 5 Open the drum doors with precautions maintain the 2 doors 6 Get the package and instructions ...

Page 7: ...ided In accordance with the wiring rules mount a multi pole switch prior to the machine to facilitate installation and service operations In order to prevent damage to the electronics and other parts that may occur as the result of condensation the machine should be placed in room temperature for 24 hours before being used for the first time In case of a gas heated machine do not assemble the mach...

Page 8: ...T Sound pressure level is found in Technical data CAUTION Your machine is equipped with an automatic weighing system which weighs the laun dry during the loading and unloading cycle For proper operation of this system you should not open the tank doors for the all duration of the wash program initiated even if errors occurs IMPORTANT Never try to open the outer drum door before the complete stop o...

Page 9: ...uter drum doors on yours sides Risk of cutting with the edge of the metal plate CAUTION The machine can work without the protective casing when the electric supply is not cut off Interlock the main isolating switch with a padlock Close the steam or gas inlet valves IMPORTANT Ensure that the machine is not loaded beyond its maximum capacity 70 kg 154 lb for WP B 4700 90 kg 198 lb for WP B 4900 and ...

Page 10: ...rs Handle with care Consult the use and first aid advice on the packing Do not dispose pure products in the environment WARNING The use and handling of chemical products such as detergent chlorine acids antilim ing agents etc may create hazards for health and environment the following precau tions should be taken Do not breathe the dusts or steam Avoid contact with skin or eyes may cause burns In ...

Page 11: ...Installation manual 11 1 1 Symbols Caution Caution presence of dangerous current Read the instructions before using the machine ...

Page 12: ...tallation X O Normal use X X X X Adjustments O X Routine cleaning O X X O Extraordinary cleaning O X X O Maintenance O X O Dismantling O X O Scrapping O X O Legend X PPE required O PPE available or to be used if necessary Normal use Safety footwear must be defined for a use on a wet floor And use glasses and gloves to manipulate chemical products 1 3 Preliminary instructions WARNING Risk of jammin...

Page 13: ... other countries we recommend that you comply with the legislation in force in the country where the ma chine is installed In France all owners of packing waste producing a weekly volume below 1100 litres can forward these to the local collection and treatment department If exceeding this volume the owners of packing waste will ensure their valu ation by reuse recycling or any other action aiming ...

Page 14: ...ng of this instruction handbook schematically shows the locking and tagging procedure de scribed below If you wish you can detach this insert and display it close to the machine to remind maintenance per sonnel of the safety instructions Always respect items 2 3 and 4 carefully before doing any repair or maintenance work on the machine Put the main switch to Off and lock the handle with a padlock ...

Page 15: ...Installation manual 15 Close and carefully lock the fixed protectors Unlock the stop valves and the main switch ...

Page 16: ...tion To handle the machine you must imperatively reassemble the transport bridles and dis engage the load cells proceed in reverse order or remove of the transport locks fitted 4 1 Lifting with a fork lift truck Warning You should never handle the machine in its longitudinal side any other than shown on the drawing below with a fork lift truck Important risk of parts deterioration for those fixed ...

Page 17: ... done with handling straps minimum capacity 3000 daN 6600 lb which bear weight of the machine Caution Make sure to place the straps correctly to avoid any bending of parts of the machine Caution In order to avoid any bending of casings you should never climb and stand on top of the machine ...

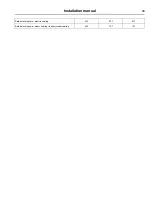
Page 18: ...PB4 900 1670 66 1970 78 2330 92 Washer extractor type WP WPB4 1100 1680 66 2180 86 2330 92 5 2 Weight Weight in kg lb machine crate Electrical heating Steam Thermal fluid heating Washer extractor type WP WPB4 700 2900 6395 2900 6395 Washer extractor type WP WPB4 900 3100 6836 3100 6836 Washer extractor type WP WPB4 1100 3280 7233 3280 7233 Precise weight depends on accessories fitted ...

Page 19: ...Installation manual 19 6 Technical characteristics 6 1 Washer extractor type 700 One door WP4 700H Drawing 07100140 Barrier WPB4 700H Drawing 07100141 ...

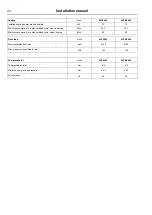
Page 20: ...stallation manual Washer extractor type 700 one door Diagram N 07100140 and 07100141 Units WP4 700 WPB4 700 Drum diameter mm 1050 41 33 1050 41 33 Drum length mm 794 31 26 794 31 26 Drum volume litre 685 685 ...

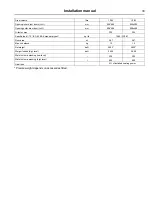
Page 21: ...Specific load 1 10 ISO 93 98 4 standard type C kg lb 68 5 151 52 Floor area m 2 04 2 04 Max unbalance kg 15 15 Net weight daN 2530 2530 Weight loaded high level daN 3010 3010 Water volume washing low level l 185 185 Water volume washing high level l 370 370 Heat loss 3 of installed heating power Precise weight depends on accessories fitted ...

Page 22: ...essure mm BSP DN32 1 1 4 DN32 1 1 4 Recommended steam pressure kPa 300 600 300 600 Recommended steam pressure low pressure heating kPa less than 50 less than 50 Functioning limits for steam valve not for low pressure kPa 100 600 100 600 Steam instantaneous flow rate at 600 kPa kg h 240 240 Steam consumption for a normal cycle ISO 93 98 4 standard type C kg at 600 kPa 24 24 Steam consumption for a ...

Page 23: ...Installation manual 23 Rated electric power electric heating kW 65 7 65 7 Rated electric power steam heating indirect steam heating kW 11 7 11 7 ...

Page 24: ...ric heating kWh 17 8 17 8 Electric consumption for a standardized cycle steam heating kWh 1 8 1 8 Floor load Units WP4 700 WPB4 700 Max transmitted floor load daN 3600 3600 Max pressure transmitted to floor kPa 144 144 Compressed air Units WP4 700 WPB4 700 Compressed air inlet mm 6 8 6 8 Min max compress air pressure bar 5 5 7 5 5 7 Consumption l h 50 50 ...

Page 25: ...Installation manual 25 6 3 Washer extractor type 900 One door WP4 900H Drawing 07100138 ...

Page 26: ...tallation manual Barrier WPB4 900H Drawing 07100139 Washer extractor type 900 Diagram N 07100138 and 07100139 Units WP4 900 WPB4 900 Drum diameter mm 1050 41 33 1050 41 33 Drum length mm 1026 40 39 1026 40 39 ...

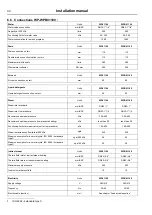
Page 27: ... max 300 300 Specific load 1 10 ISO 93 98 4 standard type C kg lb 88 5 195 2 Floor area m 2 35 2 35 Max unbalance kg 15 15 Net weight daN 2725 2725 Weight loaded high level daN 3345 3345 Water volume washing low level l 220 220 Water volume washing high level l 440 440 Heat loss 3 of installed heating power Precise weight depends on accessories fitted ...

Page 28: ... pressure mm BSP DN32 1 1 4 DN32 1 1 4 Recommended steam pressure kPa 300 600 300 600 Recommended steam pressure low pressure heating kPa less than 50 less than 50 Functioning limits for steam valve not for low pressure kPa 100 600 100 600 Steam instantaneous flow rate at 600 kPa kg h 240 240 Steam consumption for a normal cycle ISO 93 98 4 standard type C kg at 600 kPa 32 32 Steam consumption for...

Page 29: ...Installation manual 29 Rated electric power electric heating kW 87 7 87 7 Rated electric power steam heating indirect steam heating kW 15 7 15 7 ...

Page 30: ...ric heating kWh 24 3 24 3 Electric consumption for a standardized cycle steam heating kWh 2 3 2 3 Floor load Units WP4 900 WPB4 900 Max transmitted floor load daN 4100 4100 Max pressure transmitted to floor kPa 164 164 Compressed air Units WP4 900 WPB4 900 Compressed air inlet mm 6 8 6 8 Min max compress air pressure bar 5 5 7 5 5 7 Consumption l h 50 50 ...

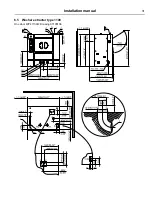
Page 31: ...Installation manual 31 6 5 Washer extractor type 1100 One door WP4 1100H Drawing 07100136 ...

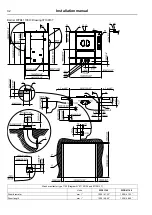
Page 32: ...llation manual Barrier WPB4 1100H Drawing 07100137 Washer extractor type 1100 Diagram N 07100136 and 07100137 Units WP4 1100 WPB4 1100 Drum diameter mm 1050 41 33 1050 41 33 Drum length mm 1256 49 45 1256 49 45 ...

Page 33: ... max 300 300 Specific load 1 10 ISO 93 98 4 standard type C kg lb 108 3 238 87 Floor area m 2 67 2 67 Max unbalance kg 15 15 Net weight daN 2850 2850 Weight loaded high level daN 3608 3608 Water volume washing low level l 300 300 Water volume washing high level l 600 600 Heat loss 3 of installed heating power Precise weight depends on accessories fitted ...

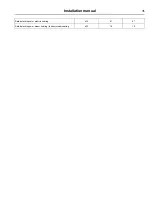
Page 34: ...low pressure mm BSP DN32 1 1 4 DN32 1 1 4 Recommended steam pressure kPa 300 600 300 600 Recommended steam pressure low pressure heating kPa less than 50 less than 50 Functioning limits for steam valve not for low pressure kPa 100 600 100 600 Steam instantaneous flow rate at 600 kPa kg h 240 240 Steam consumption for a normal cycle ISO 93 98 4 standard type C kg at 600 kPa 36 36 Steam consumption ...

Page 35: ...Installation manual 35 Rated electric power electric heating kW 91 91 Rated electric power steam heating indirect steam heating kW 19 19 ...

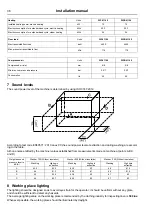
Page 36: ...level at extraction and during washing are accord ing to the table Airbone noise emitted by the machine values established from measurements made on machine at points A B C and D Weighted sound pressure level in dB A Washer 700 Without insulation Washer 900 Without insulation Washer 1100 Without insulation Washing High spin extraction Washing High spin extraction Washing High spin extraction A 63 ...

Page 37: ...ollar for drain 1 connection nozzle 4 fixing dowels 4 bolsters 4 wedges see explanation for the setting 2 Accessories delivered with each steam heating machine 1 steam electrovalve 1 steam flexible 1 steam filter 1 pipe union 3 Accessories delivered with each gas heating machine 4 meters blue flexible pipes 2 pipes 125 mm 5 length 500 mm 20 to be connect at the chimney 1 T square pipe 125 mm 5 and...

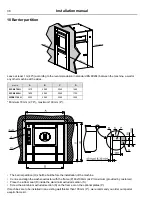
Page 38: ...0 Minimum 70 mm 2 76 maximum 100 mm 4 The barrier partition O shall be built before the installation of the machine Centre and align the washer extractor with the frame P 60x100mm 2x4 maximum provided by customer Place the rubber seal R inside the aluminium extruded section S Screw the aluminium extruded section S on the frame or on the optional plates P If machines are to be installed in an exist...

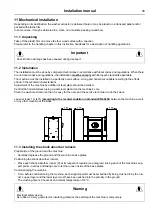
Page 39: ...ition of level plate should be avoided Control the horizontal level using a water level placed on the machine s sole Place the washer extractor so that it is easy for the user and the service technician to do their work Leave at least 1 m 40 according to the recommendation in standard EN 60204 between the machine a wall or any other machine at the sides 11 3 Installing the shock absorber runners P...

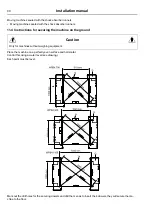
Page 40: ... securing the machine on the ground Caution Only for machines without weighing equipment Place the machine on a perfectly even surface and horizontal Control this using a water level see drawing Each point must be level Mark out the drill holes for the securing dowels and drill them so as to insert the 4 dowels they will secure the ma chine to the floor ...

Page 41: ...Installation manual 41 Put the machine in position and secure it with the dowels without tighten Bolsters G Water level N ...

Page 42: ...ls C and drill the holes for fixing of flanges holes 12 mm 1 2 depth 80 mm 3 Put the dowels in the flanges position the flanges and screw 11 5 Setting the bolsters Place each bolster G at its respective location see drawing and heave successively each bearing of the machine Verify the levels and place if necessary the wedges C between the bolster and the soles to stabilize the machine When the tri...

Page 43: ...ntroduce a flat chisel between the ground and the bol sters by heaving the machine you have to remove them and avoid to pull off the ground 12Remove of the transport locks fitted Important Before putting the machine into service it is compulsory to remove the 4 transport locks fitted To do so remove the side casings then the fixing screws of the transportation bridles B as well as the transporta t...

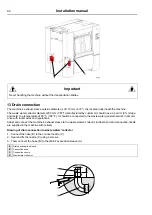
Page 44: ...94 F It should be connected to the waste water general network in accord ance with local codes and regulations Adapt and connect the machine s exhaust sleeve to the waste waters collector rubber bend and connection nozzle are supplied in the machine with collars Drawing of drain connection to waste waters collector 1 Connect the hose B to the connect nozzle C 2 Seal and fix the nozzle C using 2 sc...

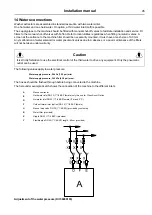
Page 45: ...taken under warranty Caution It is strictly forbidden to use the electrical control of the third water to drive any equipment Only the pneumatic outlet can be used The following values apply to water pressure Water supply pressure 50 kPa 7 25 psi mini Water supply pressure 300 kPa 43 5 psi maxi The hoses should be flushed through before being connected to the machine The hereunder example sketch s...

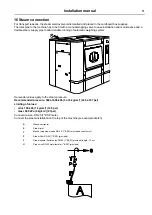
Page 46: ...w B of 3 1 3 rounds 5 mm For a 4 bars pressure unscrews the screw B of 2 2 3 rounds 4 mm For a 5 bars pressure unscrews the screw B of 2 rounds 3 mm For a 6 bars pressure unscrews the screw B of 1 1 3 rounds 2 mm Screw the nut C of each electrovalve According to the standard EN1717 The closing sheet A is normaly mounted on the machine If not ste the side sheet supplied with the machine ref 3110519...

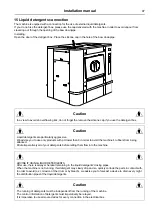
Page 47: ... products with pH lower than 9 in order to avoid the machine s rubbers from being attacked Dilute imperatively all of your detergents before letting them flow into the machine ADVISE IF USING LIQUID DETERGENTS After use there is always chemical remaining in the liquid detergents dosing pipes When the machine is not running this detergent may slowly drip and so quickly corrode the parts in contact ...

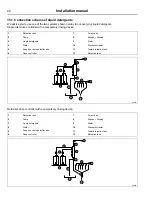
Page 48: ...e 2 Pump 8 Scoops Rinsing 3 Liquid detergents 9 Water 4 Water 10 Washer extractor 5 Soap box rinsing electrovalve 11 Toward retention tank 6 Dose controller 12 Retention tank d2033 Multi inlet dose controller with a compulsory rinsing device 1 Retention tank 7 3 way valve 2 Pump 8 Scoops Rinsing 3 Liquid detergents 9 Water 4 Water 10 Washer extractor 5 Soap box rinsing electrovalve 11 Toward reten...

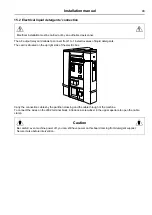
Page 49: ...rgents The card is situated on the up right side of the electric box Carry the connection cables by the partition crossing and the cable through of the machine To connect the wires on the J802 terminal block introduce a screwdriver in the upper aperture to open the cable clamp Caution Be carefull even machine power off you can still have power on this board coming from detergent supplier Secure it...

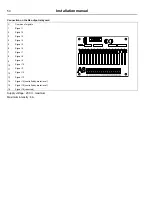
Page 50: ...1 2 Signal 2 3 Signal 3 4 Signal 4 5 Signal 5 6 Signal 6 7 Signal 7 8 Signal 8 9 Signal 9 10 Signal 10 11 Signal 11 12 Signal 12 13 Signal 13 14 Signal 14 controlled by water level 15 Signal 15 controlled by water level 16 Signal 16 reserved Supply voltage 250 V maximum Maximum intensity 6 A ...

Page 51: ...stem Hereunder values apply to the steam pressure Recommended pressure 300 at 600 kPa 3 at 6 kg cm 43 5 at 87 psi Limiting of values mini 100 kPa 1 kg cm 14 5 psi maxi 600 kPa 6 kg cm 87psi Connection size DN 25 1 BSP male Connect the steam installation on the top of the machine see example sketch A Washer extractor S Steam inlet Y Manual stop wheel valve DN 25 1 BSP provided by customer P Steam f...

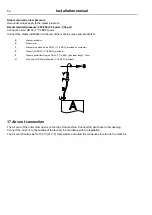
Page 52: ...valve DN 32 1 1 4 BSP provided by customer P Steam filter DN 32 1 1 4 BSP provided F Steam special flexible pipe DN 32 1 1 4 BSP provided length 70 cm U Pipe union DN 32 male female 1 1 4 BSP provided 17Air vent connection The air vent of the outer drum opens on the top of the machine Connect the bent hose to this opening Connect the air vent to the outside of the laundry in accordance with the le...

Page 53: ...Installation manual 53 ...

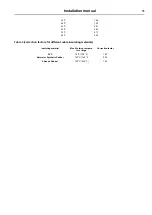
Page 54: ...essive interruptions Voltage dips Voltage dips shall not exceed 20 of the peak voltage of the supply for more than one cycle There shall be more than 1 second between successive dips 19Feeder cable sections The feeder cable sections mentioned in our literature are given only as a guide To obtain a value perfectly suited to your own application and which takes account of the different correction fa...

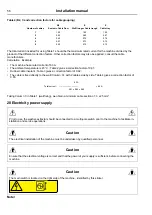
Page 55: ...0 82 55 C 0 71 60 C 0 58 Table 3 correction factors for different cable insulating materials Insulating material Max Working tempera ture range Correction factor PVC 70 C 158 F 1 00 Natural or Synthetic Rubber 760 C 140 F 0 92 Silicone Rubber 120 C 248 F 1 60 ...

Page 56: ...cable insulant Table 3 gives a correction factor of 0 92 The cable is fixed directly to the wall Column C with 2 cables side by side Table 4 gives a correction factor of 0 85 60 A Total current _________________ 84 A 0 91 x 0 92 x 0 85 Taking Column C in Table 1 wall fixing we obtain a minimum cable section of 3 x 25 mm 20Electricity power supply Prior to use the washer extractor should be connect...

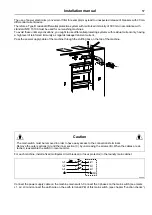
Page 57: ...rds leakage transient current Pass the power supply cable of the machine through the stuffing box on the top of the machine Caution The main switch must be removed in order to have easy access to the connections terminals Remove the outer sections A and the inner section C by unscrewing the screws B When the cables are at tached reassemble the switch in reverse order For each machine install a fix...

Page 58: ... connection The customer should arrange the installation of filter device as well as a pressure regulator manometer on the ma chine s compressed air supply Caution The machine must be supplied with dried and perfectly filtered compressed air The manual stopping valve lockable in closed position provided by customer should be installed on the machine s compressed air supply The supply pipe should a...

Page 59: ...e working tests The operating inspection must be done by an approved technician Magnetic detector for tank door safety Caution Before starting the appliance please remove the bottom guard and check that the magnetic detector is correctly aligned For barrier machines repeat this step on the second door ...

Page 60: ...on Switch on the machine s main switch and check the voltage on the three phases 3 x 400 volts Check the direction of rotation of the cage during spinning The inner drum should rotate as shown by the arrow on the drawing below Check this point especially if you have changed the machine s motor or frequency converter Washer extractor barrier type Washer extractor standard type one door ...

Page 61: ...ng by programming a final temperature Check that the steam valve opens or the heating element relay reacts as appropriate Check that the detergents container is working as they should Check the water and steam connections and the drain valve for signs of any leakages Empty the water from the machine and open its door Automatic operation Check that the external switch or switches are switched on an...

Page 62: ... you guidance and recommen dations when washing different textiles 23 1 Washing The tub symbolizes washing Symbols Max washing tem perature in C Mechanical action 95 normal 95 mild 70 normal 60 normal 60 mild 50 normal 50 mild 40 normal 40 mild 40 very mild 30 normal 30 mild 30 very mild 40 wash by hand do not wash 23 2 Bleaching The triangle symbolizes bleaching ...

Page 63: ...o not put in a tumble dryer 23 4 Ironing The iron symbolizes the domestic ironing and pressing process Symbols Explanation Max temperature 200 C Max temperature 150 C Max temperature 110 C The steam can cause irreversible damages Do not iron 23 5 Dry or water cleaning The circle symbolizes dry or water cleaning Symbols Explanation Normal dry cleaning with perchloroethyl solvent of hydrocarb Mild d...

Page 64: ...64 Installation manual Mild dry cleaning with solvent of hydrocarbon Do not dry clean Normal water cleaning Mild water cleaning Very mild water cleaning ...

Page 65: ...in gallon U S A 1 gal 3 785 33 dm or l 1 gal 231 cu in horse power 1 HP 0 745 7 kW 1 HP 1 013 9 ch inch 1 in 25 4 mm joule 1 J 0 000 277 8 Wh 1 J 0 238 92 cal kilogramme 1 kg 2 205 62 lb kg cm 1 kg cm 98 066 5 Pa 1 kg cm 0 980 665 bar 1 kg cm 10 000 mm H2O 1 kg cm 735 557 6 mm Hg pound 1 lb 453 592 37 g meter 1 m 1 093 61 yd 1 m 3 280 83 ft 1 m 39 37 in cubic meter 1 m 1 000 dm 1 m 35 214 7 cu ft ...

Page 66: ......

Page 67: ......

Page 68: ...Electrolux Professional AB 341 80 Ljungby Sweden www electroluxprofessional com ...

Reviews: