- 2 -
- 3 -
TABLE OF CONTENTS
IMPORTANT SAFETY INSTRUCTIONS ........................................................................................4
WHAT’S INCLUDED ................................................................................................................6
FEATURES .............................................................................................................................6
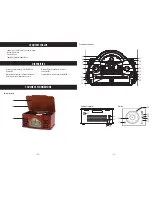
BUTTONS AND CONNECTIONS .................................................................................................6
PREPARATION FOR USE ..........................................................................................................9
UNPACKING AND SETUP .........................................................................................................9
POWER SOURCE ....................................................................................................................9
OPERATION ...........................................................................................................................10
RAISING AND LOWERING THE LID IMPORTANT .........................................................................10
PROTECT YOUR FURNITURE ....................................................................................................10
HEADPHONES........................................................................................................................10
LISTENING TO THE RADIO ......................................................................................................10
AUX IN OPERATION ................................................................................................................11
INSERTING AND PLAYING A CD ...............................................................................................11
RANDOM PLAYBACK ..............................................................................................................11
REPEAT PLAYBACK .................................................................................................................12
PROGRAMMED PLAYBACK ......................................................................................................12
PLAYING RECORDS.................................................................................................................13
CHANGING THE STYLUS ..........................................................................................................13
REPLACING THE STYLUS .........................................................................................................14
IMPORTANT! .........................................................................................................................14
CARE AND MAINTENANCE ......................................................................................................15
TO REPLACE THE CARTRIDGE ..................................................................................................15
CARING FOR COMPACT DISCS ..................................................................................................15
TONE ARM ADJUSTMENT ........................................................................................................16
MAKING THE ADJUSTMENT .....................................................................................................16
WARRANTY ...........................................................................................................................17
INSTRUCTIONS DE SÉCURITÉ IMPORTANTES .............................................................................18
CE QUI EST INCLUS ................................................................................................................20
DISPOSITIFS .........................................................................................................................20
TOUCHES ET CONNEXIONS ......................................................................................................20
PRÉPARATION POUR L’UTILISATION.........................................................................................23
DÉBALLAGE ET INSTALLATION ................................................................................................23
SOURCE D’ALIMENTATION ......................................................................................................23
UTILISATION .........................................................................................................................24
LEVER ET BAISSER LE COUVERCLE IMPORTANT ........................................................................24
PROTÉGER VOS MEUBLES .......................................................................................................24
ÉCOUTEURS ..........................................................................................................................24
ÉCOUTER LA RADIO ...............................................................................................................24
UTILISER LA FONCTION AUX IN ...............................................................................................25
INSÉRER ET LIRE UN CD .........................................................................................................25
LECTURE ALÉATOIRE ..............................................................................................................25
LECTURE RÉPÉTÉ ...................................................................................................................26
LECTURE PROGRAMMÉE .........................................................................................................26
LECTURE DE DISQUES ............................................................................................................27
CHANGER LE STYLET ..............................................................................................................27
REMPLACER LE STYLET ..........................................................................................................28
IMPORTANT! .........................................................................................................................28
SOIN ET ENTRETIEN ...............................................................................................................29
POUR REMPLACER LA CARTOUCHE ..........................................................................................29
PRENDRE SOIN DE DISQUES COMPACTS ...................................................................................29
RÉGLAGE DU BRAS DE LECTURE ..............................................................................................30
FAIRE L’AJUSTEMENT .............................................................................................................30
GARANTIE .............................................................................................................................31
TABLE DES MATIÈRES
Summary of Contents for WINSTON EANOS501
Page 17: ...electrohome com ...


