


ELECTRO FREEZE Soft Serve Model 30RMT
28
184955
123456789012345
123456789012345
123456789012345
123456789012345
123456789012345
123456789012345
123456789012345
123456789012345
123456789012345
123456789012345
123456789012345
123456789012345
123456789012345
123456789012345
123456789012345
123456789012345
123456789012345
123456789012345
123456789012345
123456789012345
123456789012345
123456789012345
123456789012345
123456789012345
123456789012345
123456789012345
123456789012345
123456789012345
123456789012345
123456789012345
123456789012345
123456789012345
123456789012345
123456789012345
123456789012345
123456789012345
123456789012345
123456789012345
123456789012345
123456789012345
123456789012345
123456789012345
123456789012345
123456789012345
123456789012345
123456789012345
123456789012345
123456789012345
123456789012345
123456789012345
123456789012345
123456789012345
123456789012345
123456789012345
123456789012345
123456789012345
123456789012345
123456789012345
123456789012345
123456789012345
123456789012345
123456789012345
123456789012345
123456789012345
123456789012345
123456789012345
123456789012345
123456789012345
123456789012345
123456789012345
123456789012345
123456789012345
123456789012345
123456789012345
123456789012345
123456789012345
123456789012345
123456789012345
123456789012345
123456789012345
123456789012345
123456789012345
123456789012345
123456789012345
123456789012345
123456789012345
123456789012345
123456789012345
123456789012345
123456789012345
123456789012345
123456789012345
123456789012345
123456789012345
123456789012345
123456789012345
123456789012345
123456789012345
123456789012345
123456789012345
123456789012345
123456789012345
123456789012345
123456789012345
123456789012345
123456789012345
123456789012345
123456789012345
123456789012345
123456789012345
123456789012345
123456789012345
123456789012345
123456789012345
123456789012345
123456789012345
123456789012345
123456789012345
123456789012345
123456789012345
123456789012345
123456789012345
123456789012345
123456789012345
123456789012345
123456789012345
123456789012345
123456789012345
123456789012345
123456789012345
123456789012345
123456789012345
123456789012345
123456789012345
123456789012345
123456789012345
123456789012345
123456789012345
123456789012345
123456789012345
123456789012345
123456789012345
123456789012345
123456789012345
123456789012345
123456789012345
123456789012345
123456789012345
123456789012345
123456789012345
123456789012345
123456789012345
123456789012345
123456789012345
123456789012345
123456789012345
123456789012345
123456789012345
123456789012345
123456789012345
123456789012345
123456789012345
123456789012345
123456789012345
123456789012345
123456789012345
123456789012345
123456789012345
123456789012345
123456789012345
123456789012345
123456789012345
123456789012345
123456789012345
123456789012345
123456789012345
123456789012345
123456789012345
123456789012345
8.1
Sanitizing Instructions
(continued)
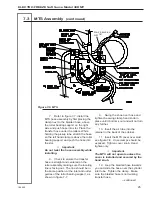
8.2
Priming
Priming the freezer removes all excess air and sanitizer from the freezing cylinders
and sets the proper overrun for the first cylinder of product. Follow these directions
for each cylinder:
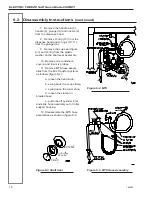
5. On the drip tray place an empty
container under each dispensing head.
6. Open both plungers and air
bleed plugs.
7. Turn the MTS switches to “ON”
and allow the mix to push the remaining
sanitizer from the freezer.
8. Close the plungers when pure
mix is being expelled.
Important:
Failure to completely remove sani-
tizer or water from the freezing cylin-
ders before placing in “AUTO” will
damage the freezer.
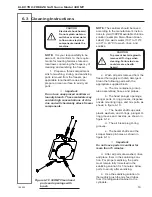
9. When pure mix is coming out of
the air bleed plug opening in the bottom
of the head, close the air bleed plug.
Wait for the MTS to fill the cylinders and
shut off.
10. After each cylinder is pressurized
and the MTS has cycled off (approxi-
mately 30 seconds) turn the DAY/NIGHT
switch to “DAY” and the SELECTOR
switch to “AUTO.”
11. Allow the freezer to cycle for 15
minutes. Sanitize the nozzles and install
on the dispensing heads. The product is
now ready to serve.
NOTE: Some sanitizer will remain in
hoses and cylinders.
12. Leave the handles down, turn
the SELECTOR switches to “OFF”, and
let the MTS force all possible sanitizer
out of the freezing cylinders.
13. Turn the MTS switches to
“OFF”.
14. Remove the pickup tubes,
holding the top 6-inch portion only.
15. Remove the mix containers and
empty any remaining sanitizer.
Important:
DO NOT use the “AUTO” position
with sanitizer in the cylinder. The
freezer will be damaged.
10. Turn the SELECTOR switches
to “CLEAN” and allow the beaters to
run for 10 minutes. Check for leaks
around the heads, drain tubes, clamps
and each MTS.
11. Drain the solution from each
cylinder by slowly pulling down on the
dispense handle.
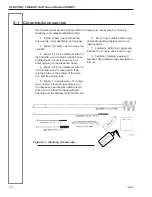
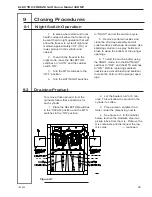
1. Holding the top 6-inch portion
only, insert each pickup tube into a
sanitized mix container through the
small hole in the rear cover and set
containers in the cabinet.
2. Fill each mix container with mix
and install the front cover.
3. Holding the top 6-inch portion
only, insert the sanitized mix probes
through the large hole in the rear cover,
and connect each probe cord to the
probe and to the back of the cabinet.
4. Turn the cabinet switch to “ON”
and close the cabinet door.
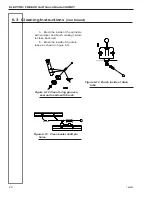
Figure 8-1


