background image

I N S TA L L AT I O N   A N D   O P E R AT I O N   M A N U A L             |             1 1

2.  Crimp insulated wire ferrules onto each supply power wire, including ground. 

Follow the ferrule manufacturer’s instructions for crimping the ferrules onto 
each wire. 

3.  Insert each ferrule terminal wire in the terminal block, ensuring the wires are 

located properly.

4.  Tighten terminal block screws to 33–40 in-lb (3.73-4.5 N-M) of torque. 

5.  Reinstall and tighten the strain relief strap, ensuring the wires are  

not strained between the strain relief strap and the terminal block. 

6.  Tighten the strain relief nut to the cable gland. 

4  

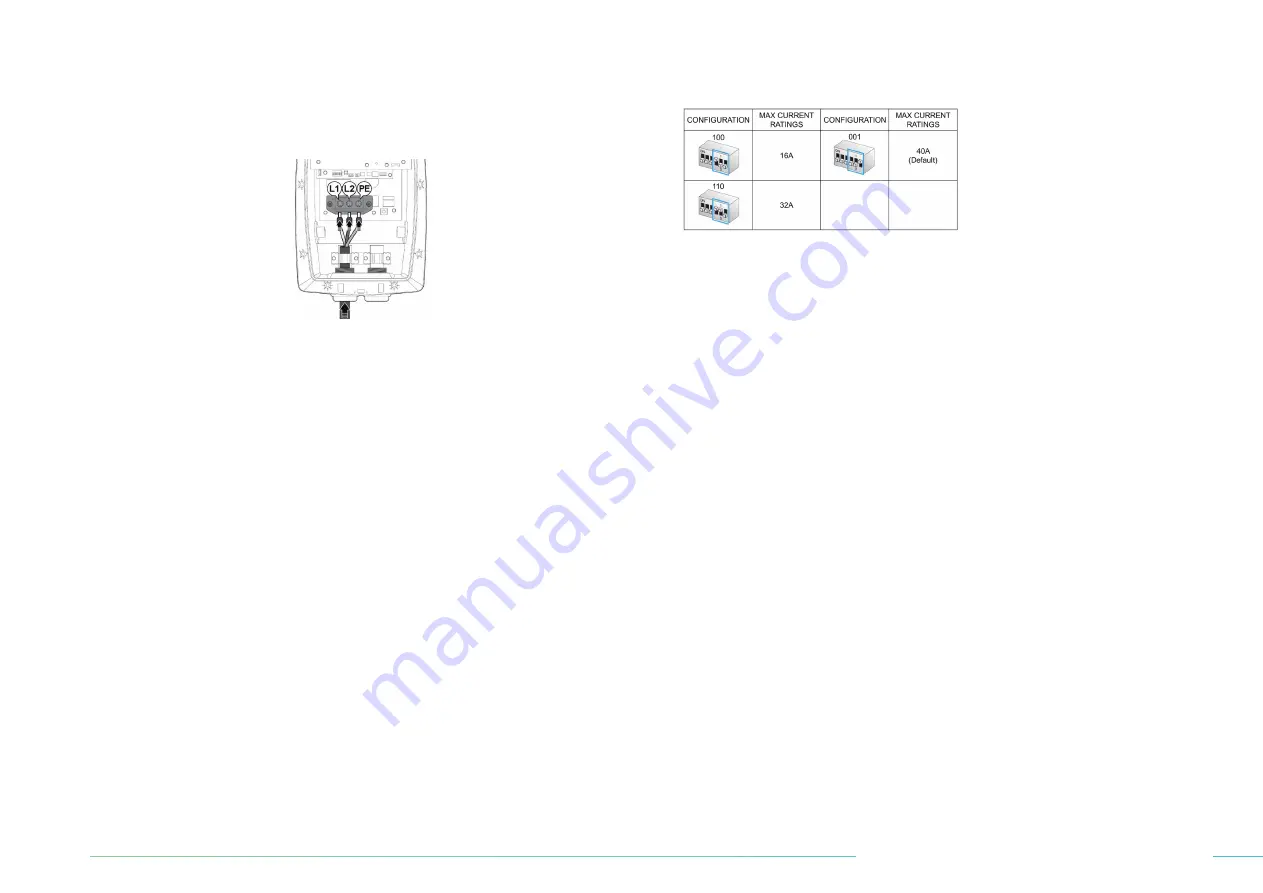
MANUAL AMPERAGE CONFIGURATION (OPTIONAL)


Use this method only if required by local code; otherwise, use the Electrify 
Canada app to set the amperage configuration.

1.  The amperage of the charger can be manually set by configuring the DIP 

switches as shown at right. It is always preferable to configure the amperage 
via the Electrify Canada app.

 N OT E:

 When there is a difference between the DIP switch settings and the 

 setting in the Electrify Canada app, the charger will issue charge at the  
lowest amperage setting.


5  

REATTACH THE COVER

1.  Secure the middle cover with the screws removed (as in the previous steps). 

2.  Attach the cosmetic cover by placing the top edge of the cosmetic cover over 

the middle cover and gently pushing the cosmetic cover into place. Loosen the 
left strain relief nut on the outside of the body. Secure the cover with the T20 
Torx screws.

6  

AMPERAGE CONFIGURATION WITH THE ELECTRIFY CANADA APP

1.  Download and install the Electrify Canada app on your smartphone (available 

for iOS and Android). 

2.  Ensure that your phone’s Wi-Fi is turned on. It is not required to be connected to 

a network. 

3.  Follow the instructions in the app to connect to your charger and configure 

your amperage setting.

7  

WI-FI SETUP (PLUG-IN OR HARDWIRED INSTALLATION)

1.  To connect the charger to a Wi-Fi network, download and install the Electrify 

Canada app on your smartphone (available for iOS and Android). 

2.  Follow the instructions in the app to set up with Wi-Fi connection. 

Summary of Contents for HomeStation EC2R040JPA10-00

Page 1: ...March 10 2021 Date de publication 10 mars 2021 HomeStation Level 2 Charger I N S TA L L AT I O N A N D O P E R AT I O N M A N UA L HomeStation Chargeur de niveau 2 G U I D E D I N S TA L L AT I O N E...

Page 2: ...e l ec t r i f y h o m e c a Customer Support Service la client le 833 531 3226...

Page 3: ...ded Components List 07 2 Recommended Tools 07 3 Installation Instructions 08 1 Before Installing 08 2 Installation Steps 09 3 Installation with Hardwiring 10 4 Operating Instructions 12 5 Charger Stat...

Page 4: ...l provincial and local laws regulations ordinances and safety standards regarding use of this device 5 ImportantSafetyInstructions RE AD ALL THE INSTRUCTIONS BEFORE INSTALLING OPERATING MAINTAINING OR...

Page 5: ...glivecomponentsincorrectlymaycausegrievousinjuriesordeath 15 Iftheelectricityservicetothechargerisdamaged immediatelyshutdown thepowertothechargerbyswitchingoffthecircuitbreakerandcontacta licensedele...

Page 6: ...O M E S TAT I O N L E V E L 2 C H A R G E R Product Overview NO ITEM NO ITEM 1 LED Ring 5 Cable Holster 2 Cosmetic Cover 6 Vehicle Connector 3 Plug 7 Mounting Bracket 4 Middle Cover 8 Body 1 2 4 5 7...

Page 7: ...INSTALLATION 1 Level 2 Pencil 3 Electric Drill 4 Phillips Head Screwdriver 5 Diagonal Cutter 6 Needle Nose Pliers 7 Wire Stripper 8 Ferrule Crimping Tool Charger User manual x 1 No 8 wood screws x 4...

Page 8: ...g bracket for the charger measured from the bottom of the bracket between 31 5 80 cm and 47 2 120 cm above the ground Configuration Installation Type 16A Hardwire Only 32A Plug In or Hardwire 40A Plug...

Page 9: ...e and measure the height to ensure the charger is between 31 5 80 cm and 47 2 120 cm above the ground NOTE The bracket must be mounted on a flat surface so that the bracket does not deform when proper...

Page 10: ...on the body of the charger by hanging the two hooks on the back of the middle cover to the ledges at the bottom of the body 5 Once the cover has been removed open the cable management clip on the righ...

Page 11: ...app NOTE When there is a difference between the DIP switch settings and the setting in the Electrify Canada app the charger will issue charge at the lowest amperage setting 5 REATTACH THE COVER 1 Sec...

Page 12: ...light up green when a connection is detected Once the charger is plugged into the vehicle the charger will begin flashing blue as it links with the vehicle When the charger is flashing solid blue the...

Page 13: ...I N S TA L L AT I O N A N D O P E R AT I O N M A N U A L 1 3 Charging is complete when the charger turns green once more Press the thumb lever on the vehicle connector to disconnect from the vehicle...

Page 14: ...with an integrated LED ring to allow for clear communication ofthecharger sstatus Forenergyefficiency onlythe bottomsectionoftheLEDringwillremainilluminated forapproximately twominutes sincethelastuse...

Page 15: ...connection to Wi Fi Red constant and or flashing Fault indicator See the Troubleshooting section 4 Faults LED INDICATOR DESCRIPTION Red 1 flash High or low input voltage detected Red 2 flashes Ground...

Page 16: ...act Customer Support at 833 531 3226 Indicator starts to flash red while charging Charger has detected an error Charger has encountered a fault Wait until the temporary error is resolved and the charg...

Page 17: ...rotocol SAE J1772 User Interface HMI LED Light Ring Wireless WLAN with 2 4GHz b g n with WPA2 Communication Protocol CPP 1 6 JSON Compliant AC Fault Monitor GFCI Integrated 20mA CCID for AC Short Circ...

Page 18: ...eisfrayed hasbrokeninsulation orshowsanyothersignsofdamage Donotusethis productif the enclosure or the electric vehicle connector is broken cracked open or shows any other indication of damage Forfurt...

Page 19: ...21 2 Aper u du produit 22 1 Liste des composants inclus 23 2 Outils recommand s 23 3 Instructionsd installation 24 1 Avant l installation 24 2 tapes d installation 25 3 Installation c bl e 26 4 Instru...

Page 20: ...es de s curit f d raux provinciaux et locaux relatifs l utilisation de cet appareil 5 Instructionsdes curit importantes LISEZTOUTESLESINSTRUCTIONSAVANTL INSTALLATION L UTILISATIONOU L ENTRETIENDECEPRO...

Page 21: ...uchargeurestendommag e couper imm diatementl alimentationauchargeur l aidedudisjoncteuret communiqueravecun lectriciencertifi 16 Couperlecircuitavantderemonterouderemplacerlechargeur 17 Afinder duirel...

Page 22: ...E C H A R G E U R D E N I V E A U 2 Aper u du produit NO ARTICLE NO ARTICLE 1 Anneau DEL 5 tui pour c ble 2 Couvercle d coratif 6 Connecteur du v hicule 3 Fiche 7 Support de montage 4 Couvercle du ce...

Page 23: ...LLATION C BL E 1 Niveau 2 Crayon 3 Perceuse lectrique 4 Tournevis cruciforme 5 Pince coupante diagonale 6 Pince bec effil 7 Pince d nuder 8 Outil de sertissage de virole Chargeur Guide de l utilisateu...

Page 24: ...ieurese situeentre80cm 31 5po et120cm 47 2po au dessusdusol Configuration Type d installation 16 A C blage uniquement 32 A Enfichable ou c blage 40 A Enfichable ou c blage 1 Installer l tui de fa on c...

Page 25: ...e vous assurer qu il se situe entre 80 cm 31 5 po et 120 cm 47 2 po au dessus du sol REMARQUE Le support doit tre mont sur une surface plane afin qu il ne se d forme pas une fois qu il sera solidement...

Page 26: ...orx T20 4 Placer le couvercle du centre sur le bo tier du chargeur en accrochant les deux crochets l arri re du couvercle sur les rebords au bas du bo tier 5 Une fois le couvercle retir ouvrir le serr...

Page 27: ...teurs DIP et le r glage de dans l application Electrify Canada le chargeur mettra une charge au r glage d amp rage le plus faible 5 REMETTRE LE COUVERCLE EN PLACE 1 Fixer le couvercle du centre l aide...

Page 28: ...que Lechargeur s allumeenvertquandunbranchementestd tect Lorsquelechargeurestbranch danslev hicule ilclignoteenbleupendantqu ileffectuelaliaisonavecle v hicule Lev hiculeestencoursderechargequandle ch...

Page 29: ...I D E D I N S TA L L AT I O N E T D U T I L I S AT I O N 2 9 Larechargeesttermin equandlechargeurs allume denouveauenvert Appuyersurlag chettedepoucesurleconnecteur duv hiculepourled brancherduv hicu...

Page 30: ...gr qui permet la communication claire de l tat du chargeur Aux fins d efficacit nerg tique seule la section inf rieure de l anneau DEL reste allum e pendant environ deux minutes la derni re interacti...

Page 31: ...en continu et ou clignotement Indicateur d anomalie Voir la section D pannage 4 Anomalies VOYANT DEL DESCRIPTION Rouge 1 clignotement Tension lev e ou faible d tect e Rouge 2 clignotements D faut de m...

Page 32: ...que Sileprobl mepersiste communiquezavecleservice laclient leau833 531 3226 Le voyant se met clignoter en rouge pendant la recharge Le chargeur a d tect une erreur Le chargeur a d tect une anomalie At...

Page 33: ...e recharge SAE J1772 Interface utilisateur IHM Anneau lumineux DEL Sans fil WLAN avec 2 4GHz b g n et WPA2 Protocole de communication Conforme OCPP 1 6 JSON Moniteur d anomalie du c a DDFTint gr dispo...

Page 34: ...entetoutautresigne dedommage Nepasutiliserceproduitsilebo tierouleconnecteurduv hicule lectriqueestbris ououvert ous ilpr sentetoutautresignededommage Pourobtenirdel aide communiquezavecnousau833 531...

Page 35: ...e l ec t r i f y h o m e c a Customer Support Service la client le 833 531 3226...

Page 36: ...Version 1 0 5 Issue Date March 10 2021 Date de publication 10 mars 2021...

Reviews: