5-7
ARRIVING ON SITE
Manual levelling
In below the procedure for manual deployment/extension of the axle and corner supports.
The manual levelling function is mainly used when automatic levelling is not possible due to a
large tilt of the caravan. With the help of this feature it is also possible to change the position of
the caravan; think of your sleeping comfort. Most people prefer to sleep with their head up
slightly. Depending on the orientation of the caravan with this feature you can manually adjust
the angle where necessary.
Step 1
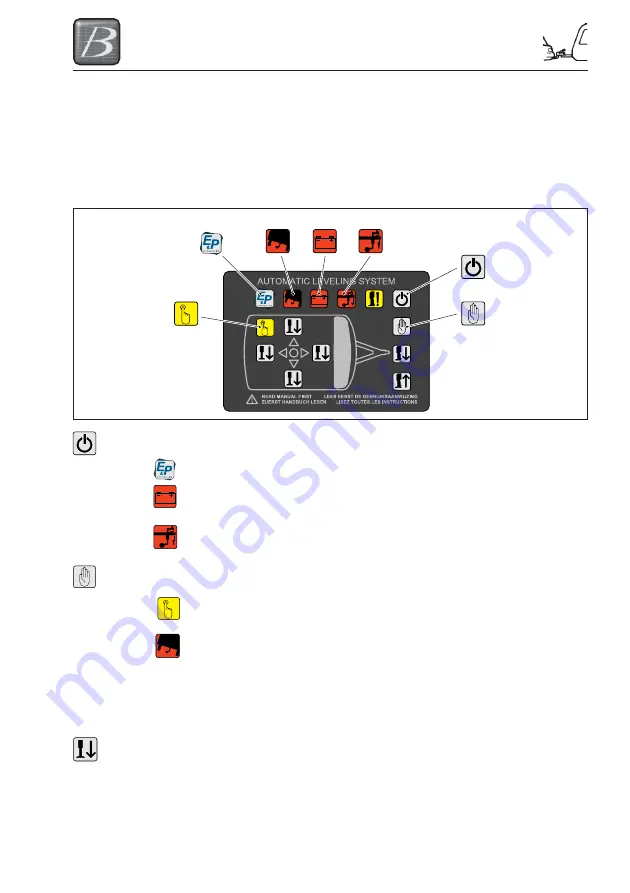
Press 1x on the button ON/OFF (no.5) to switch the levelsystem ON.
The E&P-logo LED lights up, indicating that the levelsystem is switched on.
When there is insufficient or no battery voltage, the indicator LED “LOW
VOLTAGE” (no.2) lights up.
In manual levelling, the caravan must be tilted a few degrees forwards. The
system will indicate whether you have positioned the caravan level enough.
If you have not, the indicator LED “FRONT WHEEL” (no.3) lights up.
Step 2
Press 1x on the button “MANUAL MODE” (no.6).
The indicator LED “MANUAL MODE” (no.9) lights up, indicating the manual
levelling procedure may begin.
When the caravan leans too steeply, the indicator LED “SLOPE TOO
STEEP” (no.1) lights up, although this LED lights up, you are able to level.
On the side where the caravan is low, fill the space under the axle support
(footplate) with some boards to compensate the difference in height. This
will avoid the risk it is not possible to level the caravan due to a too large
difference in height. In case of too large height difference the hydraulic jacks
may come to the end of their stroke.
Step 3
In most common cases, there lights up one ORANGE arrow on the control
panel (no.14) which indicates on which side the caravan has to be lifted.
Before lifting this side, FIRST lower the other axle-support till it touches the
ground.
9
1
2
3
ON/OFF
(no.5)
MANUAL
MODE
(no.6)
Summary of Contents for Buccaneer
Page 5: ...CONTENTS 4 CONTENTS ...
Page 7: ...1 2 INTRODUCTION ...
Page 11: ...2 4 GENERAL SAFETY ...
Page 17: ...3 6 PREPARING FOR THE ROAD ...
Page 37: ...5 18 ARRIVING ON SITE ...
Page 49: ...6 12 GETTING STARTED ...
Page 53: ...7 4 ELECTRICAL SYSTEM MAINS UNIT BUCCANEER ...
Page 75: ...8 22 HOW TO USE YOUR CARAVAN S EQUIPMENT ...
Page 84: ...8 31 HOW TO USE YOUR CARAVAN S EQUIPMENT Day and Night Bed Makeup Galera ...
Page 85: ...8 32 HOW TO USE YOUR CARAVAN S EQUIPMENT Day and Night Bed Makeup Barracuda ...
Page 93: ...8 40 HOW TO USE YOUR CARAVAN S EQUIPMENT ...
Page 96: ...9 3 SECURITY Fig 1 Fig 2 Fig 3 Fig 4 Fig 5 Fig 6 Fig 7 Fig 8 Fig 9 Fig 10 ...
Page 111: ...11 2 STORAGE ...
Page 115: ...12 4 WARRANTY ...
Page 117: ...13 2 CARAVAN CONSTRUCTION ...
Page 119: ...14 2 EQUIPMENT LIST ...
Page 120: ...15 1 ELECTRICAL DRAWINGS WIRING DIAGRAM BUCCANEER ...
Page 121: ...15 2 ELECTRICAL DRAWINGS ROAD LIGHTS BUCCANEER ...
Page 135: ...19 2 CHANGE OF OWNERSHIP ...
Page 137: ...20 2 CHANGE OF ADDRESS ...
Page 139: ...21 2 USEFUL ADDRESSES ...
Page 142: ...22 3 INDEX ...
Page 143: ...22 4 INDEX Designed and Printed by Preset Graphics Ltd Tel 01332 549278 MY2018 Ref 21558 ...


