Elan GMV64 Installation Manual Download Page 5

5 of 12 


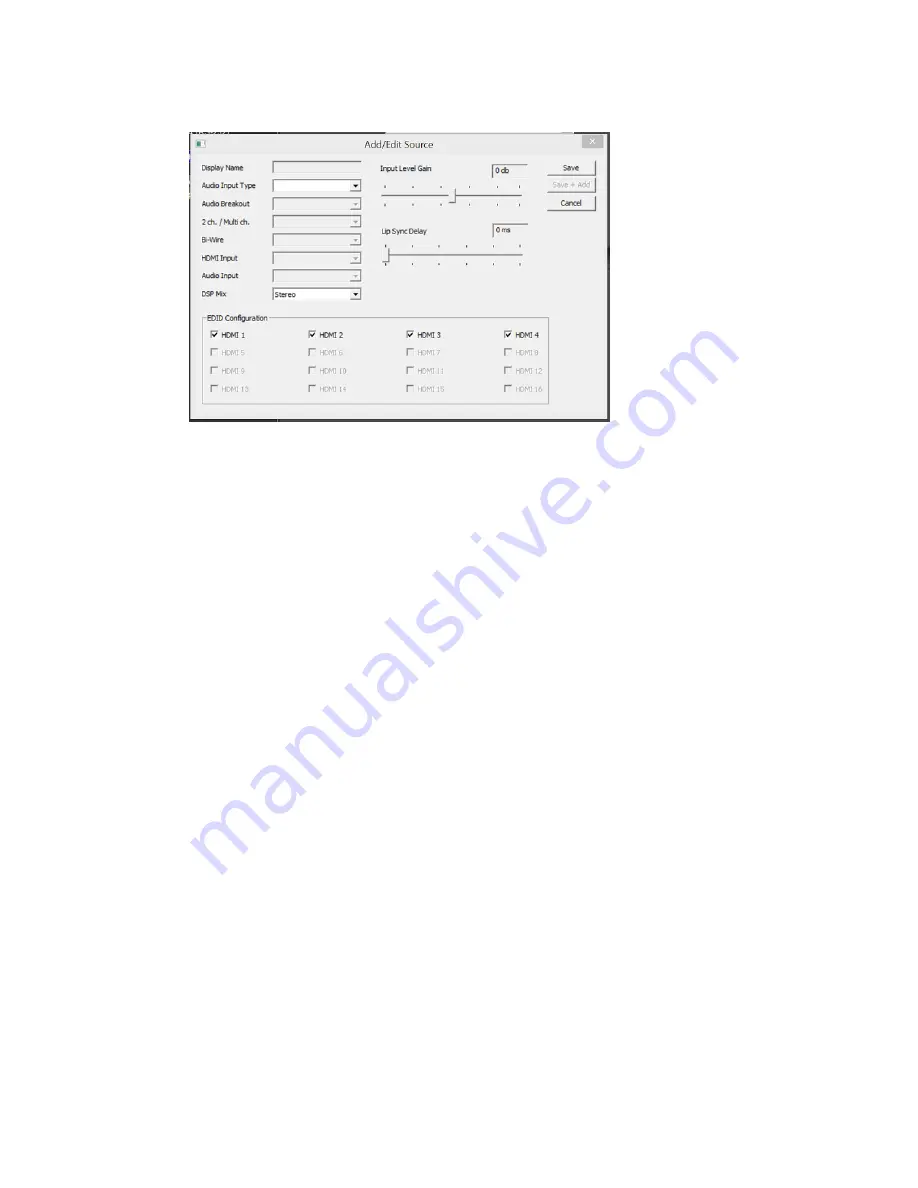
Add/Edit Source Dialog 
 

d.


Open the dialog by pressing the “Edit” button 


e.


From this dialog you configure all of the source parameters. Selections you make here 
ripple throughout the UltraMatrix setup so carefully make your selections. We recommend 
that you have a system diagram with you while programming. 

f.


Display Name – type the source label that will show on the user interfaces 

g.


Audio Input Type 

i.


Here we select where the audio is connected. Choices are HDMI, Coax, Optical, ARP 
(audio return path) or analog. If you the source is a video device then select HDMI, 
otherwise select the appropriate input type 

h.


Audio Breakout 

i.


For HDMI sources only you can select whether the audio from the device will be 
available to the audio switching matrix as a valid source. If the audio from the HDMI 
device is going to be available then set this to “Yes”. If audio from the HDMI device 
will only be routed to HDMI outputs then set this to “No”. 

i.


2 ch. / Multi ch. 

i.


When Audio Breakout is set to “Yes” we need to know if the HDMI audio is 2ch or 
Multi Ch. If it is 2 channel the UltraMatrix will allow it to be routed to analog 
outputs. If it is Multi channel then you will have to bi-wire the device to permit 
routing to analog outputs. 

j.


Bi-Wire 

i.


This selections becomes active when you select “Multi ch.” for the HDMI audio 
track. If Bi-Wire is set to “None” then you will not be able to access the HDMI audio 
from any zone that is analog or mirrored analog/digital. If the device is Bi-Wired 
then select the input type for the audio content. 

k.


HDMI Input 

i.


If you selected “HDMI” for Audio Input Type then the dialog will allow you to select 
an HDMI connection for the device. 

l.


Audio Input 

i.


If you selected any of the audio inputs for Audio Input Type or you selected a Bi-
Wire connection you will select the actual connection location on the UltraMatrix 
chassis here. 

m.


DSP Mix 

Summary of Contents for GMV64

Page 1: ...centric features were included that provide enhanced end user experience while input output configurations that embrace the complexities of local source inputs like video from a display with audio fr...

Page 2: ...communications 3 Install the switch the sources amplifier displays and speakers 4 Connect the g system to the switch electrically See the wiring diagrams for more information 5 Configure the g system...

Page 3: ...AGRAMS The ELAN UltraMatrix can be wired in various configurations and does not have a standard wiring diagram Please refer to the ELAN UltraMatrix Designer s Guide for a comprehensive list of wiring...

Page 4: ...ng a CAT5 jumper and an 890000598 RJ 45 to Male DB9 adaptor 1 You must add a Standard Connection Serial Port Communications Device and select the appropriate serial port 2 Set Paging a Paging is for a...

Page 5: ...en set this to Yes If audio from the HDMI device will only be routed to HDMI outputs then set this to No i 2 ch Multi ch i When Audio Breakout is set to Yes we need to know if the HDMI audio is 2ch or...

Page 6: ...ill be routed Selecting an output adds the Display s video and audio EDID s to the table for this device The device will then output the highest common specification for both audio and video digital s...

Page 7: ...log sources will be routed to digital outputs Does this installation require analog sources to be routed to a digital output If so select Yes if not then No ii Yes sets up an output mirror where the d...

Page 8: ...f synchronizing to the main zone volume adjustments or retaining independent volume If you synchronize the volume then you would generally hide this zone from the user interfaces k Turn On Settings wh...

Page 9: ...nage the sources for the zone q To create the second zone right click Zone 1 and choose Add A New Zone i On this and subsequent zones you will be able to Save Add to make things go quicker If you use...

Page 10: ...sion the system i The Lock EDID button changed to an Unlock EDID button when you locked it To re commission the system select Unlock EDID then follow the Commissioning steps from above e Clear HDCP Ke...

Page 11: ...ide for full details Audio Breakout Select Refer to ELAN UltraMatrix Designer s Guide for full details 2 Ch Multi Ch Select Refer to ELAN UltraMatrix Designer s Guide for full details Bi Wire Select R...

Page 12: ...the paging input Either the left or right input can be used as the driver will sum the left and right channels to create MONO output 2 Incorrect Firmware Using firmware Prior to 1 13 can result in the...

Reviews: