background image


4.1.2. Offline Pairing (Direct Connect)


When pairing with an eK Core via Direct Connect, it is connecting to the device’s 

local hotspot. This hotspot will always be formatted in the form [

eKoral-SERIAL 

NUMBER

] on your mobile device’s WiFi list (e.g. eKoral-AHbAAA000).  

In this situation, please note that your mobile device will not be connected to the 

internet and that it will not be able to control the tank or receive notifications once out of 
range of the eK Core. 


4.1.3. Troubleshooting  

If you are having difficulty connecting your mobile device to your eK Core, the 

following steps are a workaround to re-establish connectivity.  

1. Create a new mobile hotspot using your phone, and name it 

“mp”

. Set the 

password to be 

“ekoprosolutions”

. On an Android device, you can name your 

hotspot irrespective of your phone’s name. On an iOS (Apple) device, you will 
have to rename your phone 

“mp”

 for this workaround to function correctly. 

2. Access your eKoral device through the eKoral app. Select the 

“i”

 icon next to your 

device name.  

3. On the page that follows, select 

“Configure WiFi”

 (

Fig. 3, pg. 16

). Proceed with 

onscreen instructions to configure the WiFi to the 

“mp” 

hotspot you have just 

created. Even when you are experiencing connectivity issues, this should allow 
your eKoral device to come back online. 


4.2. eK Power 6


Pairing your eK Power 6 is straightforward once the eK Core controller has been 

successfully paired to your account. Connecting your eK Power 6 to your eKoral account as well 
as your eK Core can be done directly in the app. 
 

4.2.1. Pairing (in-app)


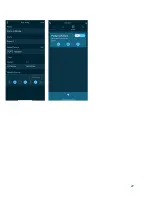
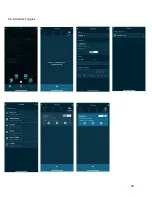
1. Tap the

 “Device” 

icon at the bottom of the screen and direct yourself onto the 

“Toggles” 

tab (

Fig. 2 & 3, Pg. 17

). Tap 

“+”

 (in the top right hand corner) and select 

the eK Power 6.  

2. Plug in your eK Power 6. Once the WiFi LED begins to flash, you can tap 

“WiFi 

LED is flashing”

 (

Fig. 3 & 4, Pg. 17

).   

Recommendation: Only pair ONE eK Power 6 at a time. Up to six eK Power 6 
units can be safely connected to a single eK Core unit.


Summary of Contents for eKoral Pro

Page 1: ...eKoral Pro User Manual 2020...

Page 2: ...1...

Page 3: ...7 Salinity Probe 2 8 Power Adapter 2 9 eK Probe Holder 3 0 Safety Precautions 6 4 0 eKoral Pro Setup 7 4 1 eK Core Pairing 4 1 1 Online Pairing Soft AP 4 1 2 Offline Pairing Direct Connect 4 1 3 Trou...

Page 4: ...esetting your eK Core 13 9 0 Connecting eKoral Sync Supported Third Party Devices 13 9 1 Identifying eKoral Sync Products 9 2 Connecting an eKoral Sync device to your eKoral account 10 0 Fail safe 13...

Page 5: ...d China please be sure to select the China setting when creating your account top right hand corner and logging into the eKoral app This will ensure that you are logged into our Chinese servers Once a...

Page 6: ...individually monitored The eK Power 6 safety features protect any high tech equipment connected to this system 2 3 eK Level Sensor The eK Level sensor uses ultrasound technology to take a precise and...

Page 7: ...32 140 F Cable Length 3m 9 84ft Dimension 12x165mm 0 47 x6 5 Laboratory grade sensor that measures water salinity and alerts the user when the measurement moves out of its ideal range The electrodes...

Page 8: ...ccount you will need to pair your eKoral device s to your eKoral account using either your mobile phone or tablet You can establish this pairing while online Soft AP or offline Direct Connect 4 1 1 On...

Page 9: ...p for this workaround to function correctly 2 Access your eKoral device through the eKoral app Select the i icon next to your device name 3 On the page that follows select Configure WiFi Fig 3 pg 16 P...

Page 10: ...to avoid contamination When mounting the probe place it as deep as you can while keeping the cap dry If you are not using your probe make sure the sensor tip is covered by the electrode storage bottl...

Page 11: ...nto the 53 0 mS calibration solution Shake the probes a bit to get rid of any air bubbles that may be trapped in the tip and click Calibrate to start calibrating After the process is complete select S...

Page 12: ...5 After completing calibration at pH 7 please rinse both probes with RO DI water When you dry the probes be sure to not touch or jostle the sensor tips 6 You can proceed to repeat the previous steps...

Page 13: ...nected 1 Tap the device icon at the bottom of the screen and direct yourself onto the toggles page Then select Add Device 2 Select the device you wish to pair in this case it is the eK Power 6 Please...

Page 14: ...s that certifies third party hardware that has the capability to work flawlessly with the eKoral system All approved products have to pass a strict testing and validation process by eKoral engineers a...

Page 15: ...11 0 Figures 1 Reset Pin 14...

Page 16: ...11 0 Figures 4 1 1 eK Core Soft AP Pairing 15...

Page 17: ...4 1 3 eK Core Troubleshooting 16...

Page 18: ...4 2 1 eK Core Pairing in app 17...

Page 19: ...4 3 eK Probes Calibration 18...

Page 20: ...5 0 If Then Rules eK Core 19...

Page 21: ...6 1 eK Core Schedule 20...

Page 22: ...21...

Page 23: ...6 2 Schedule Toggles 22...

Page 24: ...7 0 Scene 23...

Page 25: ...15 0 Resetting eK Core 23 1 Identifying eKoral Sync Products 24...

Reviews: