6.0. Schedule
6.1. eK Core
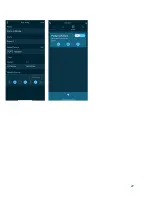
1. After selecting the schedule icon, choose what type of schedule to create (
Fig. 1 & 2, Page
20
) tap on the
“+”
icon at the bottom of the page to start a new schedule.
2. Name the schedule and edit the criteria to your needs (it is a different criteria for ‘lights
and pumps ’) (
Fig. 4-7, Pg. 20
).
3. Choose a time frame you wish for the schedule to take place; ranging anywhere between
12:00am and 11:59pm. You can preview your planned schedule before saving by tapping
“Start”
. (
Fig. 8, Pg. 20
)
4. Select the day(s) of the week you wish for the schedule to occur. This can be as many or
as little times as you wish. Tap “
Save
” to finish the schedule.
Please Note:
Checked that the saved schedule default setting is correct.
6.2. Toggles
Please note, this is slightly different from setting a schedule for the eK Core. There are a
few simple steps at the beginning to help you.
To set a schedule for a toggle, first you need to have a toggle connected.
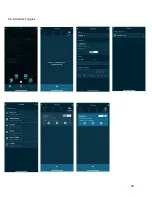
1. Tap the device icon at the bottom of the screen and direct yourself onto the
toggles page. Then select
“Add Device”
.
2. Select the device you wish to pair, in this case it is the eK Power 6.
Please Note
: To create a schedule for toggles assign functions to each port on the eK Power 6.
(
Fig. 1-3, Pg. 22
)
7.0. Scenes
Scenes allow you to control multiple devices at the same time. To use this feature fully, there
must be pumps or lights connected directly to the eK Core.
1. Tap on the scene tab on the control page of your app. Then tap
“+”
to begin the
set up.
2. Select the scene type between “
Maintain”
,
“Feed”
and
“Custom”
. Once you
have selected your preferred type, enter the name of your tank. (
Fig. 4, Pg. 23
)
3. On the same page, you will be able to adjust the intensity of your pumps and
lighting while the scene is taking place.
4. With your connected Power Bar, you can pause the scene and allocate whichever
outlet you wish. (
Fig. 6 & 7, Pg. 23
)
5. You may set a scene duration that can range anywhere between
0 and 6 hours
to ensure safety. It can be chosen to the hour and minute.
6. Once you have created a scene that you are satisfied with, press
Save
.
12
Summary of Contents for eKoral Pro
Page 1: ...eKoral Pro User Manual 2020...
Page 2: ...1...
Page 15: ...11 0 Figures 1 Reset Pin 14...
Page 16: ...11 0 Figures 4 1 1 eK Core Soft AP Pairing 15...
Page 17: ...4 1 3 eK Core Troubleshooting 16...
Page 18: ...4 2 1 eK Core Pairing in app 17...
Page 19: ...4 3 eK Probes Calibration 18...
Page 20: ...5 0 If Then Rules eK Core 19...
Page 21: ...6 1 eK Core Schedule 20...
Page 22: ...21...
Page 23: ...6 2 Schedule Toggles 22...
Page 24: ...7 0 Scene 23...
Page 25: ...15 0 Resetting eK Core 23 1 Identifying eKoral Sync Products 24...


