background image

8

Installation

Please follow instruction when installing 

this product in accordance with the instruction 

manual. This product must be positioned in a sufficiently stable location, it can be  
potentially hazardous due to falling and can cause injury, particularly to children if it  
positioned incorrectly.

• Before installing this TV set, make sure your outlet voltage corresponds to the voltage  
  stated on the product rating label

• Do not use a damaged power cord, plug or loose outlet. Doing so may cause an  
  electric shock.

• Do not plug several devices into the same outlet. Doing so may cause the outlet to  
  overheat and start a fire. Make sure the outlet is readily accessible during operation  
  of the equipment.

• Do not bend, twist or kink the power cord excessively. 

• Do not allow anything to rest on or roll over the power cord and antenna cable.  
  Doing so may cause a fire or an electric shock. 

• Do not run the power cord near heat-producing appliances such as radiators, stoves or  
  irons. The excessive heat could melt the insulation and expose live wires, resulting in  
  fire or electric shock.

• Unplug this TV during lightning storms or when unused for long periods of time.  
  Not doing so may result in fire or electric shock.

• Do not cover the ventilation openings of the product with items such as newspapers,  
  tablecloths, curtains etc or insert objects into the slots available on the products.  
  As this could result in the product temperature rising and could cause a fire. 

• If you notice any unusual odors or smoke around the unit, immediately disconnect the  
  unit from the outlet and contact the service center. Failure to do so may result in fire  
  or electric shock.

• When not using the unit for long periods of time or when you are moving the unit  
  please ensure to disconnect the power cord from the wall socket.

• Do not expose this appliance to rain or moisture as it may result in fire or an  

   electric shock hazard
• Do not temper or change or modify the product in any way.
• Only use Accessories outlined and recommended by the manufacturer.
• Please do not expose the product to splashing or water contact 
• Please do not place any object on top of the product including objects filled with liquids  

  such as vases.
• Danger of explosion if battery is incorrectly placed. Replace with same or equivalent type.

IMPORTANT INFORMATION

GENERAL SAFETY INSTRUCTIONS (Cont.)

Summary of Contents for K55USW

Page 1: ...55 4K ULTRA HD SMART TV K55USW INSTRUCTION MANUAL Please read this manual carefully before using and keep it for future reference...

Page 2: ...Network Wired 22 Wireless 22 Network Setting Warnings 23 HOW TO OPERATE TV Connecting to SIMPLINK HDMI CEC 24 Shortcut to Accessbility Menu 24 ENJOY LIVE TV Live TV Menu 25 Checking Program Informatio...

Page 3: ...39 Connecting Smart Devices 40 Controlling TV with ThinQ app 42 Cast mobile screen to TV 43 Playing sound from Smart device through TV Speakers 44 Connecting USB 45 Viewing Photos and Videos 47 Using...

Page 4: ...2 Setting the Screen Size 63 Energy Saving Feature 64 Eye Comfort Mode 64 HDMI ULTRA HD Deep Colour 64 Instant Game Response 65 Sound Sound Mode 66 Setting Sound Out output 67 Internal TV Speakers 67...

Page 5: ...ing 72 Using the Signal Test 72 Edit Programmes 73 Edit Programmes List 74 Connection Setting the TV Name 75 Network Conneciton Settings 75 Setting a Wired Network 75 Setting a Wireless Network 75 Dev...

Page 6: ...tting 83 Advertisement 84 Visually Impaired Menu 85 High Contrast Screen 85 Hard of Hearing 85 Subtitles 85 Support Allow automatic updates 86 Check for updated 86 TV Information 86 Notifications 87 A...

Page 7: ...t The lightning flash symbol within the triangle is intended to warn you of non insulated dangerous voltage the product s enclosure that could be of sufficient magnitude to generate a risk of electric...

Page 8: ...ctric shock Unplug this TV during lightning storms or when unused for long periods of time Not doing so may result in fire or electric shock Do not cover the ventilation openings of the product with i...

Page 9: ...r the products If a television is not positioned in a sufficiently stable location it can be potentially hazardous due to falling Many injuries particularly to children can be avoided by taking simple...

Page 10: ...e or combustible materials near the unit Doing so may result in fire or explosion Do not place any naked flame sources such as lit candles cigarettes or incense sticks on top of the TV set The antenna...

Page 11: ...nother person to assist in the following task Attaching the stand Step 1 Place a soft cushioned material on top of a flat surface to prevent damaging the screen panel Then place the TV screen flat on...

Page 12: ...et another person to assist in the following task We recommend you use a professional installer as we assume no liability for any eventual damage to the product or injury to yourself if you mount the...

Page 13: ...13 CONTROLS AND CONNECTIONS TV BUTTON...

Page 14: ...NPUT 2 RJ45 ETHERNET 3 VIDEO AUDIO LEFT RIGHT 4 HEADPHONE OUT 5 HDMI 3 6 RF IN ANTENNA 7 OPTICAL OUT 8 HDMI 2 ARC 9 HDMI 1 10 USB INPUT USB connection Insert a USB storage device into the USB port to...

Page 15: ...tions in the menu or teletext Next few pages of MAGIC REMOTE CONTROL explains the following First Time Pairing Re Registering The Magic Remote Control Open Prime Video Open Program Guide Open Settings...

Page 16: ...allow you convenient access to various Smart TV functions FIRST TIME PAIRING Registering the Magic Mouse Remote Control You must register the Magic Remote Control on your Smart TV when you use it for...

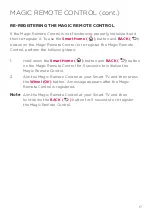
Page 17: ...Home button and BACK button on the Magic Remote Control for 5 seconds to initialize the Magic Remote Control 2 Aim the Magic Remote Control at your Smart TV and then press the Wheel OK button A messag...

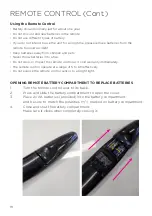
Page 18: ...ct the remote control as it void warranty immediately The remote control operate at a range of 5 to 6M effectively Do not expose the remote control sensor to a bright light REMOTE CONTROL Cont OPENING...

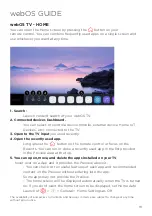
Page 19: ...the Recents You can run or close a recently used app in the list provided in the Preview area at the top 5 You can open move and delete the apps installed on your TV hover over on a App and It provid...

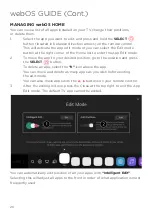
Page 20: ...ve the app to your desired position go to the position and press the SELECT button To delete an app select the X icon above the app You can move and delete as many apps as you wish before exiting the...

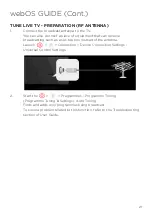
Page 21: ...such as a set top box instead of the antenna Launch Connection Device Connection Settings Universal Control Settings 2 Start the Programmes Programme Tuning Programme Tuning Settings Auto Tuning Finds...

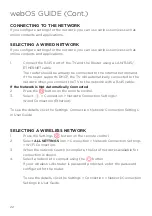
Page 22: ...NETWORK 1 Press the Settings button on the remote control 2 Select ALL SETTINGS icon Connection Network Connection Settings Wi Fi Connection 3 When the network search is complete the list of networks...

Page 23: ...rence from other devices that use the 2 4 GHz frequency wireless phone Bluetooth device or microwave oven Although interference can also happen when using the 5 GHz frequency it is less likely to occu...

Page 24: ...uto Power Sync is set to On turning on a SIMPLINK linked device will turn the TV on When you turn off the TV the device will also be turned off 6 Turn on the connected device When the TV automatically...

Page 25: ...The menu appears only if an external storage device is connected and the recorded video can be viewed The programmes displayed in Programme List are a configuration of pro grammes provided by the broa...

Page 26: ...f the desired programme You can view more information on the programme and perform Watch Record only available on certain models or Reminder Scheduled Recording only available on certain models etc 5...

Page 27: ...rammes using the UP DOWN buttons You can view broadcast information about the programme you are currently watching using the LEFT RIGHT buttons Press the BLUE button on the remote control to move the...

Page 28: ...ar The Live Playback function can be used only for broadcast programmes you view through the antenna input terminal However you cannot use this option while listening to a radio programme Select a dev...

Page 29: ...mally Because of the content protection technology used the recorded video cannot be played on PCs or other TV models Also the video cannot be played if the TV s video circuit is replaced Do not remov...

Page 30: ...set the New Reminder 5 Launch Guide PROGRAMME SCHEDULING You can select a show to schedule it for watching or recording 1 Press the remote control s LIST button and select the Guide tab on the left si...

Page 31: ...ording should be at least 1 minute MANAGING RECORDINGS You can view and play recordings stored on storage devices by using the Recordings app 1 Press the remote control s LIST button and select the Re...

Page 32: ...in middle of the direction arrows You can operate basic playback related features You can do the settings related to play on repeat of the video This switches you to a screen where you can set up add...

Page 33: ...Actions button on the remote control and select Teletext TO SET TELETEXT LANGUAGE Use the Teletext language function when two or more Teletext languages are broadcast 1 Press the Settings button on t...

Page 34: ...ch Content Store Depending on the model the provided contents may differ or some features may be limited Exercise caution when in use by children Children may have access to inappropriate online conte...

Page 35: ...st 5 Read the details of the app and then press Install 6 When the installation is complete you can run the app immediately Available categories may vary depending on the country or service status If...

Page 36: ...rmation see How to Operate TV Using Universal Remote Control in User Guide 1 Press the button on the remote control 2 Launch Search Some models may not be supported You must connect to the network to...

Page 37: ...variety of content and information using the desired search terms 1 Returns to the previous screen 2 Provides a list of content for the selected genre 3 Enter a search term 4 Exit the Search You must...

Page 38: ...input port or network 4 The currently selected output speaker is displayed and you can navigate to the output speaker settings screen 5 You can view and select the connected storage device 6 You can c...

Page 39: ...ard 4 Press the at the top right and select the Sign In 5 Log in to your LG ThinQ account A list of the registered LG ThinQ devices will appear If you are in an area where the LG ThinQ app is not in s...

Page 40: ...he connected device You can only delete certain devices from the TV 4 You can check the connection guide for Home IoT Devices You can connect and display the devices registered to your LG ThinQ accoun...

Page 41: ...2 Connect your TV and smart device to the same Wi Fi network You can check the Wi Fi network of TV at Connection Network Connection Settings Wi Fi Connection 3 Run the LG ThinQ app installed on your...

Page 42: ...or select the external input with voice commands instead of using the remote control 2 You can use the same functions as the Magic Remote s pointer and arrow keys Some controls may be limited in exter...

Page 43: ...o not connect the device Even if you try to connect again the popup will not appear and the connection will not work To cancel Block go to Connection Mobile Connection Management Screen Share It is re...

Page 44: ...ect the TV from the list of devices 2 The TV will be connected to the smart device If the output speaker is set to Bluetooth or has a setup history the TV may not be detected in the list of smart devi...

Page 45: ...l USB HDD with a rated voltage of 5 V or less and a rated current of 500 mA or less If you use a device requiring a higher voltage current than the rated voltage current it may not operate properly du...

Page 46: ...ystem not supported by the TV to the USB IN port the format message appears To use the connected USB storage device you should format the device first After format all the data of USB storage device w...

Page 47: ...type of content and viewing method 2 Select and delete the desired content You cannot delete files that are shared from other devices 3 Select the content you want to play You can only select the same...

Page 48: ...unning the music player 3 You can zoom in out of the photos 4 Starts the slide show 5 Rotates photos 6 360 degree photos can be viewed in 360 degrees Using the 360 VR Play on a normal photo may distor...

Page 49: ...playlist while watching a video 3 You can control basic video playback functions 4 Rotates videos Some models may not be supported 5 360 degree videos can be viewed in 360 degrees Using the 360 VR Pla...

Page 50: ...AL OPTIONS 1 You can change subtitle settings 2 You can set audio tracks 3 You can set continue watching to resume playing from the last viewed scene 5 Returns to the basic operation screen CONNECT EX...

Page 51: ...age devices and add them to My Playlist 4 Select your desired music content and enjoy it 1 Select the desired type of content list 2 Select and delete the desired content You cannot delete files that...

Page 52: ...full screen mode Screen Off You can listen to music with the screen turned off 4 You can change the position of the music player 5 You can minimize the music player 6 This feature closes the music pl...

Page 53: ...may vary depending on the network connection To play on other operating systems or devices refer to the manual of the operating system device BROWSE AND WATCH THE CONTENT STORED ON THE PC USING THE T...

Page 54: ...e supported for a router that does not support multi cast For more information refer to the user guide that came with your router or contact the manufacturer Captions are only supported on some connec...

Page 55: ...Start Screen Share faster by having your mobile device or PC connected to the same network as the TV Though it can be connected without a wireless router connecting your device to a 5 GHz router is re...

Page 56: ...e Block Ads feature is set to On 5 Split the screen to display the TV screen You can browse web pages while watching TV 6 You can zoom in or out on the screen while browsing the website Add to bookmar...

Page 57: ...the TV s Web Browser app so care needs to be taken about children s access to harmful online contents You can lock the Web Browser app to prevent access to harmful online contents Configure the setti...

Page 58: ...d web pages only Blocked Sites You can configure the settings to block specific websites To use the Site Filtering function you should enter the TV password The initial password is set as 0000 When Fr...

Page 59: ...eep Timer and so on Press the button on the remote control 1 You can set Picture Mode 2 You can set Sound Mode 3 You can choose Sound Out 4 You can set Sleep Timer 5 Move to the Connection screen 6 Yo...

Page 60: ...tball Cricket Suitable picture for sports games Sharpens the image of rapid movements such as kicking or throwing a ball The name of the sport may differ depending on region Game Suitable picture for...

Page 61: ...he closer to 50 the sharper and clearer the image Colour Tones down or up the colours displayed on the screen The closer to 100 the deeper the colour Tint Adjusts the colour balance between red and gr...

Page 62: ...ngs Picture Options Noise Reduction Removes small dots that stand out so as to make the image clean Black Level Adjusts the brightness of the dark parts of images Select High for a bright screen or se...

Page 63: ...et distorted while zooming in or out Selecting a different screen size from the original size may cause the image to look different Depending on the combination of picture format and screen size the e...

Page 64: ...Mode The colour temperature will be adjusted to reduce eye fatigue On The colour temperature of your TV screen is adjusted Off Turns off the Eye Comfort Mode Some models may not be supported HDMI ULTR...

Page 65: ...ULTRA HD Deep Colour feature to On for the HDMI terminal connected to the gaming device to enable Instant Game Response It works only when the Sound Sound Out is set to Internal TV Speaker Audio Out L...

Page 66: ...n adjust the volume of the left and right speakers ULTRA Surround Enjoy an immersive soundscape with the virtual multi programme surround sound effect This option can be enabled if Sound Mode is set t...

Page 67: ...ct to the recently used devices when you turn the TV on We recommend that you connect an LG audio device that supports LG Sound Sync using LG TV mode or LG Sound Sync mode on device If the device fail...

Page 68: ...ports Optical to the optical digital audio output port to enjoy your TV s sound in richer quality and greater convenience Only available for models with an optical digital port For some devices you ca...

Page 69: ...in speakers and the audio device connected to the digital optical audio output port simultaneously Wired Headphones Internal TV Speaker Audio is played through the TV s in ternal speakers and the Wir...

Page 70: ...s DTV Audio Setting When different audio types exist in an input signal this function allows you to select the audio type you want If set to Auto the search order is AC4 HE AAC Dolby Digital Plus Dolb...

Page 71: ...nected LG Sound Sync device using a TV remote control If the auto power feature of the sound bar that supports LG Sound Sync is set to On the sound bar will be turned on or off together when the TV is...

Page 72: ...programmes that are currently broadcasting If Safety is turned on a pop up window will appear asking for password MANUAL PROGRAMME TUNING Press Programmes Programme Tuning Programme Tuning Settings Ma...

Page 73: ...ock Unlock Lock the selected programmes or unlock the locked programmes Skip Restore Set the selected programmes to be skipped when switching programmes or disable the skipping option of the programme...

Page 74: ...em to the favourite programmes list 2 Delete the selected programmes from the favourite programmes list 3 Move Select one or more programmes in the Preferred Programmes list press the Move button and...

Page 75: ...ctly you can add a wireless network Connect via WPS PBC If the wireless router you want to connect to has a Wi Fi Protected Setup Push Button Configuration WPS PBC feature you can easily connect to th...

Page 76: ...d and used simultaneously Auto Power Sync If Auto Power Sync is set to On turning on a SIMPLINK linked device will turn the TV on When you turn off the TV the device will also be turned off LG Wireles...

Page 77: ...be connected to the same network The Turn on via Wi Fi feature must be used in an app on a smart device that supports the feature The Turn on via Bluetooth feature can only be used with certain LG Ele...

Page 78: ...the default will be used Applies to Digital broadcasting Keyboard Languages Select the language to use the on screen keyboard To Set Teletext Language To see the details click the Enjoy Live TV TELETE...

Page 79: ...imer Programme Set a channel to display when the power is turned on This option can be set only when Input is set to TV Volume Set audio volume to use when the power is turned on Power Off Timer Set P...

Page 80: ...Select TV Rating Locks Supported only in the digital mode Some models may not be supported The initial password is set as 0000 ENABLING PROGRAMME LOCKS Blocks the programmes that contain inappropriat...

Page 81: ...1 Press the General Safety Reset Password 2 Set or change the password for the TV The initial password is set as 0000 When France or Norway is selected for Country the password is not 0000 but 1234 RE...

Page 82: ...ome to launch automatically when turning on the TV Home Promotion You can turn on or off the advertisements on the Home screen The configurable items differ depending on model SETTINGS HELP 1 Press Ge...

Page 83: ...2 Set power options to reduce energy consumption Auto Power Off Set the TV to turn off automatically when there has been no user input for a specified amount of time HDD Eco Mode If you set the mode t...

Page 84: ...k of the number of times an ad is shown on your TV This information is used to help limit the number of times the same ad is displayed You can clear this cookie or turn it on or off at any time by goi...

Page 85: ...he colour of the menu on the screen to black and white tone to make its ambiguity very clear Set to On INVERT COLOURS Press Accessibility Invert Colours To enhance the visibility of the menus on the s...

Page 86: ...if necessary you can perform a manual check The configurable items differ depending on model The latest version can be obtained via digital broadcast signals or internet connections Changing the progr...

Page 87: ...ces Legal Notice It s a legal notice for services provided via TV Open Source Software Notice You can view the instructions for each item RESTORING THE DEFAULT SETTINGS Press Support Reset to Initial...

Page 88: ...defective I cannot turn the TV on with the remote control Please make sure your TV power plug is correctly connected to the outlet Replace the batteries in the remote control Use alkaline batteries Ch...

Page 89: ...ning Programme Tuning Settings Auto Tuning If you are using a set top box consult its supplier The screen shakes after the momentary appearance of vertical horizontal lines and net pattern Connect wir...

Page 90: ...is weak the top bottom left right sides of the screen may be snowy I don t see anything or the image keeps flickering when I try to connect the HDMI cable Check whether your HDMI cable is compliant wi...

Page 91: ...ponent When you are connecting to the AV IN or COMPONENT IN check to ensure each cable is matched with the corresponding colour connection For component cables make sure the video red cable and audio...

Page 92: ...he TV To use dual monitors check that the PC or notebook supports dual monitor mode Reconnect the HDMI cable If you have connected the RGB output port of your PC to the HDMI IN of your TV you need an...

Page 93: ...the video player on a PC Check for file damage Check that the video and subtitle files have the same name check that both the video file and the subtitle file are in the same folder Check that the sub...

Page 94: ...on USB storage devices Press the button on your remote control Press the record that appears on the bottom left of the screen to start recording Which signals support recording Real time and scheduled...

Page 95: ...ble modem off and back on and wait for the device to reset 2 Turn the wired wireless router off and back on and wait for the device to reset 3 Turn the TV off and on If you want to establish a wired L...

Page 96: ...turer or your Internet service provider DNS network connection lost When you are in the Menu s mentioned on page 89 WIRED or WI FI menus please check below When X appears next to DNS Check the AP Rout...

Page 97: ...parts of a particular website are not visible when I am using the Internet The Web Browser supports only HTML5 media and not Flash Plug in The Web Browser does not support plug in installation You ca...

Page 98: ...on Colours Aspect Ratio 16 9 Multimedia Playback Format under USB Mode Music MP3 M4A AAC WMA Movie AVI MP4 MPG MKV MOV DAT VOB RM RMVB Photo JPG BMP PNG Power Source 100 240V 50 60Hz Power Consumption...

Page 99: ...99 THIS PAGE IS LEFT BLANK ON PURPOSE...

Page 100: ...CUSTOMER SUPPORT help eko entertainment com au DISTRIBUTED BY Ayonz Pty Ltd...

Reviews: