


- 11 -
Operation
4.2. Initial operation:
Coupling between inside and outside unit
After applying power, the two dots (..) in the display of the inside unit will
illuminates and the status display of the outside unit will start blinking.
Press the
OK
key followed by the
ESC
key
.
The initialising process runs
fully automated, whereby the devices are coupled with each other. During
this process, which lasts for approx. 15 sec. the display shows OK.
This coupling is used to secure that the outside unit cannot be misused or
changed to prevent unauthorised persons from getting access.
After initialization is completed, a single blinking dot signals normal
operation. The standard security code which is automatically used is 99.
Please change this code to your own individual code.
Note:
The exchange of the outside unit is only possible via resetting the
system to the initial settings. All data are erased in this case. You have
to carry out the initialisation once again. All fingers have to be enrolled
again in the system after this reset.
-
12
-
Operation
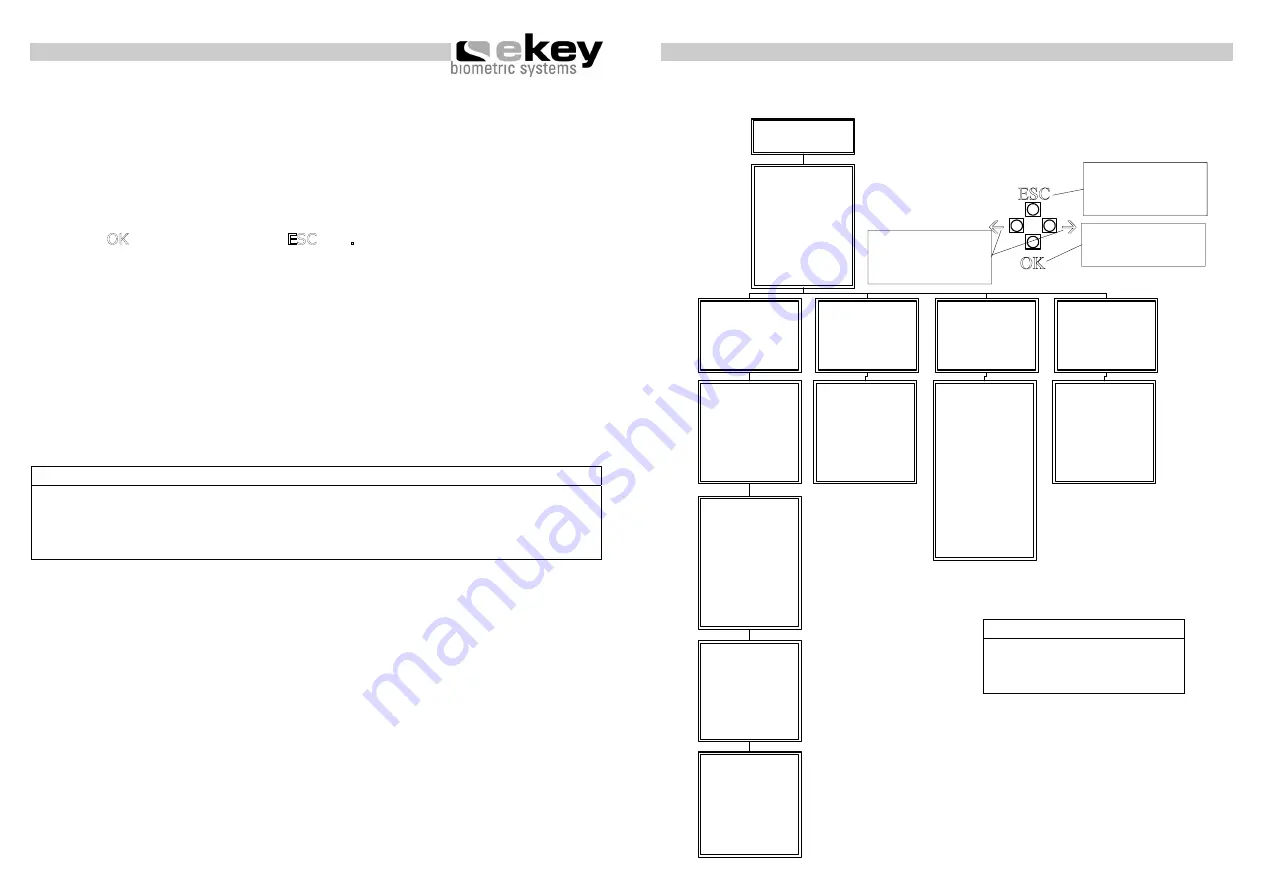
4.3. Programming menu
00 ... 99
Enter the security code
Enter the left number of
your security code followed
by the OK key. Enter the
r i g h t n u m b e r o f t h e
security code. The initial
standard code is 99. Press
OK. Should you key in the
wrong code 3 times, the
system will be locked for
30 mins.
Sc
Security code
This menupoint is used to
s e t t h e s e c u r i t y c o d e
(initial standard setting is
99). It is recommended to
change this standard code
to an individual code.
rr
Reset to initial standard
settings
This menupoint is used to
reset to the initial standard
settings. All data is deleted
w i t h o u t r e c a l l . U s e r r
before you hand over the
system to another owner.
du
delete user
This menupoint is used to
delete users. For the user
selected all fingers enrolled
are deleted.
Eu
enroll user
This menupoint is used to
e n r o l l f i n g e r s i n t h e
system.
1 ... 99
Set user number
Each user has its own user
number. A user number
which is already in use, is
marked with a blinking dot
after the number.
F1 ... F0
Set finger number
Each finger of a user is
saved by using a number.
Chose here the number of
your finger. Start to count
with one at the little left
finger. Count the fingers to
the right little finger until
1 0 . I n s t e a d o f 1 0 t h e
display shows 0.
1 ... 99
Set user number
Each user has its own user
number. A user number
which is already in use, is
marked with a blinking dot
after the number.
. (blinking)
Normal operation
00 ... 99
Enter new security codes
First enter the left number
o f y o u r s e c u r i t y c o de ,
followed by the right one.
Without keying in your
new security code, you
c a n n o t a c c e s s t h e
system anymore.
In case you forget your
security code, the only
solution possible is to
reset the system to the
initial standard settings.
00
Enter the security code
Enter the left number of
your security code followed
by the OK key. Enter the
r i g h t n u m b e r o f t h e
security code. The initial
standard code is 99. Press
O K . I f y o u k e y i n t h e
wrong code 3 times, the
system will be locked for
30 mins.
Å
Æ
OK
ESC
Control keys for the
internal unit
Terminates the operation
in the menu, respectively
jumps one menupoint
higher
Confirmation,
respectively jumps one
menupoint lower
Right, left navigation in
the menu, respectively
changes values in the
display
o1 ... o3
Enter output (channel)
The finger, which has been
e n r o l l e d i n th e f o r me r
menu is now assigned to a
c e r t a i n c h a n n e l . F o r
example the forefinger is
used to unlock channel 1.
EF
Enroll Finger
The sensor of the external
u n i t i s a c t i v a t e d . T h e
status display is orange.
Go to the external unit and
d r a g y o u r f i n g e r - a s
described in the operating
manual - over the sensor.
The status display now is
green, which means the
finger has been enrolled
successfully.
Note:
The word „channel“ and
„relay” are used
interchangeably.


