eKey TOCAhome Installation & Operating Manual Download Page 5

- 9 - 

Installation 


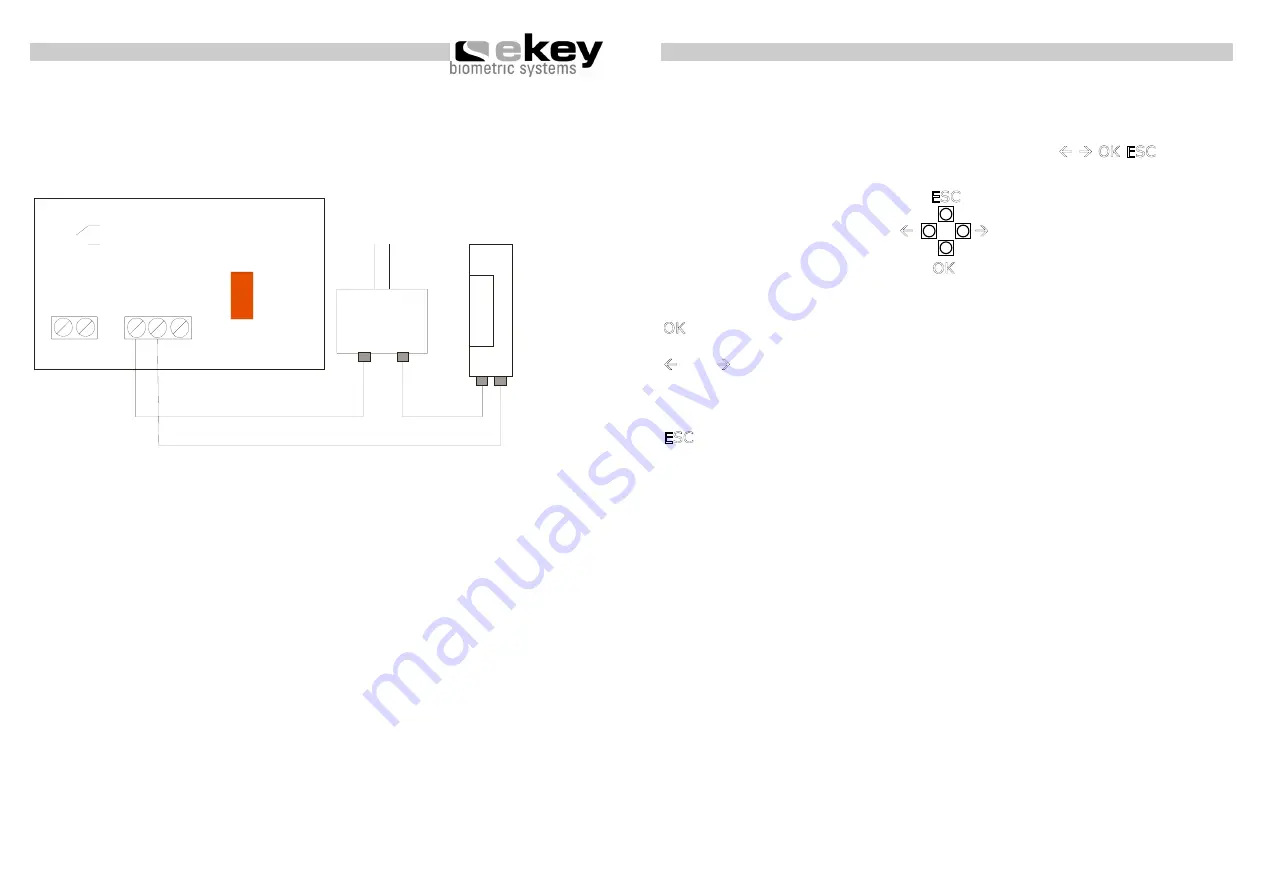
Example: Connecting to a door opener 


Internal unit with dry contact

Relay

Power supply

Door opener

NC

C NO

1 2

Channel1

C

NO

NC

110 V~


230V~ 

or 

 - 

10 

Operation 


4.


Operation 


4.1. Using the operation keys of inside unit 

Programming is carried out by the usage of 4 keys: 

Å


Æ

 OK ESC


OK

 serves to enter the menu and to confirm your input.  


Å

 and 

Æ

 serves to change the values in the display and respectively for 

navigation respectively as shown in the illustration of programming menu 

in chapter 4.3.  
 

ESC

 serves to cancel the current selection. 


Program-, menu functions and display 

Normal operation 

. (blinking) 

Enrol user 

Eu 

Delete user 

du 

Security code setting  

Sc 

Reset to initial settings 

rr 

(deletes all user settings and data) 


Å

Æ

OK

ESC

Summary of Contents for TOCAhome

Page 1: ...ome ekey TOCAhome 3 ekey TOCAhome pc Access system with fingerscan 2 Index of contents SCOPE OF SUPPLY 3 DEVICE OVERVIEW 5 INSTALLATION 6 OPERATION 10 POSSIBLE PROBLEM AREAS AND SOLUTIONS 16 TECHNICAL...

Page 2: ...anual Quick user guide Power supply Inside unit Manual Warranty card User list Screws and pins Mounting plate OU Outside unit Mounting plate IU Quick user guide 4 Scope of supply 1 1 Additional parts...

Page 3: ...utside unit Install the Mounting plate as shown in the illustration besides directly on the wall The ideal installation height is at approximately 135 cm 52 inches upper edge At this height the finger...

Page 4: ...with a change over contact which is freely usable the maximum switching power is 250V 5A Each door opener has to be connected to a dedicated power supply without exception don t use the power supply...

Page 5: ...sage of 4 keys OK ESC OK serves to enter the menu and to confirm your input and serves to change the values in the display and respectively for navigation respectively as shown in the illustration of...

Page 6: ...Eu enroll user This menupoint is used to e n r o l l f i n g e r s i n t h e system 1 99 Set user number Each user has its own user number A user number which is already in use is marked with a blink...

Page 7: ...that this user number is already in use Example 1 Assign the desired user number by using the keys and 9 Press OK 10 The display shows F1 F1 stands for finger 1 Please start to count your fingers at t...

Page 8: ...ide and outside unit are ready for initial operation 16 Possible problem areas and solutions 5 Possible problem areas and their solutions Problem Reason Solution The enrolment of a finger is not succe...

Page 9: ...remely low rate of false identification power consumption o max 7W Speed o Recognition time 20ms per stored finger o Enrolment time 1 2s per finger Recommended diameters of the wires Cable length Min...

Page 10: ...key biometric systems subject to changes errors and omissions excepted No responsibility is accepted for the correctness of the information given ekey biometric systems GmbH Co KG Lunzerstra e 64 A 40...

Reviews: