background image

14

Chapter 2  Settings and Adjustments

3

  Perform the auto adjustment again with the analog screen 

adjustment pattern displayed.

 To adjust flickering, screen position, and screen size 

automatically [Screen]

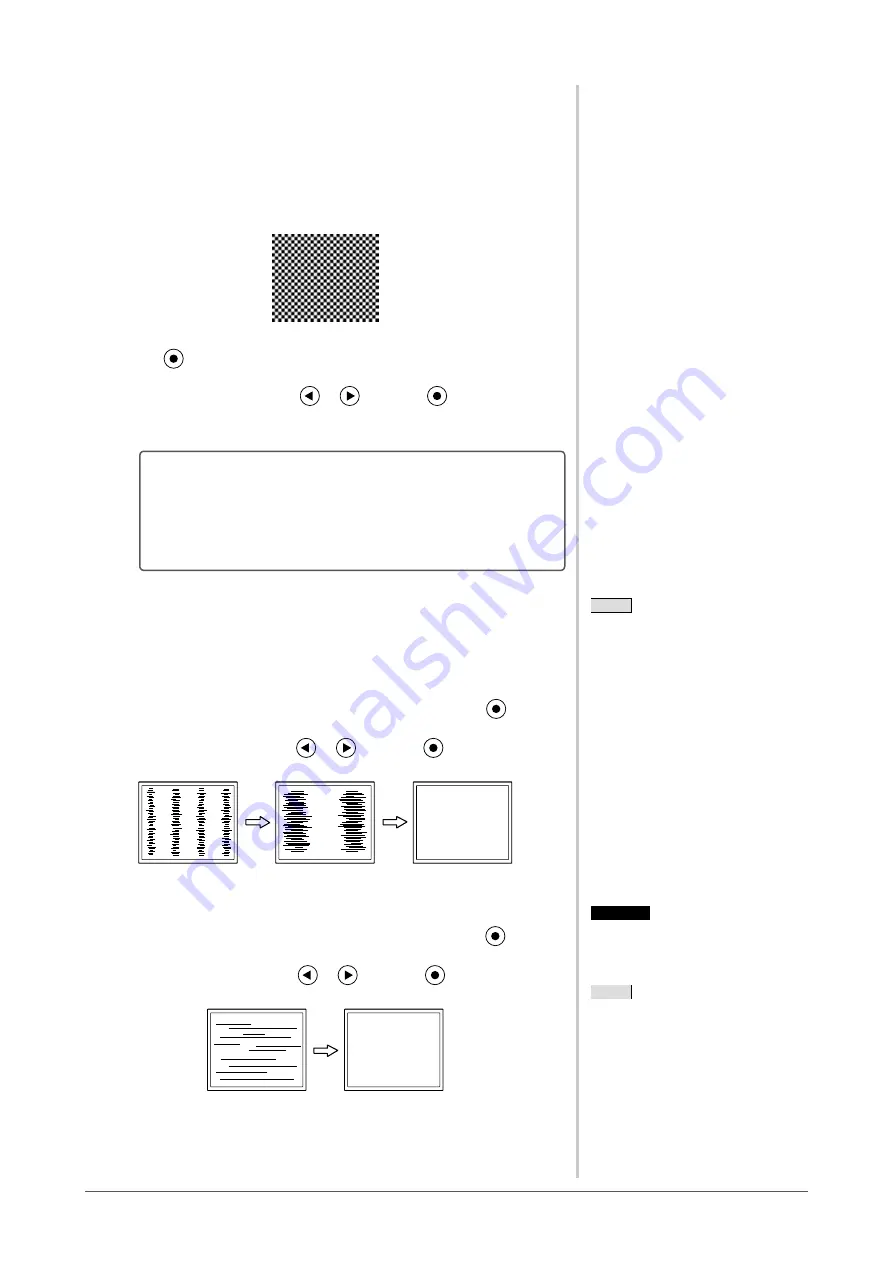
(1)  Display Pattern 1 of the “Screen adjustment pattern files” in full 

screen on the monitor.

(2)  Choose <Screen> from the <Auto Adjustment> menu, and press 

.

The <Screen> menu appears.

(3)  Select “Execute” with 

 or 

, and press 

.

Flickering, screen position, and screen size are corrected by the auto-
adjustment function.


If the screen is not displayed correctly even after adjusting in 
step 3 above, perform the adjustments according to the 
procedures on the following pages. When the screen is 
displayed correctly, go to step 5 

“● To adjust color gradation 

automatically [Range]” (page 15)

.

4

 Perform advanced adjustments for the following using the 

<Screen> menu of the Adjustment menu.

Adjust the clock, phase and position, in this order.

 To eliminate vertical bars [Clock]

(1)  Choose <Clock> from the <Screen> menu, and press 

.

The <Clock> menu appears.

(2)  Adjust the clock with 

 or 

, and press 

.

The adjustment is completed.

 To remove flickering or blurring [Phase]

Adjustable range: 0 to 63

(1)  Choose <Phase> from the <Screen> menu, and press 

.

The <Phase> menu appears.

(2)  Adjust the phase with 

 or 

, and press 

.

The adjustment is completed. 

NOTE

•  Press the control button slowly so as 

not to miss the adjustment point.

•  When blurring, flickering or bars 

appear on the screen after adjustment, 
proceed to 

“● To remove flickering or 

blurring [Phase]” (page 14)

 to remove 

flickering or blurring.

Attention

•  Flickering or blurring may not be 

eliminated depending on your PC or 
graphics board.

NOTE

•  When vertical bars appear on the 

screen after adjustment, go back to 

“● To eliminate vertical bars [Clock]” 
(page 14).

 (Clock → Phase → Position)

Summary of Contents for FLEXSCAN S1701-X -

Page 1: ...e volume carefully to familiarize yourself with safe and effective usage Please read to the Setup Guide for basic information ranging from connection of the monitor to a PC to using the monitor The la...

Page 2: ...y submitted material or information confidential unless prior arrangements are made pursuant to EIZO NANAO CORPORATION s receipt of said information Although every effort has been made to ensure that...

Page 3: ...xtended periods of time Periodic cleaning is recommended to keep the monitor looking new and to prolong its operation lifetime Refer to Cleaning page 4 The LCD panel is manufactured using high precisi...

Page 4: ...lens cleaning paper Remove persistent stains gently with a cloth dampened with a little water and then clean the LCD panel again with a dry cloth for better finishing Cabinet Clean the cabinet with a...

Page 5: ...r ON OFF Power Indicator 18 2 9 Displaying Monitor Information Information 18 2 10 Setting Language Language 19 2 11 Setting On Off for the automatic brightness adjustment function Auto EcoView 19 2 1...

Page 6: ...er To select the display mode FineContrast mode page 16 Portrait Landscape display available For height adjustable stand and EZ UP stand only The software ScreenManager Pro for LCD DDC CI to adjust th...

Page 7: ...justment menu determines an item on the menu screen and saves values adjusted 7 Power button Turns the power on or off 8 Power indicator Indicates monitor s operation status Blue Operating Orange Powe...

Page 8: ...e display mode Resumption of Default Setting To reset color adjustment values Reset see page 20 Main menu Refer to page 9 for operation 1 Screen Adjustment Automatic Adjustment To adjust flickering an...

Page 9: ...and selecting function 1 Press The main menu appears 2 Select a function with or and press The sub menu appears 3 Select a function with or and press The adjustment setting menu appears 4 Adjust the...

Page 10: ...lutions Frequencies The monitor supports the following resolutions Analog Input Resolution Frequency Dot Clock 640 480 VGA VESA 75 Hz 135 MHz Max 720 400 VGA TEXT 70 Hz 800 600 VESA 75 Hz 1024 768 VES...

Page 11: ...indow click Display Settings 4 On the Display Settings dialog select the Monitor tab and select desired resolution in the Resolution field 5 Click the OK button 6 When a confirmation dialog is display...

Page 12: ...access procedures Item Overview OS A Readme txt file Screen adjustment pattern files Used when adjusting the image of the analog signal input manually ScreenManager Pro for LCD DDC CI A software for...

Page 13: ...nitor comfortably Adjustment Procedure 1 Perform the auto adjustment To adjust flickering screen position and screen size automatically Screen 1 Choose Screen from the Auto Adjustment menu and press T...

Page 14: ...vanced adjustments for the following using the Screen menu of the Adjustment menu Adjust the clock phase and position in this order To eliminate vertical bars Clock 1 Choose Clock from the Screen menu...

Page 15: ...rn files 2 Choose Range from the Auto Adjustment menu and press 3 Select Execute with or and press The output range is adjusted automatically 4 Close the Pattern 2 6 Modify blurred characters or lines...

Page 16: ...ts Independent setting and saving of color adjustment are available for each FineContrast mode Adjustment items in each mode According to the FineContrast mode selected the adjustable function differs...

Page 17: ...he Kelvin K are available only as reference Gain To adjust red green and blue to a desired color tone respectively 0 to 100 Adjust the respective brightness of red green blue to make a desired color t...

Page 18: ...pears 3 Select a menu position with or and press The setting is completed 2 8 Setting Power Indicator ON OFF Power Indicator This function allows you to set the power indicator blue ON OFF in the moni...

Page 19: ...ion as a result of the brightness of the monitor 1 Press The EcoView Index menu appears The power saving ratio comes to high as the indicator level meter lights towards right 2 13 Locking Buttons This...

Page 20: ...t only to the default settings and the other is to reset all the settings to the default settings To reset color adjustment values Only the adjustment values in the current FineContrast mode will reve...

Page 21: ...nal is switched the active signal type Analog or Digital appears at the top right corner of the screen for three seconds To set input signal selection Input Signal Setting Function Auto When a PC is t...

Page 22: ...on after power on Check whether the PC is turned on Check whether the signal cable is connected properly Switch the input signal with When inputting a sync on green signal the SoG setting for the moni...

Page 23: ...his is due to LCD panel characteristics and is not a failure 10 Interference patterns or pressure marks remain on the screen Leave the monitor with a white or black screen The symptom may disappear 11...

Page 24: ...attaching an arm or stand follow the instructions of their user s manual When using another manufacturer s arm or stand confirm the following in advance and select one conforming to the VESA standard...

Page 25: ...g Orange Digital input This monitor complies with the DVI DMPM standard Power Saving System The monitor enters the power saving mode in five seconds in connection with the PC setting PC Monitor Power...

Page 26: ...t Signal Connectors DVI D connector D sub mini 15 pin connector Analog Input Signal Sync Separate TTL Positive Negative Sync on Green 0 3Vp p Negative Analog Input Signal Video Analog Positive 0 7Vp p...

Page 27: ...saving mode 0 6W or less 0 5W typ for single signal input when stereo mini jack cable is not connected Input Signal Auto SoG Off Power button Off 0 5W or less when stereo mini jack cable is not conne...

Page 28: ...27W or less Speaker not working Power saving mode 0 6W or less 0 5W typ for single signal input when stereo mini jack cable is not connected Input Signal Auto SoG Off Power button Off 0 5W or less wh...

Page 29: ...Horizontal 178 Vertical 178 CR 10 or more Dot Pitch 0 294 mm Horizontal Scan Frequency Analog 31 80 kHz Digital 31 64 kHz Vertical Scan Frequency Analog 50 75 Hz Non interlace Digital 59 61 Hz VGA Tex...

Page 30: ...61 5 mm 2 42 inch Mass Main unit including Height adjustable Stand Approx 7 2 kg 15 9 lbs Main unit including EZ UP stand Approx 8 8 kg 19 4 lbs Main unit without stand Approx 5 2 kg 11 5 lbs Movable...

Page 31: ...31 Chapter 5 Reference Main default settings factory settings Auto EcoView On Smoothing 3 FineContrast Mode Custom Input Signal Auto Off Timer Disable Language English...

Page 32: ...339 8 13 4 363 14 3 36 1 42 59 2 32 100 3 9 100 3 9 unit mm inch Height adjustable Stand 11 6 0 46 13 9 0 55 13 9 0 55 TILT 50 5 1 99 339 8 13 4 363 14 3 272 2 10 7 300 11 8 205 8 1 100 3 9 100 3 9 38...

Page 33: ...1 99 339 8 13 4 363 14 3 272 2 10 7 300 11 8 205 8 1 100 3 9 100 3 9 389 5 489 5 15 3 19 3 421 521 16 6 20 5 30 216 8 5 131 5 5 2 131 5 5 2 100 3 9 100 3 9 58 2 28 SWIVEL 35 35 320 12 6 239 9 4 172 6...

Page 34: ...6 100 3 9 117 4 6 205 8 1 241 9 5 TILT unit mm inch Height adjustable Stand 172 6 8 374 14 7 35 35 SWIVEL 239 9 4 320 12 6 38 5 1 52 61 5 2 42 378 4 14 9 13 3 0 52 405 15 9 303 11 9 15 5 0 61 334 13...

Page 35: ...38 5 1 52 61 5 2 42 25 517 20 4 100 3 9 100 3 9 340 13 4 30 7 1 21 74 4 2 93 1 7 2 1 7 2 121 3 4 8 170 6 7 152 5 6 152 5 6 117 4 6 117 4 6 374 14 7 131 8 5 2 60 5 2 38 186 1 7 3 284 2 11 2 13 7 0 54 1...

Page 36: ...100 3 9 117 4 6 152 5 6 100 3 9 152 5 6 47 5 1 87 406 5 506 5 16 19 9 442 542 17 4 21 3 15 5 0 61 unit mm inch EZ UP stand 376 3 14 8 405 15 9 301 1 11 9 334 13 1 240 9 4 246 8 9 7 38 5 1 52 61 5 2 42...

Page 37: ...22 TMDS Clock shield 7 DDC Data SDA 15 Ground return for 5V Hsync and Vsync 23 TMDS Clock 8 NC 16 Hot Plug Detect 24 TMDS Clock NC No Connection D sub mini 15 pin connector 5 1 3 4 2 8 7 6 9 10 12 13...

Page 38: ...ity volume passing through each color s filter Phase Phase means the sampling timing to convert the analog input signal to a digital signal Phase adjustment is made to adjust the timing It is recommen...

Page 39: ...transmission system for digital interface VESA DPMS Video Electronics Standards Association Display Power Management Signaling VESA provides the standardization of signals from PC graphics board for p...

Page 40: ...egative VESA 1024 768 75Hz 78 8 MHz Horizontal 60 02 Positive Vertical 75 03 Positive VESA 1152 864 75Hz 108 0 MHz Horizontal 67 50 Positive Vertical 75 00 Positive VESA 1280 960 60Hz 108 0 MHz Horizo...

Page 41: ...ful interference to radio communications However there is no guarantee that interference will not occur in a particular installation If this equipment does cause harmful interference to radio or telev...

Page 42: ...s 5 min nach hinten 5 e Der Standfu mu die M glichkeit zur Drehung des Bildschirmger tes besitzen max 180 Der maximale Kraftaufwand daf r mu weniger als 100 N betragen f Der Standfu mu in der Stellung...

Page 43: ...ity of the Product due to possible technical innovations and or regulations c Any deterioration of display performance caused by the deterioration of expendable parts such as the LCD panel and or back...

Page 44: ...ung usw hervorgerufen werden z B Ver nderungen von Helligkeit oder Helligkeitsverteilung Ver nderungen von Farbe oder Farbverteilung Pixeldefekte einschlie lich von durchgebrannten Pixeln usw d Produk...

Page 45: ...ts consommables tels que le panneau LCD et ou le r tro clairage etc par exemple des changements de luminosit des changements de l uniformit de la luminosit des modifications de couleur des changements...

Page 46: ...les como el panel LCD y o la Backlight etc p ej cambios de brillo cambios de uniformidad del brillo cambios de color cambios de uniformidad del color defectos de p xeles incluyendo p xeles muertos etc...

Page 47: ...o delle prestazioni dello schermo causato dal deterioramento delle parti consumabili come il pannello LCD e o la retroilluminazione ecc per esempio i cambiamenti di luminosit cambiamenti di uniformit...

Page 48: ...x ndringar i ljusstyrka j mnhet i ljusstyrka f rg f rgj mnhet defekta pixlar och eller fast lysande pixlar etc d Alla defekter hos Produkten som orsakats av extern utrustning e Alla defekter hos Produ...

Page 49: ...49 EIZO NANAO CORPORATION EIZO EIZO EIZO EIZO i 5 ii 30 000 LCD 3 EIZO EIZO 7 EIZO EIZO EIZO LCD pixel pixel LCD EIZO EIZO EIZO EIZO EIZO EIZO...

Page 50: ...50 EIZO NANAO CORPORATION EIZO EIZO EIZO EIZO i 5 ii 30 000 3 EIZO EIZO 7 EIZO QC EIZO EIZO EIZO EIZO EIZO EIZO EIZO EIZO...

Page 51: ...51 EIZO NANAO EIZO EIZO EIZO EIZO i 5 ii 3 LCD 3 EIZO 7 EIZO EIZO EIZO a EIZO b c LCD d e f g LCD EIZO EIZO EIZO EIZO EIZO EIZO...

Page 52: ...52 Pb Hg Cd Cr VI PBB PBDE SJ T 11363 2006 SJ T 11363 2006...

Page 53: ......

Reviews: