background image

English 

4

 PRECAUTIONS 

PRECAUTIONS 

IMPORTANT! 

• 

This product has been adjusted specifically for use in the region to which it was 
originally shipped. If operated outside the region to which it was originally shipped, 
the product may not perform as stated in the specifications. 

• 

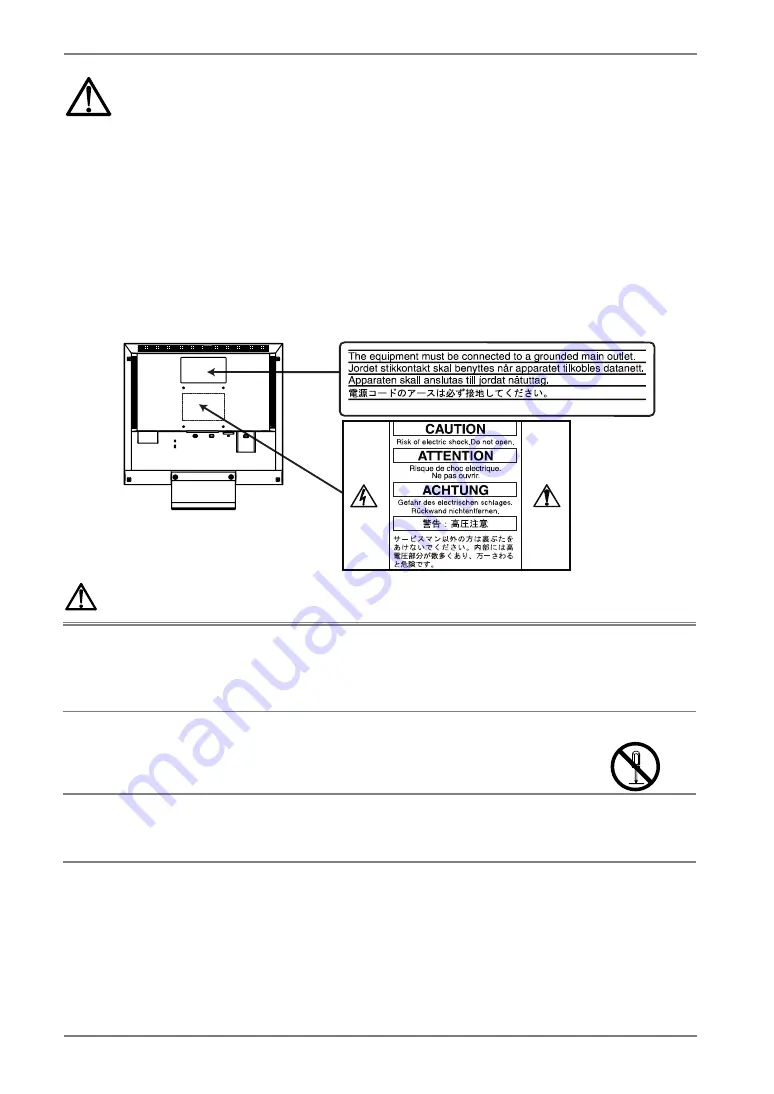
To ensure personal safety and proper maintenance, please read this section and the 
caution statements on the unit (refer to the figure below). 

[Location of the Caution Statements] 


 WARNING 


If the unit begins to emit smoke, smells like something is burning, or 
makes strange noises, disconnect all power connections immediately 
and contact your dealer for advice. 

Attempting to use a malfunctioning unit can be dangerous. 


Do not dismantle the cabinet or modify the unit. 

Dismantling the cabinet or modifying the unit may result in electric shock or 
burn. 


Refer all servicing to qualified service personnel. 

Do not attempt to service this product yourself as opening or removing covers 
may expose you to dangerous voltage or other hazards. 


Summary of Contents for FlexScan L 665 L665 L665

Page 1: ...User s Manual Color LCD Monitor...

Page 2: ...any submitted material or information confidential unless prior arrangements are made pursuant to Eizo Nanao Corporation s receipt of written information Although every effort has been made to ensure...

Page 3: ...the signal cable 13 2 3 Sound Connections 15 3 ScreenManager 16 3 1 How to use the ScreenManager 16 3 2 Adjustments and Settings 17 3 3 Useful Functions 18 4 ADJUSTMENT 20 4 1 Screen Adjustment 20 4...

Page 4: ...figure below Location of the Caution Statements WARNING If the unit begins to emit smoke smells like something is burning or makes strange noises disconnect all power connections immediately and cont...

Page 5: ...ric shock S I G S I G AUTO AUTO ENT ENT OK Set the unit in an appropriate location Not doing so may cause damage and could result in fire or electric shock Do not place outdoors Do not place in the tr...

Page 6: ...power cord if it begins to thunder Touching them may result in electric shock When attaching an arm stand please refer to the user s manual of the arm stand and install the unit securely with the encl...

Page 7: ...osed space Do not use the unit lying down or upside down Using the unit in these ways blocks the ventilation slots and prevents proper airflow leading to fire or other damage Do not touch the plug wit...

Page 8: ...ed life span When the screen becomes dark or begins to flicker please contact your dealer Do not press on the panel or edge of the frame strongly as this will result in damage to the screen There will...

Page 9: ...f 60 Hz VGA text 70 Hz Resolution 1280 dots x 1024 lines Auto Adjustment compliant ColorManagement function incorporated Support to sRGB p 37 standard Built in speaker system 1 2 Package Contents Plea...

Page 10: ...isplay the volume control bar Press the right or left button to mute off 3 Headphone jack stereo mini jack 4 Input signal selection button 5 Auto Adjustment Button 6 Enter Button 7 Control Buttons Up...

Page 11: ...an Arm Stand 4 16 Stand Detachable 4 3 Allows for connection of a security cable This lock supports Kensington s MicroSaver security system For further inforamation please consult Kensington Technolo...

Page 12: ...s menu enables to change the screen size p 22 When your computer and display support VESA DDC the suitable resolution and the refresh rate are set by just plugging your display into the computer witho...

Page 13: ...nnection with the screw in fasteners Analog Input Signal Cable Connector PC Signal Cable enclosed Video Output Connector D Sub mini 15 pin Standard graphics card Macintosh G3 Blue White G4 Signal Cabl...

Page 14: ...e equipment must be connected to a grounded main outlet Not doing so may result in fire or electric shock 3 Turn on the monitor s main power and then switch on the PC s power The monitor s power indic...

Page 15: ...2 Connect the other side of stereo mini jack cable to the line out of audio devices Sound control Audio performance is available by connecting the headphone to the Headphone jack When headphones are c...

Page 16: ...tons to select the desired setting icon and push the Enter button The setting menu appears 3 Use the Control buttons to make all required adjustments and push the Enter button to save the settings 3 E...

Page 17: ...nd 4 4 Power save Setup p 27 Screen Size Border Intensity 4 2 Displaying a low resolutions p 23 Input Signal Set the input signal selection of automatic or manual p 19 Off Timer Set the monitor s off...

Page 18: ...amount of time has lapsed This function was created to reduce afterimage p 36 characteristics that are particular to LCD monitors when the monitor screen is left on for a long period without use Proce...

Page 19: ...k on To display Switch off the monitor s power by the power switch then hold down the Enter button once again and turn the power back on Automatically selecting the input signal function The monitor w...

Page 20: ...stments 1 Push the Auto adjustment button on the front panel The message Your setting will be lost if you press again now appears and remains on the screen for 5 seconds While the message is on the sc...

Page 21: ...ontal bars appear on the screen Use the Phase p 37 adjustment Select the Phase and eliminate the horizontal flickering blurring or bars by using the right and left buttons NOTE Horizontal bars may not...

Page 22: ...ss will not be adjusted 5 To smooth the blurred texts of the enlarged screen of the lower resolutions Switch the Smoothing setting See p 23 6 To set the Contrast of the screen Use the Contrast adjustm...

Page 23: ...ted Enlarged Displays the picture on the screen in full irrespective of the picture s resolution Since the vertical resolution and horizontal resolution are enlarged at same rates some horizontal or v...

Page 24: ...the black area surrounding the displayed image Set the Border Intensity In the Enlarge mode or Full Screen mode the outer area border is usually black Select Border Intensity in the Others menu and ad...

Page 25: ...he specific adjustment They are available only as a reference tool To create an uniform white or black screen the percentages for each will probably not be the same Custom mode To adjust the color set...

Page 26: ...he red green and blue color tones for each mode custom colors can be defined The 100 indicates unadjusted condition Display a white or gray background image and adjust the Gain NOTE The values shown i...

Page 27: ...ower saving STAND BY SUSPEND OFF Power saving Yellow Procedure Operate the mouse or keyboard to return to a normal screen Digital input This monitor complies with the DVI DMPM p 36 Procedure 1 Set the...

Page 28: ...e for speaker When the monitor is in the power saving mode sound of speaker also erases simultaneously can be performed Procedure 1 Set the PC s power saving settings 2 Select Sound 3 Select Disable E...

Page 29: ...that is able to support an object weighting 13 5 kg 29 8 lbs T V GS approved arm stand Use an arm stand with sufficient stability mechanical firmness to support the weight of the monitor Use an arm st...

Page 30: ...ront control panel Try pressing a key on the keyboard or clicking the mouse p 27 Try pressing the power of the computer 2 Following messages appear Error messages shown below will remain on the screen...

Page 31: ...p 21 5 Horizontal bars of distortion appear Decrease the horizontal bars using the Phase p 21 6 Letters and lines appear blurred Switch the Smoothing mode to Off p 22 7 The screen is too bright or too...

Page 32: ...tment lock is probably on To unlock switch the LCD monitor off Then while pressing the Auto adjustment button switch the power on p 18 The Auto sizing function is intended for use on the Macintosh and...

Page 33: ...as these may cause damage to the cabinet or LCD panel Cabinet To remove stains wipe the cabinet with a soft lightly moistened cloth using a mild detergent Do not spray wax or cleaner directly into th...

Page 34: ...log Input Signal Sync Separate TTL Positive Negative Analog Input Signal Video 0 7Vp p 75 Positive Input Signal Digital TMDS Single Link Signal registration Analog 30 Factory preset 23 Plug Play VESA...

Page 35: ...Green ground 12 Data SDA 3 Blue video 8 Blue ground 13 H Sync 4 Ground 9 No pin 14 V Sync 5 No pin 10 Ground Shorted 15 Clock SCL DVI D Connector Pin No Signal Pin No Signal Pin No Signal 1 TMDS Data2...

Page 36: ...mperature settings 5 000 K Slightly reddish white 6 500 K Warm white tone similar to white paper or daylight 9 300 K Slightly bluish white DVI Digital Visual Interface A digital flat panel interface D...

Page 37: ...pixels are displayed as a full screen sRGB Standard RGB International Standard for Red Green and Blue color space A color space was defined with the aim of the color matching between applications and...

Page 38: ...English 38 MEMO MEMO...

Page 39: ...ie nachfolgenden Diagramme 23 signaux ont t enregistr s en usine dans le microprocesseur du moniteur conform ment au diagramme de synchronisation ci dessous A Front Porch Vordere Schwarzschulter Front...

Page 40: ...0 36 0 Posi Posi 35 16 56 25 0 667 24 0 028 1 2 000 72 0 057 2 VESA 800 600 40 0 Posi Posi 37 88 60 32 1 000 40 0 026 1 3 200 128 0 106 4 VESA 800 600 50 0 Posi Posi 48 08 72 19 1 120 56 0 770 37 2 40...

Page 41: ...25 22 222 800 17 067 600 28 444 1024 17 778 625 2 200 88 0 607 23 6 400 256 0 739 28 20 000 800 15 840 600 26 400 1056 16 579 628 1 280 64 0 478 23 4 800 240 1 373 66 16 000 800 12 480 600 20 800 104...

Page 42: ...onmental labelling of personal computers The labelling scheme was developed as a joint effort by the TCO The Swedish Confederation of Professional Employees Svenska Naturskyddsforeningen The Swedish S...

Page 43: ...ous system and is toxic in high doses The relevant TCO 99 requirement states that batteries the colour generating layers of display screens and the electrical or electronics components must not contai...

Page 44: ...there is no guarantee that interference will not occur in a particular installation If this equipment does cause harmful interference to radio or television reception which can be determined by turnin...

Page 45: ...wenden schlechte Erkennbarkeit Augenbelastung bei zu geringem Zeichenkontrast Recycle Auskunft Die R cknahme dieses Produktes nach Nutzungsende bernimmt EIZO in Deutschland zusammen mit dem Partner vo...

Reviews: