background image

8

1

INSTALLATION

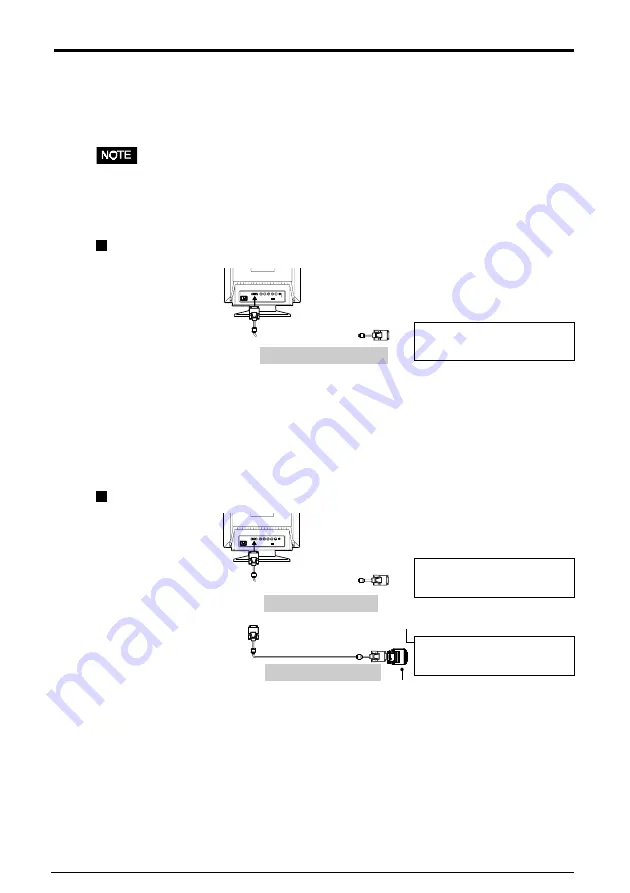
Macintosh Adapter (Optional)
Please consult EIZO dealer.

D-Sub mini 15 pin

D-Sub

mini 15 pin

 Macintosh

1 INSTALLATION

1-1.

Connecting the monitor to the PC

1) Be sure that the power switches of both the PC and the monitor are OFF.

2) Plug the signal cable into the connector at the rear of the monitor.

• When connecting the signal cable or cable adapter, first check that the shape at the

cable side matches the shape at the connecting side.  After connecting, secure the
connection with the screw-in fasteners.

3) Plug the other end of the cable into the video connector on the rear of the PC.

Standard PC graphics board

Using the monitor with Windows

®

 95/98

A monitor information file is saved in the EIZO CRT Utility disk included in the
package.  It includes all the required information for best operation with Windows 95/
98.
Please install the enclosed utility and select your model name from the monitor list in
Windows 95/98.  For installation procedure, please read the readme. txt file in the
utility disk.

Macintosh

4) Plug the power cord into the power connector at the rear of the monitor.  Then plug

the other end of the cord into a power outlet.

Macintosh (Blue & White)

Signal Cable (enclosed)

D-Sub

mini 15 pin

Signal Cable (enclosed)

Standard PC graphics board

D-Sub mini 15 pin

D-Sub mini 15 pin

Signal Cable (enclosed)

D-Sub 15 pin

D-Sub

mini 15 pin

Summary of Contents for FLEXSCAN F930 -

Page 1: ...User s Manual FlexScan F930 Color Display Monitor English...

Page 2: ...oration Eizo Nanao Corporation is under no obligation to hold any submitted material or information confidential unless prior arrangements are made pursuant to Eizo Nanao Corporation s receipt of said...

Page 3: ...ly to a standard wall power outlet Location of the Caution Statements PRECAUTIONS IMPORTANT To ensure personal safety and proper maintenance Please read this section and the caution statements on the...

Page 4: ...fore using it again Using a monitor after it has been dropped may result in fire or electric shock Keep the plastic packing bags away from children and infants Plastic bags can be dangerous To avoid d...

Page 5: ...or equipment damage Handle with care when carrying the monitor Note that the monitor is heavier at the front than at the rear Do not move it alone Always work with another person The screen is optica...

Page 6: ...power outlet may result in electric shock When adjusting the viewing angle of the monitor do not do so by handling the sound unit or USB hub if applicable Adjusting the monitor in this way may break t...

Page 7: ...IZING Fine Contrast Setting Button The Button Setting menu switches this button s function Auto Sizine or Fine Contrast See page 18 Power Switch BNC D SUB Selection Button Selects BNC or D Sub connect...

Page 8: ...on the rear of the PC Standard PC graphics board Using the monitor withWindows 95 98 A monitor information file is saved in the EIZO CRT Utility disk included in the package It includes all the requi...

Page 9: ...all connections have been made properly Refer to the TROUBLESHOOTING section on page 26 for additional adivice 1 2 Using the AUTO SIZING Button After connecting the monitor to the PC first press the...

Page 10: ...on on the screen Horizontal Scan Frequency 30 130 kHz 1 3 Setting the resolution The following look up table shows the maximum Non interlaced vertical refresh rates for this model with regard to stand...

Page 11: ...NTER key 2 To exit the ScreenManager select the Exit icon or push the down Arrow key twice and press the ENTER key Leaving the ScreenManager idel for 45 seconds or more will turn the adjustment off au...

Page 12: ...Uniformity Adjusts Uniformity Convergence Function Position Size Adjusts Horizontal Image Size Vertical Image Size Adjusts Horizontal convergence Adjusts Vertical convergence What is convergence Conve...

Page 13: ...m mode Please refer to page 14 for the detail Moir Adjusts Horizontal Moir Adjusts Vertical Moir What is moir Moir refers to an interference pattern of dark wavy lines on the screen It is not a defect...

Page 14: ...ng the right or left arrow key Temperature canbe set from 4 000 K to 10 000 K in 500 K increments The default is set at 9 300 K What is color temperature Color temperature is a method to measure the w...

Page 15: ...we call Gain and the saturation of R G and B how vivid or dull they are which we call Cutoff If only a quick setting is required that is close to the desired color but not exact skip making any change...

Page 16: ...ack level It changes only the ending point the white level The Gain adjustment is used to fine tune the whites and light grays to a good balance If an inappropriate adjustment is made corrections can...

Page 17: ...disk For compensation if this file is not available please open a window on the Windows or Macintosh OS for alternative use Set the background to black and open a white window whose size is more than...

Page 18: ...2 After the setting adjust the contrast and brightness in the main menu The adjustment data for the contrast and brightness can be stored in each input mode soft or ex iSet the monitor to maximum bri...

Page 19: ...werManager feature automatically reduces the monitor s power consumption during idle periods The EIZO PowerManager functions comply with the VESA DPMS standard What is VESA DPMS The acronym VESA stand...

Page 20: ...ically shifts the operation into the Off Timer Mode when the set On Period expires The energy consumption of the monitor in the Off Timer Mode is as low as the one of the monitor in PowerManger Mode 2...

Page 21: ...mage This monitor provides signal filter adjustments according to the characteristics of each graphics board for displaying the image properly If the characteristics of the graphics board does not mat...

Page 22: ...is in the advance notice mode of the Off Timer The monitor will be in the Off Timer Mode within 15 minutes 7 To adjust menu position of the ScreenManager Procedure 1 Select Menu Position and adjust t...

Page 23: ...bled by holding down the up arrow key on the control pad while switching on the monitor s power This will disable lock the ScreenManager protecting from accidental changes To unlock the buttons switch...

Page 24: ...nal cables Example Selecting the active input The BNC D Sub selection button on the front panel can be used to select either BNC or D Sub connection as the active input The ScreenManager s Input Prior...

Page 25: ...will not detect signals automatically in this mode Select the active input by pressing the input signal selection button on the monitor s front panel The Input Priority function does not automatically...

Page 26: ...de Try pressing any keys on the front panel or switch the monitor off and then on The monitor may be in Off Timer Mode If the problem persists switch off the monitor power for a few minutes then switc...

Page 27: ...correct distortion and tilting by reorienting the monitor Use of the Moir adjustment may cause a slight vibration To eliminate the vibration set the adjustment level to lower percentage or 0 See page...

Page 28: ...t unnoticeable See page 13 3 Change to a different desktop background to reduce moir even further Change the horizontal and vertical dimensions of the desplay area Change the selected desktop or wallp...

Page 29: ...d ENTER key does not operate 19 AUTO SIZING button does not operates Points to check with possible solutions The Adjustment Lock is probably on To unlock switch off the monitor power then hold down th...

Page 30: ...uildup of dust water or oil on the plug may result in fire Never use thinner benzene alcohol ethanol methanol or isopropyl alcohol abrasive cleaners or other strong solvents as these may cause damage...

Page 31: ...hed PowerManager Mode 1 Less than 10 W PowerManager Mode 2 Less than 3 W Input Connector D Sub mini 15 pin and BNC 5 Switchable Recommended Resolution 1600 dots 1200 lines Input Signal Sync H V Separa...

Page 32: ...d 13 H Sync 5 No pin 6 Red ground 14 V Sync 7 Green ground 15 Clock 8 Blue ground BNC connector Input signal Connector Sync on green Composite sync Separate sync H Sync N A TTL H V composite sync TTL...

Page 33: ...tered in the monitor s microprocessor Resolution Frequen cies Interlace Sync Polarity Video Signal fH kHz fV Hz Level VGA 720 400 31 47 70 09 Non H Negative 0 7V p p text V Positive 75 Ohm VESA 1600 1...

Page 34: ...34 6 SPECIFICATIONS MEMO...

Page 35: ...f personal computers The labelling scheme was developed as a joint effort by the TCO The Swedish Confederation of Professional Employees Svenska Naturskyddsforeningen The Swedish Society for Nature Co...

Page 36: ...lour generating layers of certain computer displays Cadmium damages the nervous system and is toxic in high doses The relevant TCO 99 requirement states that batteries the colour generating layers of...

Page 37: ...ference will not occur in a particular installation If this equipment does cause harmful interference to radio or television reception which can be determined by turning the equipment off and on the u...

Page 38: ...h Anlage III R ntgenverordnung Die in diesem Geraet entstehende R ntgenstrahlung ist durch die eigensichere Kathodenstrahlroehre ausreichend abgeschirmt Recycle Auskunft Die R cknahme dieses Produktes...

Reviews: