background image

18

Chapter 2 Installation / Connection

2-3.  Connecting the Power Cord

Attention

 • Turn off the monitor before connecting it.
 •

When removing the power cord, always remove the power plug from the power outlet first.

1. 

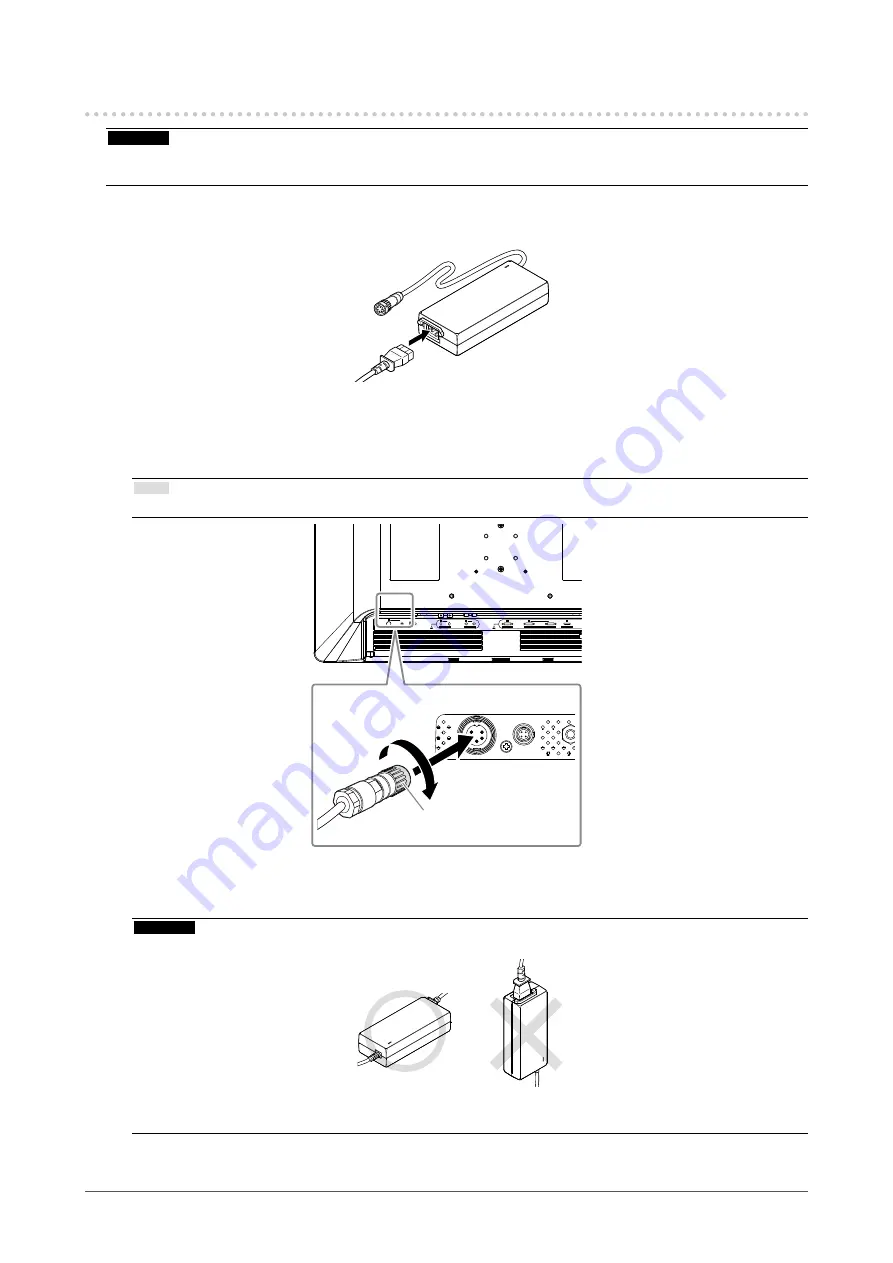
Connect the power cord to the AC IN terminal on the AC adapter.

Insert the power cord all the way to the back.

2. 

Connect the DC OUT terminal of the AC adapter to the DC IN terminal on the 

monitor.

Align the connector shape with the port shape, rotate the lock ring clockwise, and fix it securely.

Note

 • If the lock ring is stiff and does not rotate, push it further into the monitor and try again to rotate it.

DC

12G-SDI

IN

OUT

IN

OUT

3G-SDI

IN

OUT

DVI-D 1

IN

OUT

DVI-D 2

IN

DisplayPort

IN

5V


2A

Lock ring

3. 

Check the rated value on the AC adapter and connect the power plug to the 

power outlet.

Attention

 • If the AC adapter is installed vertically, make sure the AC inlet is not at the top.

Correct: Horizontal position

Incorrect: Vertical position

 • Secure the adapter using a banding band such as a cable tie as necessary to prevent it from dropping.

Summary of Contents for CuratOR EX3241

Page 1: ...llation Manual separate volume carefully to familiarize yourself with safe and effective usage Please retain this manual for future reference For monitor adjustment and settings refer to the Installat...

Page 2: ...unit This product has been adjusted specifically for use in the region to which it was originally shipped If operated outside this region the product may not perform as stated in the specifications N...

Page 3: ...s Symbols on the unit Symbol This symbol indicates Power Switch Press to turn the monitor s power off Power Switch Press to turn the monitor s power on Direct current Alerting to electrical hazard CAU...

Page 4: ...t falls disconnect the power immediately and ask your local EIZO representative for advice Do not continue using a damaged unit Using a damaged unit may result in fire or electric shock Use the unit i...

Page 5: ...result in fire or electric shock Handle the power cord and AC adapter with care Handle the power cord and AC adapter with care Do not place heavy objects on pull or tie the power cord or the AC adapte...

Page 6: ...e electric shock or equipment damage Do not touch the plug or AC adapter with wet hands Doing so may result in electrical shock Use an easily accessible power outlet This is to facilitate disconnectin...

Page 7: ...aning the unit while it is plugged into a power outlet may result in electric shock If you plan to leave the unit unused for an extended period of time disconnect the power plug from the wall socket a...

Page 8: ...EIZO representative The screen may have defective pixels or a small number of light dots on the screen This is due to the characteristics of the panel itself and is not a malfunction of the product D...

Page 9: ...e Welpas Glutaral Sterihyde Glutaral Cidex Plus28 Ammonia Ammonia water Hydrogen peroxide Hydrogen peroxide solution Alkyldiaminoethylglycine hydrochloride Satenidin solution Benzalkonium chloride Zal...

Page 10: ...2 1 Before Installing the Product 15 Installation Requirements 15 2 2 Installing the Product 16 2 3 Connecting the Power Cord 18 2 4 Connecting the Cables 19 2 5 Installing the Cable Cover 20 2 6 Tur...

Page 11: ...ith DisplayPort 1 2 SST Single Stream Transport UHD HDMI signal 1 input Compatible with UHD Other functions S R S C Smart Resolution with Sparse Coding function Reduces blur on input images allowing f...

Page 12: ...AHM250PS48T Cable cover with screws Monitor attachment screw M4 12 x 4 M6 15 x 4 User Manual CD Installation Manual Outline Dimensions Instructions for Use 1 3 Controls and Functions AC adapter 2 3 1...

Page 13: ...cutes the function assigned to this button Select items in the menu screen 5 F2 button 6 F3 button 7 F4 button 8 F5 ENTER button Executes the function assigned to this button Select items in the menu...

Page 14: ...G HD SDI 15 SDI 1 2 output terminals BNC type The signal into the SDI input terminal is output as is SDI 1 is compatible with 12G 6G 3G HD SDI and SDI 2 is compatible with 3G HD SDI 16 DVI D 1 2 input...

Page 15: ...thorough operational testing of the system cables arms etc in the environment where the product will be used Installation Requirements When installing the monitor ensure that there is adequate space a...

Page 16: ...nd attach it to achieve the following tilt angles of the monitor Up 45 down 45 Connect the cables after attaching an arm or stand The monitor arm and stand are heavy Dropping them may result in injury...

Page 17: ...ickness of installation fixture 2 mm 4 5 mm M4 screw M6 screw Installation fixture Screw supplied with the monitor Cabinet Using commercially available screws Installation fixture Commercially availab...

Page 18: ...hape with the port shape rotate the lock ring clockwise and fix it securely Note If the lock ring is stiff and does not rotate push it further into the monitor and try again to rotate it DC 12G SDI IN...

Page 19: ...DMI cable is held securely Attention Do not use damaged cables Do not connect or disconnect the signal cable while the monitor is turned on The SDI terminal DVI D terminal DisplayPort terminal and HDM...

Page 20: ...are not pinched between the cable cover and the monitor Securely tighten the screws in the two locations Screw tightening torque 0 4 N m to 0 7 N m Tool required Phillips screwdriver 2 Avoid subjecti...

Page 21: ...ctly even though the monitor is functioning properly This message appears when no signal is input Example The message shown on the left may appear because some devices to be connected do not output th...

Page 22: ...178 178 Brightness typical 700 cd m2 Response Time typical 18 ms black white black Contrast Ratio typical 1000 1 Video Signals Input Terminals SDI 1 BNC 12G 6G 3G HD SDI SDI 2 BNC 3G HD SDI DVI DVI D...

Page 23: ...ironmental Requirements Temperature 20 C to 60 C 4 F to 140 F Humidity 10 to 90 R H no condensation Air Pressure 540 hPa to 1060 hPa AC adapter Power Input 100 240 VAC 10 50 60 Hz 3 0 A Maximum Power...

Page 24: ...20 x 1080 50p 56 250 50 000 1920 x 1080 59p 67 433 59 940 1920 x 1080 60p 67 500 60 000 640 x 480 60 31 469 59 940 800 x 600 60 37 879 60 317 1024 x 768 60 48 363 60 004 1280 x 800 60 49 702 59 810 12...

Page 25: ...in malfunction of the monitor Install the equipment in a controlled environment in which such effects are avoided Classification of Equipment Electric shock protection type Class I EMC class EN60601 1...

Page 26: ...necessary the equipment or system should be observed to check for normal operation in the configuration in which it will be used When using portable RF communication equipment keep it 30 cm 12 inches...

Page 27: ...onments Compliance level Electromagnetic environment Guidance Electrostatic dis charge ESD IEC EN61000 4 2 8 kV contact discharge 15 kV air discharge 8 kV contact discharge 15 kV air discharge Floors...

Page 28: ...survey a should be less than the compliance level in each frequency range b Interference may occur in the vicinity of equipment marked with the following symbol Note 1 UT is the a c mains voltage pri...

Page 29: ...5800 WLAN 802 11 a n Pulse modulation b 217 Hz 0 2 0 3 9 9 5500 5785 a For some services only the uplink frequencies are included b Carrier waves are modulated using a 50 duty cycle square wave signa...

Page 30: ...and if not installed and used in accordance with the instruction manual may cause harmful interference to radio communications Operation of this equipment in a residential area is likely to cause harm...

Page 31: ...ZO Corporation All rights reserved 1st Edition February 2019 Printed in Japan 00N0N101A1 IFU EX3241 6 www eizoglobal com 8 5B 153 Shimokashiwano Hakusan Ishikawa 924 8566 Japan Siemensallee 84 76187 K...

Reviews: