6.3 Switching off the engine
Emergency Stop procedure:
If it becomes necessary to stop the machine
immediately, set the ON/OFF switch to “Stop” or “0”
Normal procedure:
Let go of the throttle lever and wait until the engine
has changed to idling speed. Then set the ON/OFF
switch to “Stop” or “0”.
6.4 Practical tips
Practice all operating techniques with the engine
switched off before you start to use the machine.
EXTENDING THE CUTTING LINE
WARNING:
Do not use any kind of metal wire or
metal wire encased in plastic in the cutting head. This
may cause serious injuries to the user.
To extend the cutting line run the motor at full speed
and tap (“BUMP”) the cutting head on the ground.
This will automatically extend the line. The blade on
the safety shield will cut the line to the appropriate
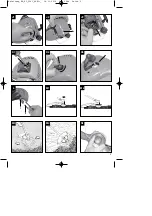
length (Fig. M1).
Caution:
Remove all grass and weed remains at
regular intervals to prevent the shaft tube
overheating. Grass and weed remains become
trapped under the safety shield (Fig. M2) and they
prevent the shaft tube receiving adequate ventilation.
Remove the remains carefully using a screwdriver or
the like.
DIFFERENT CUTTING METHODS
If the machine is correctly assembled with the safety
hood and cutting head it will cut weeds and long
grass in places with difficult access, for example
along fences, walls and foundations and also around
trees. It can also be used for mowing work to remove
vegetation to allow the better preparation of a garden
or to clear a certain area down to the soil.
PLEASE NOTE:
Even if it is used carefully, cutting
around foundations, stone or concrete walls, etc. will
result in the line suffering more than normal wear.
TRIMMING / MOWING
Swing the trimmer from side to side in a scything
motion. Always keep the cutting head parallel to the
ground. Check the site and decide what cutting height
you require. Guide and hold the cutting head at the
required height to ensure that you cut evenly (Fig.
M3).
LOWER TRIMMING
Hold the trimmer right in front of you at a slight angle
so that the underside of the cutter head is above the
ground and the line strikes the correct target. Always
cut away from yourself. Never draw the trimmer
towards yourself.
CUTTING ALONG FENCES / FOUNDATIONS
When cutting approach wire mesh fences, lath
fences, natural stone walls and foundations slowly so
that you can cut close to them without striking the
obstacle with the line. If, for example, the line strikes
stones, stone walls or foundations, it will wear or fray.
If the line strikes wire fencing it will break.
TRIMMING AROUND TREES
When trimming around tree trunks, approach slowly
so that the line does not strike the bark. Walk around
the tree, cutting from left to right. Approach grass or
weeds with the tip of the line and tilt the cutting head
forwards slightly.
WARNING:
Take extreme care during mowing
work. When doing such work keep a distance of 30
meters between yourself and other people or animals.
MOWING
For mowing you want to cut all the vegetation down to
the ground. To do this, set the cutting head at an
angle of 30° to the right. Place the handle in the
required position. Remember the increased risk of
injury to the user, watchers and animals and the
danger of damaging other items due to objects (for
example stones) being thrown out (Fig. M4).
WARNING: Do not remove any objects from
footpaths, etc. using the trimmer.
The trimmer is a
powerful tool and can throw small stones and other
objects a distance of 15 meters or more, causing
injuries and damage to cars, houses and windows.
7. Cleaning, maintenance, storage,
transport and ordering of spare parts
7.1 Cleaning
Keep all safety devices, air vents and the motor
housing free of dirt and dust as far as possible.
Wipe the equipment with a clean cloth or blow it
with compressed air at low pressure.
We recommend that you clean the device
immediately each time you have finished using it.
Clean the equipment regularly with a moist cloth
and some soft soap. Do not use cleaning agents
or solvents; these could attack the plastic parts of
the equipment. Ensure that no water can seep
into the device.
10
GB
Anleitung_BG_PT_3041_SPK1:_ 16.11.2010 11:13 Uhr Seite 20
Summary of Contents for 34.018.13
Page 15: ...EH 04 2012 02 ...
Page 16: ...EH 04 2012 02 ...


