background image

34

5. Wireless LAN Configurations

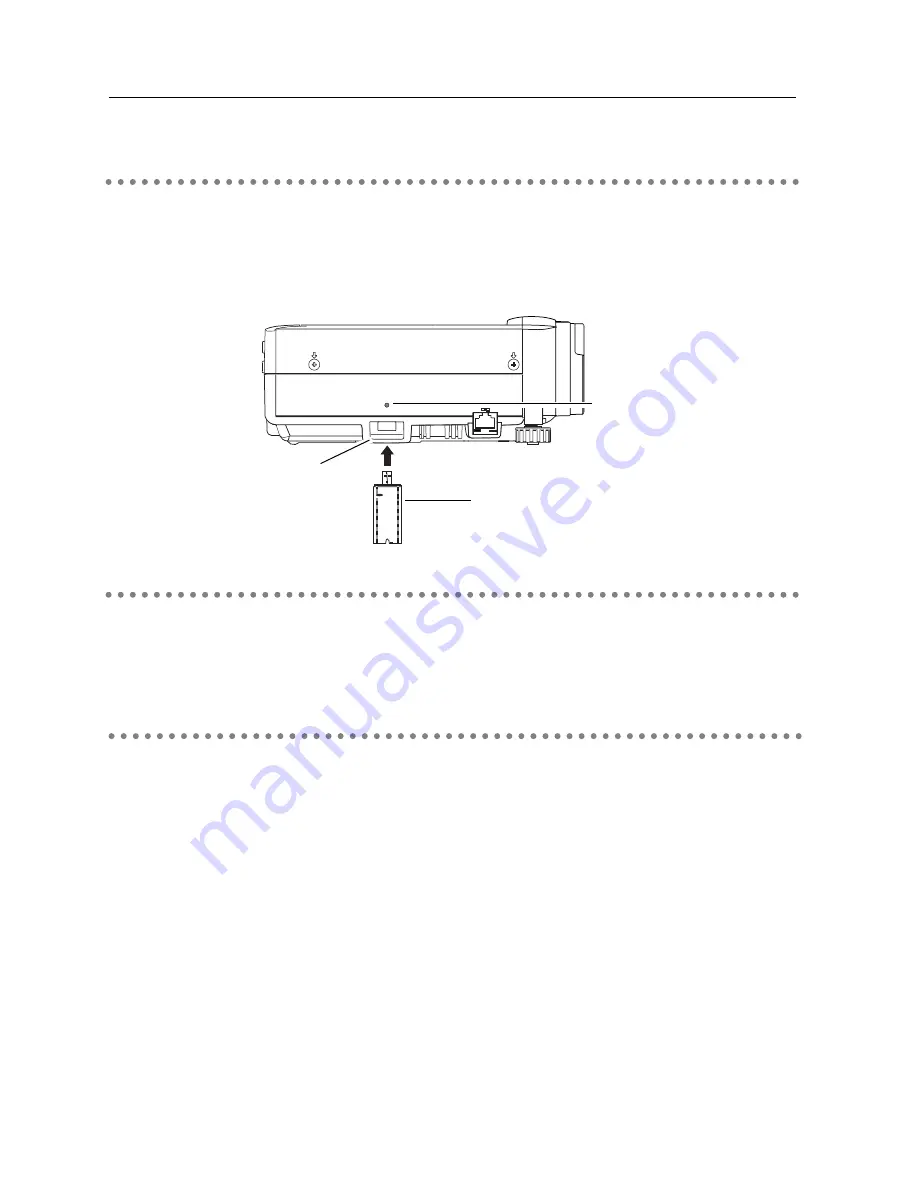
Insert the USB Wireless LAN Adapter into the USB terminal of the projector. Inserting the

adapter after verifying the shape of the connector in order not to break the terminal.

CAUTION: Use specified USB Wireless LAN Adapter (Model : WL-30). If you use other product,

the projector will not be operated properly.

Setting Procedures

1. Turn on the projector and select “Wireless” from the input menu of the projector. The

Network connection standby display will appear and the “Please wait...” message will be

displayed. Refer to “3. Names and Functions of the Operation Screen” 

➔ 

“Network

Connection Standby Display” (p.20).

After short time, the message changes to “ Ready for use”. If the USB Wireless LAN Adapter

is not attached to the projector, “Wireless” cannot be selected.

2. Select “Wireless Setting” from the projector menu and press the SELECT button.  

Select similar environment between LAN 4 and LAN 5 with the Point 

7 8 

buttons. (LAN 4,

LAN 5, and SIMPLE* are factory default settings. Select similar environment to the

installation location. For each settings, refer to the chart on page 38.)

“SIMPLE” mode is used for simple setting without complicated LAN setting procedures to

connect to the Wireless LAN. See “Easy Setting” (pp.36–37) for details.

Attaching the USB Wireless LAN Adapter

With Easy setting, you can make Wireless LAN settings easily without any complicating settings

(p.36).

Set the Wireless LAN network through the projector menu.

Detailed network settings will be made with browser.  Refer to “6. Configurations with Browser”.

(p39–54) Complete the settings described in this chapter before performing the steps in “6

Configurations with Browser.”

Setting the Network Environment

USB

USB

USB Terminal

USB Wireless LAN Adapter

Optionally available.  (Model : WL-30)

USB Lamp
After the USB Wireless LAN
Adapter becomes ready for use,
the lamp will start to blink green
when  receiving data.

Summary of Contents for WL-30

Page 1: ...t read the owner s manual of the projector to understand the projector s basic operation and the safety instructions The safety instructions in the owner s manuals should be followed Owner s Manual No...

Page 2: ...ve 1999 5 EC Federal Communication Commission Notice This equipment has been tested and found to comply with the limits for a Class B digital device pursuant to part 15 of the FCC Rules These limits a...

Page 3: ...egistered trademark or a trademark of its respective corporation USB Wireless LAN Adapter Use the optionally available USB Wireless LAN Adapter Model WL 30 If you use other product the projector may n...

Page 4: ...tworkModule Client 21 NetworkModule Moderator 23 4 Wired LAN Configurations 25 Connecting to the LAN Line 26 Network Environment Settings 26 Setting Procedure 26 Confirming the Operation 28 User PIN C...

Page 5: ...e Clients Participants 61 Unregister from Moderator Status 62 How to Use the Moderator Function 62 Project the Client s Images 62 Stop Projecting the Client s Images 62 Easy Settings for Moderator Fun...

Page 6: ...any of VGA 640 x 480 SVGA 800 x 600 XGA 1024 x 768 The color number should be either 16 byte 65536 colors or 24 32 bit 16 77 million colors Communication Protocol TCP IP Network Correspond Wireless LA...

Page 7: ...ency Channel 2412MHz 2462MHz CH1 CH11 Modulation Form IEEE802 11g OFDM 54 4Mbps 64QAM 36 24Mbps 16QAM 18 12Mbps QRSK 9 6Mbps BPSK IEEE802 11b DSSS1 11 5Mbps CCK 2Mbps DQPSK 1Mbps DBPSK Protocol TCP IP...

Page 8: ...8...

Page 9: ...Chapter 1 About LAN Functions 1 This chapter describes the features the mechanism and connection procedures of the LAN 9...

Page 10: ...the server to project through the projector Moderator function with which the moderator can project the image on the participants computer screen at the meetings or the classes Multi control function...

Page 11: ...ojection via the LAN You can project the image on Computer 1 Wired LAN connection or Computer 2 Wireless LAN connection through the selected projector An Example of the Connection 0 0 0 5 1 0 1 5 2 0...

Page 12: ...eless LAN equipment Communication mode via SSID ESSID Wireless communication mode corresponded computer AdHoc Computer 2 Network Projector Wireless communication mode AdHoc Communicate over an access...

Page 13: ...hen the projector s remote control employs mouse operating function you can operate the computer by the remote control which is provided with the projector Use the remote control pointing to the proje...

Page 14: ...14...

Page 15: ...This chapter describes how to install the NetworkModule software and how to set up the networks 2 Setup Procedures Chapter 2 15...

Page 16: ...ations pp 33 38 Detailed LAN configurations need to be done with a browser later First complete the Wired or Wireless LAN connection between computers and projectors then start browser configurations...

Page 17: ...sh version does not appear open the English folder in the CD ROM and double click AutoRun exe in it 2 Main menu will be displayed on the screen Three software names will be shown on the left side of t...

Page 18: ...tor By clicking the Launch NetworkModule Moderator you can activate the software directly from the CD ROM without installing the software into the computer f Install each software with following the i...

Page 19: ...Chapter 19 3 3 Names and Functions of the Operation Screen This chapter describes the functions of each part of the operation screen...

Page 20: ...w last 6 characters of a MAC address e Display the Network Mode Auto 10 100M is for Wired mode 802 11b 11 802 11g 11 is for Wireless mode r Display the Network Type Wired for Wired mode AdHoc or Infra...

Page 21: ...Screen q Refresh List button Search the projector connected to the networks w Locator button Click the button after selecting a projector from the Network Projector List the operated computer s nickna...

Page 22: ...ration screen of the projector Refer to 10 How to Use the PJ Controller pp 73 90 1 Create Nickname box Create a nickname for each participant When using moderator function each computer s nickname up...

Page 23: ...hich are not written below 6 Moderator Client List Screen Clients participants who joined the moderator s group will be shown The moderator selects one of the participants from the list to project his...

Page 24: ...24...

Page 25: ...Chapter 4 Wired LAN Configurations 4 This chapter describes the preparation for Wired LAN setting with projectors and how to set the LAN environment 25...

Page 26: ...ct Wired Setting in the projector menu and press the SELECT button Select similar LAN environment among LAN1 2 and 3 with the Point 7 8 buttons LAN1 2 and 3 are the factory default setting environment...

Page 27: ...buttons 5 After completing all the settings select Set and press the SELECT button Now all procedures has done To cancel the adjusted settings select the CANCEL button before clicking the SET button...

Page 28: ...creen appears the network has not connected yet Try searching again with the Refresh List button If error screen appears again reconfirm the LAN setting When the projector is set where separated by th...

Page 29: ...o be searched directly by the IP address 1 Click the Add NetworkModule button in the Advanced Settings menu The Add NetworkModule screen will appear 2 Click Add then the Enter IP address screen will a...

Page 30: ...a the networks You can also change the User PIN code See 6 Configurations with Browser Advanced Setup User PIN code p 50 NetworkModule Information MAIN PROGRAM xxxxx BOOT PROGRAM xxxxx MAC ADDRESS 080...

Page 31: ...55 255 255 255 255 255 255 255 255 255 255 255 DNS ADDRESS 255 255 255 255 255 255 255 255 255 255 255 255 IP CONFIGURATION MANUAL DHCP MANUAL INTERRUPT CONNECTION PERMISSION ENABLE ENABLE ENABLE IP C...

Page 32: ...32...

Page 33: ...nd configurations differ depending on the LAN installation location Consult your system administrator for installation and set the LAN appropriately To operate via Wireless LAN your computer has to be...

Page 34: ...the SELECT button Select similar environment between LAN 4 and LAN 5 with the Point 7 8 buttons LAN 4 LAN 5 and SIMPLE are factory default settings Select similar environment to the installation locat...

Page 35: ...haracters into the projector the access point and the Wireless LAN compatible computer up to 32 characters Characters can be selected from A Z a z blank space 0 9 or hyphen with the Point ed buttons M...

Page 36: ...e switching period the projector cannot be operated SIMPLE LAN settings will be shown by pressing the SELECT button The settings cannot be changed 4 Activate NetworkModule Client or NetworkModule Mode...

Page 37: ...Factory Default from the projector menu p 35 and press the SELECT button All the LAN settings will go back to the factory default settings For details refer to Wireless LAN Factory Default Settings p...

Page 38: ...h ARP PING ENABLE ENABLE DISABLE DNS DOMAIN _ _ _ SYSTEM PASSWORD BLANK BLANK BLANK USER PIN CODE 0000 NONE 0000 NONE 0000 NONE These settings can be made only from 6 Configurations with Browser pp 39...

Page 39: ...tion in advance The browser can set or operate LAN setting Configure Wired Wireless LAN environment E mail Setting Configure E mail function to manage the projector remotely Operation of Network Viewe...

Page 40: ...the Advanced button in the Proxy Server field Enter the IP address set on the projector in the Do not use proxy server for addresses beginning with field Netscape Navigator Start up Netscape Navigator...

Page 41: ...activate the screen directly from the browser screen without using NetworkModule Client or NetworkModule Moderator Enter the projector s Network IP address in the URL address bar of the browser Use t...

Page 42: ...42 6 Configurations with Browser Display the current setting environment The contents differ depending on Wired or Wireless LAN environment Screen of Wireless LAN Screen of Wired LAN Information...

Page 43: ...hown Current SSID Show SSID set on the projector Current Channel Show the channel through which the projector is currently communicating Data Transfer Rate Show the current Wireless communication spee...

Page 44: ...dvanced Setup pp 46 52 If you have set the items from the advanced setup Quick Setup is not necessary Setting items differ depending on the Wireless LAN and Wired LAN To reflect the settings on the pr...

Page 45: ...to use If IP Configuration Method is set to DHCP or BOOTP this setting is not needed Subnet Mask Set the Subnet mask in the environment you wish to use If IP Configuration Method is set to DHCP or BO...

Page 46: ...sk in the environment you wish to use If IP Configuration Method is set to DHCP or BOOTP this setting may become unnecessary depending on the settings of DHCP Server and BOOTP Server Gateway Address S...

Page 47: ...he image transfer speed may become slower WEP Key 1 Key 4 Set WEP key in the hexadecimal notation 0 to F 5 bytes are set for 40 bit WEP 13 bytes are set for 104 bit and 16 bytes are set for 128 bit WE...

Page 48: ...dministrator up to ASCII254 characters Mail Address Enter E mail addresses of users up to ASCII254 characters Option When the checked item has occurred the projector sends alert messages Time Set the...

Page 49: ...2 characters Re enter New Admin Password Re enter the new admin password you wish to set The password you have entered is displayed as up to ASCII32 characters APPLY button Click the APPLY button to u...

Page 50: ...t the factory setting the User PIN code is not set If you do not need to set a PIN code enter 0000 Parameter Description Enter New User PIN code Enter a new PIN code you wish to set The PIN code you h...

Page 51: ...want to set a password leave here blank First you need to set the admin password p 49 or you cannot set the moderator login password Parameter Description Enter new Moderator Login password Enter new...

Page 52: ...cting Hide the Status bar on the network standby screen will be disappeared Refer to 3 Names and Functions of the Operation Screen Network Connection Standby Display p 20 Accept Interruptive Connectio...

Page 53: ...pe Channel SSID WEP Security Depending on Wireless or Wired input setting items will be varied Parameter Description LAN1 5 SIMPLE Select a LAN setting from LAN1 3 LAN4 LAN5 and SIMPLE APPLY button Cl...

Page 54: ...projector on this screen To enable the new settings the projector has to be restarted Click RESTART Parameter Description RESTART button Click this button when you restart the projector after completi...

Page 55: ...Chapter 7 Project the Image via the Networks 7 Project the image on the computer screen by operating the projector which is connected to the networks 55...

Page 56: ...d Setup Miscellaneous p 52 On the Real time Capture screen the destination projector will be displayed in blue or black When Real time capturing has been done the Real time Capture button will become...

Page 57: ...Chapter 8 Use the Moderator Function 8 With Moderator function the moderator can project the participants computer screen through the projector in meetings or in classes 57...

Page 58: ...time to transfer the data to the computer connected to the projector The image data will not be limited by the computer s application because the data transfer of each computer adopts the screen captu...

Page 59: ...workModule Moderator is installed on the moderator s computer and moderator s computer image can be projected Preparation Procedure for Using the Moderator Function 1 Configure the Moderator Login pas...

Page 60: ...to each projector through the moderator screen Select the projector on the screen The selected projector will be blue and click the Moderator login button 4 Set Session Password screen will appear Ent...

Page 61: ...ayed in the moderator s client list screen To quit the session right click the projector icon on the computer task bar and select Exit from the moderated session from the menu The client screen will a...

Page 62: ...enter the password here to prevent the session from interfering 3 The confirmation screen in step 5 will not appear 4 Each client participants will joins the session in step 6 Inputting the password...

Page 63: ...ame LAN with the projector through the projector by operating a projector or a computer First check if the projector and the computer are connected to the networks correctly with Wired or Wireless to...

Page 64: ...dHoc Computer Wireless Communication Mode AdHoc Server Instruction FTP Server Computer Wireless Communication Mode AdHoc Image Data The Mechanism of NetworkViewer and the Flow of the Signal Network Vi...

Page 65: ...n will be held 2 The computer issues an instruction to project the image then the projector will follow the instruction and read the image data each time to project The projector can also instruct to...

Page 66: ...d for Wired LAN for the input source of the projector Activate NetworkModule Client or NetworkModule Moderator Detected projector names and IP addresses will be displayed Select the projector 2 Specif...

Page 67: ...6 Click Set button Click Set button to set up the server information on the specified projector The configured server information can be stored even if you unplug the projector 7 Select Play Mode and...

Page 68: ...ectly from the browser is also possible In this case enter the projector IP address directly into browser s address bar Configure NetworkModule button 2 Specify the projector to display the image Only...

Page 69: ...ojector The configured server information can be stored even if you unplug the projector 6 Select Play Mode and display the image Play Mode Auto Infinite Loop Keeps playing images repeatedly Auto Play...

Page 70: ...er refer to 1 Operating with the PJ Controller pp 66 67 or 2 Operating with the browser pp 68 69 1 Configure the FTP server which provides image data referring to Operating with the PJ Controller or O...

Page 71: ...number of repeating times of auto play Maximum 255 times Manual Switch images manually Press the Point e button on the projector or the remote control to show the next image and the Point d button to...

Page 72: ...72...

Page 73: ...ntroller works for Operating the projector Operating the Network viewer Controlling the projector Monitor the operation status of the projector in real time Send an e mail to the administrator about o...

Page 74: ...ctor name will be blue You can select and operate one projector only Multiple projectors cannot be operated If you select and execute multiple projectors another function screen Multi Control Screen S...

Page 75: ...e each item Parameter Description Language Select a desired language from the pull down menu and click Set Temperature Set the unit of temperature displayed on the control screen of the projector Sele...

Page 76: ...the SMTP server is not available in your network environment If the SMTP server is located in your LAN Local Area Network the address set to SMTP server should be specified the in SMTP server located...

Page 77: ...e The Projector lamp is turned off because projector power circuit is failed Unplug this projector from AC outlet and ask for servicing to qualified service personnel When the life of the lamp has bee...

Page 78: ...rn on the projector Caution about turning on off the projector via the networks When you wish to turn on off the projector via the networks preset the projector as follows 1 Select Setting from the Pr...

Page 79: ...ollows Normal Temperature Error Power Failure Input Status Display the following input status Input Display the selected input mode Selection Display the selected input source mode Signal Status Displ...

Page 80: ...projector is turned off Input On this screen you can select an input source of the projector Check the input terminal and select the signal mode from the pull down menu Click Set button to switch the...

Page 81: ...age H Position Click 7 8 to adjust the horizontal position V Position Click 7 8 to adjust the vertical position Clamp Click 7 8 to adjust the clamp level Display Area H Click 7 8 to decrease increase...

Page 82: ...follows Component Input VIDEO S VIDEO Input Parameter Description System Adjustment Select a scan mode of component signal AUTO Automatically adjust to the scan mode of the input signal Parameter Desc...

Page 83: ...namic Standard Real Cinema Black Board Image 1 4 from the pull down list Image 1 4 can be set by users Original Mode Displays the original mode Contrast Click 7 8 to adjust the image contrast Brightne...

Page 84: ...een settings Sound On this screen you can adjust the sound volume of the projector Parameter Description Parameter Description Aspect Select Normal True Wide or Full screen Digital Zoom Click or _ but...

Page 85: ...PJ Controller Setting On this screen you can configure the projector Refer to the next page for each item and description The items displayed on this screen are varied according to the functions provi...

Page 86: ...N the image will be temporarily hidden from view Freeze By clicking ON the image will temporarily freeze Power Management Select Ready Shut Down or OFF from the pull down menu Enter the count down tim...

Page 87: ...Input PC adjustment System Adjustment Image Adjustment Screen and Setting Parameter Description Video System Display the current video system Horizontal Click 7 8 buttons to adjust horizontal screen s...

Page 88: ...tting in the Memo field 3 Save the setting Set Click Save button to save the adjustment Enter the name of the setting 10 How to Use the PJ Controller Loading the Set Click the pull down menu of Load S...

Page 89: ...same network Operation 1 Activate NetworkModule Client or NetworkModule Moderator and call up the Advanced Settings screen 2 Select the projectors to operate by the mouse pointer with pressing the Ctr...

Page 90: ...lue Back Select ON to project blue screen when the input source is not detected Display Select to display or not to display the On screen menu No Show Select ON to display the blank screen Freeze On o...

Page 91: ...Chapter 11 Appendix 11 Troubleshooting Terminology Setting up IP Address with arp ping Command 91...

Page 92: ...NetworkModule Moderator and try to connect with the Easy setting button Refer to 5 Wireless LAN configuration Easy settings pp 36 37 Wireless LAN Connection cannot be established AdHoc Mode When selec...

Page 93: ...ave the DHCP function For detail of the settings refer to the owner s manual for the devices or consult a system administrator of the network Is the segment where the projector is installed different...

Page 94: ...oc mode check which Wireless channel you are using If the computer using the same channel as yours is existing closely the networking speed may be diminished or the communication unstable Change chann...

Page 95: ...is short for Wireless fidelity and a marketing brand name for IEEE 802 11b High Rate Only the products that have passed an inter operation test carried by WECA is approved as Wi Fi Any products appro...

Page 96: ...hyphen MAC address is indicated on a label attached to the bottom of each unit 3 Next enter ping command as follows Example C ping 169 254 1 100 by executing ping command the IP address will be set I...

Page 97: ...ng screen see page 35 The WEP configuration screen appears Refer to 6 Configurations with Browser Wireless Setting p 47 as well 1 Use the Point ed buttons to select the WEP security type To disable WE...

Page 98: ...character use the Point 7 8 buttons to select a character position Enter all the character count displayed with 4 Use the Point 7 8 buttons to select Set and press the SELECT button to return to the...

Page 99: ...KW6BC...

Reviews: