background image

13

CONNECTING PROJECTOR

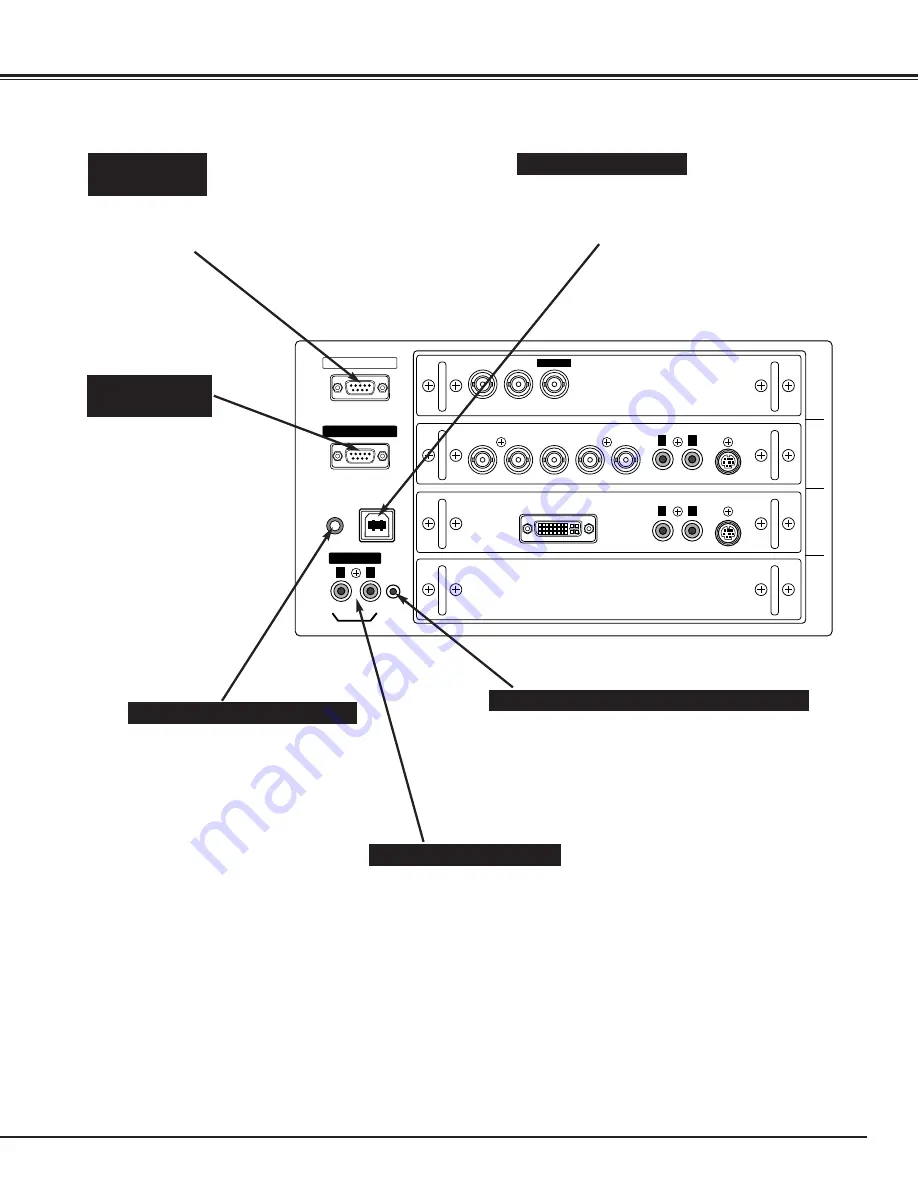
Connect an external audio
amplifier to these jacks.  
(Refer to P14, 15.)

AUDIO OUTPUT JACKS

This projector uses a micro processor to control unit.
Occasionally, micro processor may malfunction and
need to be reset.  This can be done by pressing
RESET button with a pen, which will shut down and
restart unit. Do not use RESET function excessively.

RESET BUTTON

When using Wired / Wireless Remote
Control Unit as Wired Remote
Control, Connect Wired Remote
Control Unit to this jack with Remote
Control Cable (supplied).
(Refer to page 18.)

R/C JACK

USB PORT  (Series B)

INPUT 1

INPUT 2

INPUT 3

DVI

AUDIO

CONTROL PORT

CONTROL PORT

AUDIO

R/Pr

G/Y

B/Pb

H/HV

V

(MONO)

(MONO)

R

L

R

L

(MONO)

AUDIO OUT

R

L

R/C JACK

USB

SERIAL PORT IN

SERIAL PORT OUT

RESET

INPUT 4

SDI IN1

SDI IN2

SDI OUT

SERIAL  PORT

OUT TERMINAL 

SERIAL  PORT

IN TERMINAL 

This port is used to control a projector
with computer.
Connect USB port of computer to this
port.

If you control a projector by computer,
you must connect a cable (not provided)
from your computer to this terminal.

This terminal outputs signal
from SERIAL PORT IN. More
than two projectors can be
controlled with one computer
by connecting SERIAL PORT
IN. of another projector to this
terminal.

Summary of Contents for LC-HDT10

Page 1: ...rusted dependable name in projector lamp sales http www myprojectorlamps com http www myprojectorlamps ca http www myprojectorlamps eu The following projector manual has not been modified or altered i...

Page 2: ...Projection lens is optional MULTIMEDIA PROJECTOR MODEL LC HDT10 OWNER S INSTRUCTION MANUAL...

Page 3: ...O REDUCE THE RISK OF FIRE OR ELECTRIC SHOCK DO NOT EXPOSE THIS APPLIANCE TO RAIN OR MOISTURE This projector produces intense light from the projection lens Do not stare directly into the lens as possi...

Page 4: ...abinet slots as they may touch dangerous voltage points or short out parts that could result in a fire or electric shock Never spill liquid of any kind on the projector This projector should be operat...

Page 5: ...with the limits for a Class A digital device pursuant to Part 15 of FCC Rules These limits are designed to provide reasonable protection against harmful interference when the equipment is operated in...

Page 6: ...PERATION OF REMOTE CONTROL 18 REMOTE CONTROL CODE CHANGE AND OPERATING RANGE 19 REMOTE CONTROL BATTERIES INSTALLATION 19 OPERATING ON SCREEN MENU 20 HOW TO OPERATE ON SCREEN MENU 20 FLOW OF ON SCREEN...

Page 7: ...to PC Adjustment No complicated setup is necessary and projection is always precise Power Management Power Management function is provided to reduce power consumption while a projector is not in use T...

Page 8: ...operating power of Cooling Fans FRONT OF CABINET LAMP COVER ADJUSTABLE FEET This projector is equipped with cooling fans for protection from overheating Pay attention to following to ensure proper ve...

Page 9: ...ct a projector with peripheral equipment before turning a projector on Refer to pages 12 15 for connection CONNECTING AC POWER CORD Connect AC Power Cord supplied to a projector AC outlet must be near...

Page 10: ...ENS SHIFT ADJUSTMENT MOVED UP OR DOWN MOVED LEFT OR RIGHT Use LENS SHIFT button and POINT UP DOWN button to move image up or down Refer to page 23 Use LENS SHIFT button and POINT LEFT RIGHT button to...

Page 11: ...hen moving a projector Moving it unproperly may result in damage of cabinet or person s injury Replace lens cover and retract feet to pre vent damage to lens and cabinet 1 2 3 Pull up lock buttons on...

Page 12: ...ong Guide to fit Plug into Socket 3 4 INPUT 1 INPUT 2 INPUT 3 DVI AUDIO CONTROL PORT CONTROL PORT AUDIO R Pr G Y B Pb H HV V MONO MONO R L R L MONO AUDIO OUT R L R C JACK USB SERIAL PORT IN SERIAL POR...

Page 13: ...uipment to R Pr G Y and B Pb jacks or connect computer output 5 BNC Type Red Green Blue Horiz Sync and Vert Sync from computer to R Pr G Y B Pb H HV and V jacks Refer to P14 15 Connect computer output...

Page 14: ...rol Cable supplied Refer to page 18 R C JACK USB PORT Series B INPUT 1 INPUT 2 INPUT 3 DVI AUDIO CONTROL PORT CONTROL PORT AUDIO R Pr G Y B Pb H HV V MONO MONO R L R L MONO AUDIO OUT R L R C JACK USB...

Page 15: ...MAC VGA Adapter BNC Cable BNC x 5 Audio Cables RCA x 2 Audio Cable stereo NOTE When connecting cable power cords of both a projector and external equipment should be disconnected from AC outlet Turn...

Page 16: ...r NOTE When connecting cable power cords of both a projector and external equipment should be disconnected from AC outlet Turn a projector and peripheral equipment on before computer is switched on Au...

Page 17: ...25 Adjust focus P23 Adjust volume P24 Selects an item or adjusts value in the On Screen Menu P20 Executes the item selected P20 Turns the projector on or off P22 ZOOM buttons Select LENS SHIFT functio...

Page 18: ...his indicator is dim when a projector is turned on And bright when a projector is in stand by mode INDICATORS WARNING TEMP indicator This indicator flashes red when internal projector temperature is t...

Page 19: ...also used as VOLUME button P24 0 IMAGE 1 10 buttons Selects image levels IMAGE 1 IMAGE 10 P32 3 AUTO PC button Operates the Auto PC adjustment function P29 4 NO SHOW button Turns the picture into blac...

Page 20: ...Unit toward projector Receiver Window whenever pressing any button Maximum operating range for Remote Control Unit is about 16 4 5m and 60 in front and rear of a projector 16 4 5 m 60 16 4 5 m 60 Cod...

Page 21: ...tment on ON SCREEN MENU 2 MOVING POINTER 3 SELECT ITEM Move pointer see below or adjust value of item by pressing POINT button s on Side Control or on Remote Control Unit Select item or set selected f...

Page 22: ...ENU Used to adjust sound volume Bass or Treble to select Built in SP On Off and Sound Mute Refer to P24 IMAGE ADJUST MENU Used to select image level among Standard AV Cinema Standard PC Real and Image...

Page 23: ...disappears after 30 seconds Press POWER ON OFF button again to turn off projector LAMP indicator lights bright and READY indicator turns off After approximate 90 seconds READY indicator will light gr...

Page 24: ...n Side Control or on the Remote Control Unit Message Lens shift is displayed 2 Press POINT UP button to move image up press POINT DOWN button to move image down press POINT LEFT to move image left and...

Page 25: ...LEFT RIGHT button s to cut off sound Dialog box display is changed to On and sound is cut off To restore sound to its previous level press POINT LEFT RIGHT button s again Press POINT DOWN button to mo...

Page 26: ...CT INPUT 3 DVI TERMINAL Input 3 When your computer is connected to INPUT 3 DIGITAL terminal select RGB PC Digital RGB AV HDCP When your computer is connected to INPUT 3 ANALOG terminal select RGB Anal...

Page 27: ...nection of computer and a projector is set correctly Refer to TROUBLESHOOTING on page 43 Auto SYSTEM Menu icon Displays system being selected SYSTEM MENU SELECT COMPUTER SYSTEM MANUALLY Press MENU but...

Page 28: ...o move a red arrow pointer to system that you want to select and then press SELECT button 1 2 Projector automatically detects incoming Video signal and adjusts itself to optimize its performance When...

Page 29: ...changed to a 4 3 image even if the input signal is HDTV Aspect H Aspect V These adjust the horizontal and vertical scale and position of the screen When a SELECT button is pressed the mode changes to...

Page 30: ...ore adjustment parameters Adjustment parameters from Auto PC Adjustment can be memorized in this projector Once parameters are memorized setting can be done just by selecting Mode in SYSTEM SELECT Men...

Page 31: ...t dialog box will appear Press POINT LEFT RIGHT button to adjust value Adjusts an image as necessary to eliminate flicker from display Press POINT LEFT RIGHT button to adjust value From 0 to 31 Fine s...

Page 32: ...at you want to store and then press SELECT button Reset all adjust parameters on adjustment dialog box to previous figure Mode free To store adjustment data To clear adjustment data To clear adjustmen...

Page 33: ...E ADJUST Menu P33 34 IMAGE 1 10 IMAGE LEVEL SELECT DIRECT Select image level among Standard AV Cinema Standard PC Real and Image 1 Image 10 by pressing IMAGE button on Side Control or on Remote Contro...

Page 34: ...ress SELECT button IMAGE ADJUST Menu icon Press SELECT button at this icon to display previous items Press POINT LEFT RIGHT buttons to adjust value Press SELECT button at this icon to display next ite...

Page 35: ...ion OFF position L1 Noise reduction LEVEL 1 position L2 Noise reduction LEVEL 2 position L3 Noise reduction LEVEL 3 position Noise reduction Progressive scan Image Level Menu Move a red frame pointer...

Page 36: ...T LEFT RIGHT buttons to select SETTING and press SELECT button Setting dialog box appears 2 Press POINT DOWN button to move a red frame pointer to Lamp mode Set 4 lamps mode or 2 lamps mode by pressin...

Page 37: ...sed This function is used to project the image to a rear projection screen Ceiling function Rear function Press SELECT button at this icon to display next items Press SELECT button at this icon to dis...

Page 38: ...der to reduce power consumption and conserve lamp operating time The factory default settings for power management are Ready and 5 Min The power management function is canceled When a SELECT button is...

Page 39: ...MAIN ON OFF switch to OFF And then while pressing a SELECT button return the MAIN ON OFF switch to ON again This will cancel the projector s control panel lock Be sure to reset Lamp Counter when Lamp...

Page 40: ...an event reposition a projector so that Ventilation Slots are not obstructed Air Filter may be clogged with dust particles Clean Air Filter by following section AIR FILTER CARE AND CLEANING on this pa...

Page 41: ...s unnatural replace lamp LAMP REPLACE indicator lights yellow LAMP REPLACE indicator flashes yellow Projection lamp is defective or fails to be turned on Restart a projector on and make sure lamp is o...

Page 42: ...replaced on Lamp Status Display Figure shows case of replacing LAMP 2 LAMP 1 LAMP 2 LAMP 3 LAMP 4 CAUTION DO NOT OPERATE A PROJECTOR WHILE ANY OF LAMPS IS REMOVED IT MAY RESULT IN MALFUNCTIONS FIRE HA...

Page 43: ...ect the projector s AC plug from the AC outlet immediately Contact an authorized service station for a checkup of the unit and replacement of the lamp Additionally check carefully to ensure that there...

Page 44: ...ssing Power ON OFF button to OFF make sure a projector works as follows 1 LAMP indicator lights bright and READY indicator turns off 2 After 90 seconds READY indicator lights green again and a project...

Page 45: ...ries Inc It is designed and manufactured to meet rigid U L safety standards against risk of fire casualty and electrical hazards The CE Mark is a Directive conformity mark of the European Community EC...

Page 46: ...the projector can be turned on The WARNING TEMP indicator keeps flashing Check and clean the Air Filter The projector is being cooled down It cannot be turned on until the READY indicator lights green...

Page 47: ...768 1152 x 864 1280 x 720 1280 x 1024 Quit 1600 x 1200 Yes No 1 1080i 50 1035i Auto 1080i 60 575p 480p 720p 575i Mode 1 Mode 20 640 x 480 Reset SYSTEM 2 Input 3 RGB Analog RGB Scart SYSTEM 1 RGB PC Di...

Page 48: ...Remote control Off Yes No Factory default Blue back On Off Display Rear Code 2 Image adjust Contrast Brightness Color Red Green Blue Sharpness Store Quit 0 63 0 63 0 63 0 63 0 63 0 63 0 15 Image 1 Im...

Page 49: ...nd SDI Output Input 1 Jacks BNC Type x 5 R Pr G Y B Pb H HV and V RCA Type Audio R and L and DIN 8 pin Control port Input 2 Jacks DVI I Terminal Digital Analog RCA Type Audio R and L and DIN 8 pin Con...

Page 50: ...Shield 5V Power Ground for 5V Hot Plug Detect 9 13 10 12 11 14 15 16 T M D S Data0 No Connect T M D S Data0 No Connect T M D S Data0 Shield T M D S Clock Shield T M D S Clock T M D S Clock 17 21 18 2...

Page 51: ...87 17 SXGA 4 1280 x 1024 64 20 70 40 SXGA 5 1280 x 1024 62 50 58 60 SXGA 6 1280 x 1024 63 90 60 00 SXGA 7 1280 x 1024 63 34 59 98 SXGA 8 1280 x 1024 63 74 60 01 SXGA 11 1152 x 900 71 69 67 19 SXGA 12...

Page 52: ...00 60 00 D 1035i 1920 x 1035 Interlace 33 75 30 00 When a input signal is digital from DVI terminal refer to chart below D 1080i 60 1920 x 1080 Interlace 33 75 30 00 D 1080i 50 1920 x 1080 Interlace 2...

Page 53: ...schland Tel 06126 9371 0 Fax 06126 9371 14 E Mail info eiki de Eastern Europe EIKI CZECH spol s r o Umeleck 15 170 00 Praha 7 Czech Republic Tel 42 02 20570024 42 02 20571413 Fax 42 02 20571411 E Mail...

Reviews: