background image

7

9

Maintenance

Cleaning the sprinkler has to be done thoroughly since clogged up capillaries may cause the simulation to be
useless. Clean the capillaries thoroughly with the supplied 0.5-mm drill or a needle.

Before storage or transportation, all parts have to be clean.

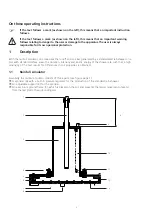
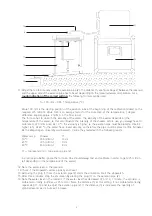
For replacing the round sealing (4), remove the four nuts (11) and the reservoir (3), replace the round sealing
(4) and reasseble the sprinkler using the four nuts (11).

For replacing sealing (5), remove the eight screws (12), the reservoir and assembled sprinkler part. Replace
the sealing. Reassemble the sprinkler using the eight screws (12).

For replacing sealing (6) remove the eight screws (13) and the assembled sprinkler part. Replace the sealing.
Reassemble the sprinkler using the eight screws (13).

Nothing in this publication may be reproduced and/or made public by means of print, photocopy, microfilm or any other means without
previous written permission from Eijkelkamp Agrisearch Equipment.

Technical data can be amended without prior notification.

Eijkelkamp Agrisearch Equipment is not responsible for (personal) damage due to (improper) use of the product.

Eijkelkamp Agrisearch Equipment is interested in your reactions and remarks about its products and operating instructions.

Summary of Contents for 09.06

Page 1: ...2 1 Description 2 1 1 Rainfall simulator 2 1 2 Accessories 3 2 Technical specifications 4 3 Safety instructions 4 4 Calibration 4 5 Installation 6 6 The use 6 7 Application 6 8 Troubleshooting 6 9 Mai...

Page 2: ...by a standardised rainshower on a plot with standard surface area The duration intensity and kinetic energy of the shower are such that a high sensitivity of the test results for differences in soil...

Page 3: ...d levelling the sprinkler Two levels 16 and four knobs 18 are used to level the support B on which the sprinkler is placed The stainless steel adjustable legs 17 are positioned on the ground frame C G...

Page 4: ...check if all capillaries are clear and to calibrate the sprinkler before use on the plot field Follow the next procedure A plot can only be used once Therefore do not calibrate or test the sprinkler...

Page 5: ...C the water has a lower viscosity so therefore the pipe must be placed a little bit lower At the Wageningen University and Research Centre they tested with the following results Water temp Shower h 1...

Page 6: ...e aeration pipe 2 starts the simulation Start the stopwatch 6 During the simulation move the sprinkling head sideways in all horizontal directions to make sure that the drops emerging from the capilla...

Page 7: ...r part Replace the sealing Reassemble the sprinkler using the eight screws 12 For replacing sealing 6 remove the eight screws 13 and the assembled sprinkler part Replace the sealing Reassemble the spr...

Reviews: