background image

Chapter 10: Configuring the Data Logger

egnite Querx features a data logger that records the following data at a 
customizable interval:

Average, minimal and maximal temperature

Average, minimal and maximal humidity (TH and THP models only)

Average, minimal and maximal air pressure (THP models only)

Querx THP can record 36.864 entries. Querx TH and PT have enough memory for 
73.728 entries. The WLAN Models feature a capacity of 4 million entries. For 
Querx THP, this equates to a timeframe of 25 days at an interval of one entry per 
minute. In the case of Querx TH / PT it is sufficient for at least 25 days, while the 
WLAN models can log data for 7.5 years.

Data tracking can be optimized by compressing the measurements. If this feature 
is activated, Querx will only log data if the measurement has changed since the 
last entry. This can expand the period that can be tracked significantly, if the 
measurements change infrequently. It bears noting that the average, minimal and
maximal values need to remain unchanged, in order for an entry to be pared.

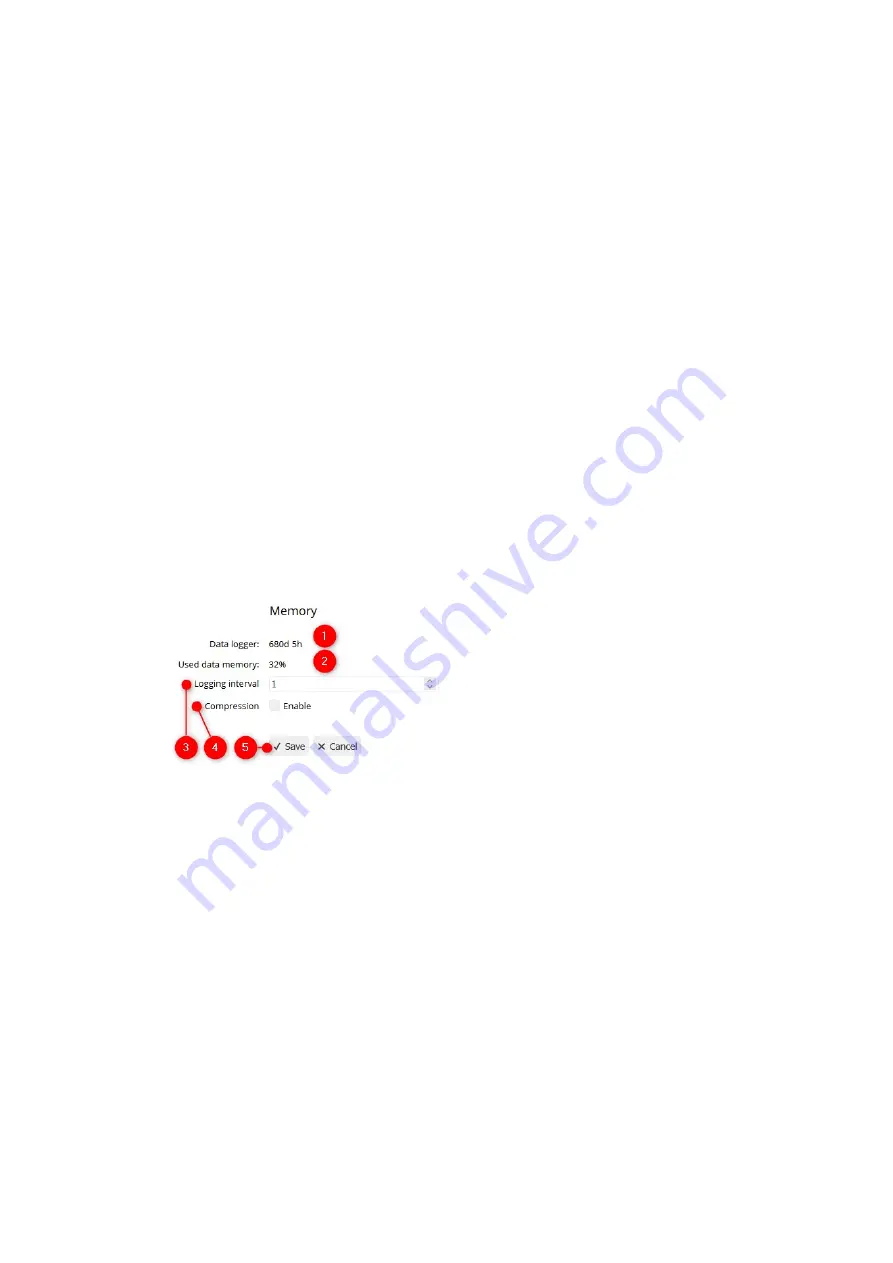
1.

The number of days between the first and last entry in the memory. This 
includes periods in which the device was not active.

2.

Percentage of the memory that has been used. The memory is designed as a 
ring memory. Once it has been filled, the oldest entry will be overwritten. In this
case, the value will register as 100% continually.

3.

Enter the required number of minutes between individual entries in the field 

Interval

.

4.

Select whether the recorded data is to be compressed. Data compression can 
cause temporary, negligible errors in the graphic visualization.

5.

Click 

Save

 to apply your changes.

45

Summary of Contents for Querx

Page 1: ...egnite Querx Network Thermometer Hygrometer Barometer and Data Logger User Guide Querx TH Querx WLAN TH Querx THP Querx WLAN THP Querx PT Querx WLAN PT Handbook version 6 1 Firmware version 6 0 1...

Page 2: ...he Initial Setup 15 Network Connection 15 Power Supply 16 Network Configuration 16 Accessing the Web Interface 17 Installing the Sensor 18 Connecting Pt100 or Pt1000 Sensors 18 Chapter 4 First Setting...

Page 3: ...ter 11 Creating a New User Account 46 User Administration 46 Logging In and Out 48 Chapter 12 Configuring Sensors 50 Monitoring Threshold Values 50 Monitoring Variations 52 Chapter 13 Email Configurat...

Page 4: ...FTP Action 72 Cofiguring Sensor Alarm Events 72 Configuring Time interval Events 73 Configuring Defined times Events 74 Configuring System Events 74 Chapter 20 Installing CA Certificates 75 Activatin...

Page 5: ...Cleaning 105 Changing the Battery 106 Chapter 23 Miscellaneous 108 Manufacturer and Contact Information 108 Disclaimer 108 5...

Page 6: ...devices is considered contrary to the designated use The manufacturer takes no responsibility for consequences resulting out of any application that does not comply with the designated use Please foll...

Page 7: ...00 6 3 2011 09 Generic standards Emission standard for residential commercial and light industrial environments EN 61326 1 2013 07 Electrical equipment for measurement control and laboratory use EMC r...

Page 8: ...n the model This lets the device track data for at least 25 days up to several years All gathered data is visualized in an interactive graph that can be viewed in any web browser Furthermore data can...

Page 9: ...twork activity LED egnite Querx PT egnite Querx PT100 item number EGN600514 egnite Querx PT100 Simple Pt100 test sensor without pocket sleeve egnite Querx PT100 Set item number EGN600414 Like egnite Q...

Page 10: ...er EGN600114 Like egnite Querx TH item number EGN600214 but also includes USB power adapter with micro USB cable and interchangeable plugs for UK EU US and AU outlets Ethernet patch cable egnite Querx...

Page 11: ...S and AU outlets Ethernet patch cable egnite Querx WLAN PT1000 item number EGN601715 egnite Querx WLAN PT1000 Simple Pt1000 test sensor without pocket sleeve WiFi antenna egnite Querx WLAN PT1000 Set...

Page 12: ...r power supply 7 Network link LED 8 RJ45 socket for Ethernet connection 9 Network activity LED egnite Querx WLAN TH egnite Querx WLAN TH item number EGN601215 egnite Querx WLAN TH with integrated sens...

Page 13: ...terchangeable plugs for UK EU US and AU outlets Ethernet patch cable Hardware Accessories and Spare Parts Accessories and spare parts are available from the manufacturer WiFi antenna Ethernet cable Mi...

Page 14: ...display for egnite Querx The current version is available for Windows and as an image for Raspberry Pi Palamoa for Android Free Android app for our IoT cloud Palamoa that lets you monitor Querx data...

Page 15: ...owser A power supply Either the adapter included in the set or a common USB charger In most cases any free USB port on your PC can also be used to supply power An Ethernet cable and a free Ethernet po...

Page 16: ...rger to power Querx Querx can also be connected to a free USB Port if no free power outlet is available In this case please ensure that the port supplies enough current and does not unexpectedly turn...

Page 17: ...ed connection is not working In this case please make sure that the wire is securely plugged into the socket or replace the wire or socket Accessing the Web Interface After successfully configuring th...

Page 18: ...ght Devices with temperature and humidity sensors should be exposed to a sufficient airflow Measurements can be made in still air but the results for humidity will be falsified Please ensure that the...

Page 19: ...ores are used to select whether the sensor is connected to Querx PT using two three or four cable cores 1 The above illustrations tell you which switch position your sensor requires 2 Use a tool with...

Page 20: ...erminals You will require the following tools in order to connect a sensor A tool with a fine tip e g a fine screwdriver or a pair of tweezers A ballpoint pen Possibly a magnifying glass Two DIP switc...

Page 21: ...glass Connect the individual cable cores to the terminals as displayed in the images 3 Use the biro to depress the fixture corresponding with the terminal to which you want to connect the cable core...

Page 22: ...ttings for the web interface s language is English Should you prefer to view it in German please open the drop down menu Localization Language in the section System General and select German Click Sav...

Page 23: ...n the last Sundays of March and October please deactivate auto in the section DST You will need to select whether summer time is active manually 3 Click Save in order to apply your changes The followi...

Page 24: ...sor data A confirmation window will open 2 Confirm that you wish to delete all data saved on the device by activating the button labelled Are you sure 3 Click Yes Please be patient as this process may...

Page 25: ...the right sidebar If a threshold value is transgressed the current value is displayed in red alongside a corresponding icon Lower threshold transgressed Upper threshold transgressed Value falling too...

Page 26: ...you only want to display the current data in a compact way click the small triangle next to the corresponding display field In a wide browser window clicking the layout button hides or unhides the si...

Page 27: ...time and corresponding values in the sidebar 2 Configuring Display Options The components that are displayed in the graph can be selected in the sidebar You can select the following settings for each...

Page 28: ...shold values that will trigger alerts The bars thickness corresponds to the dead band The color indicates which sensor the threshold applies to Configuring the Display Period The display period can be...

Page 29: ...ct a specific week month or year from this drop down menu Increasing or Decreasing the Display Period A smaller version of the graph with two sliders is displayed below the timeline The left slider 1...

Page 30: ...grey and the graph will only display the exact time period that is selected Heatmap The heatmap displays an overview of a year or week in the form of a calendar Each day s average values are color co...

Page 31: ...ighted by a yellow border 7 The time frame can be selected at the lower end of the side bar 8 You can display a week or an entire year and navigate the history via the two arrows Exporting Data The da...

Page 32: ...ed time frame s date and starting time the average minimum and maximum values as well as a timestamp for each measurement of the selected time frame Embedding Graphs Into Other Sites Wherever Querx ca...

Page 33: ...ed in the configuration area In its default settings the system name is querx000000 where the six zeros are a placeholder for the last six digits of the device s MAC address The second section display...

Page 34: ...eader The upper section of each page displays current data which is automatically updated More information on this section is available in the following passage 2 Configuration menu Navigate to all th...

Page 35: ...received 2 Temperature 3 Humidity TH and THP models 4 Dew point or dew point spread TH and THP models 5 Air pressure THP models One of the following symbols is displayed next to the corresponding valu...

Page 36: ...imum of 15 letters and digits can be used for the system name It is advisable to refrain from using special symbols 2 If you wish enter the responsible contact person into the input field Contact and...

Page 37: ...ime coordinated UTC The interface and exported data however display the local time In order to display the correct time you need to ensure that the correct time zone has been configured 1 Select the c...

Page 38: ...onnection to the NTP server was not established successfully Please ensure that the device is connected to the internet or use a local NTP server 3 Click Save to apply your changes Information If a va...

Page 39: ...4 Alternatively time and date can be synced with your PC In order to do this click Sync PC 39...

Page 40: ...the wired network connection automatically This is referred to as dynamic configuration as it is newly configured each time the device is booted which can change the settings Alternatively the network...

Page 41: ...DNS server automatically or B Set the DNS server manually Although a static DNS server can be set up with a dynamic IP address this should only be done in very specific scenarios 4 Click Save to appl...

Page 42: ...configure an alternative DNS server 8 Click Save to apply your settings WiFi Interface Open the configuration page System WiFi to set up the WiFi interface for an egnite Querx WLAN device 1 Check Acti...

Page 43: ...ettings If the connection is established successfully the button will turn green If no connection is established it will turn red 6 Click Save to apply your changes Network Configuration Open the conf...

Page 44: ...ration page System Network to deactivate these services 1 The discovery feature allows Querx Hub to display all devices on the local network In the case of larger setups these can be grouped with each...

Page 45: ...s feature is activated Querx will only log data if the measurement has changed since the last entry This can expand the period that can be tracked significantly if the measurements change infrequently...

Page 46: ...and the device s configuration Read Data Write Configuration The user can read the data gathered by Querx and the device s configuration They can additionally edit the configuration User Administratio...

Page 47: ...gs and create the user account Editing or Deleting a User Any previously created user can be deleted or edited 1 Click the X symbol next to any user to delete the account Confirm that you wish to remo...

Page 48: ...privileges you will need to log into the web interface The login button is located in the upper right corner of the interface s start page 1 Click Login 2 Enter the user name in the field User Name a...

Page 49: ...Once a user is successfully logged in the user name will be displayed on the right side of the header 1 Clicking logout 2 will log the user out of the interface 49...

Page 50: ...g and rising calculated values such as the dew point The following sections explain how to configure the temperature sensor but are also applicable to the other sensors that are supported by other mod...

Page 51: ...C with a dead band of 5 C An alert is triggered if the value falls below the lower threshold 1 If it normalizes and remains within the range of the dead band before falling below the threshold again...

Page 52: ...rapidly Once the temperature falls below 25 C 2 the device registers that a difference of more than 5 C has occured in the last 30 minutes and triggers an alert The device senses that the difference...

Page 53: ...pecific times such as during the day or on weekends Managing Email Accounts The configuration of at least one email account is required for email notifications to be sent A second account can optional...

Page 54: ...ls The server certificate can be verified in order to ensure the mail server s authenticity This requires a CA certificate to be installed as described in chapter Chapter 20 Installing CA Certificates...

Page 55: ...only used to notify the responsible person Interval Emails are sent at specific intervals This can for instance transmit current data Time Emails are sent at specific times for instance daily at a cer...

Page 56: ...ace holders can be used to transmit current data You can create custom templates at a later time Until then select one of the predefined templates email tpl for notifications or report tpl for periodi...

Page 57: ...inutes by which emails will be sent 2 You can specify that an email will only be sent if the relevant sensor data has changed since the last email Please note that this applies not only to the average...

Page 58: ...icking Cancel will discard your changes Testing the Email Action If you would like to test your setup click the button Test to send an email to the recipient immediately The button should turn green a...

Page 59: ...disarmed at a later time by clicking the button Disable On Querx WLAN the activation can be automated 1 Click the button Enable with timefilter 2 Specify the time at which the action shall be activat...

Page 60: ...the data sent by Querx for further processing Managing MQTT Actions Open the configuration page Interfaces MQTT 1 Enable MQTT 2 Enter the MQTT Broker s host name 3 If neccessary change the MQTT broke...

Page 61: ...aily weekly or monthly point of time System Triggered when a system event occurs 9 Click the button Add to create the selected action Refer to Chapter 19 Configuring an MQTT Action for more detailed i...

Page 62: ...r changes Modbus Register Read Register Address Offset Format Contents 30010 9 int16 Error bits 0x0001 Temperature sensor error 0x0002 Humidity sensor error 0x0004 Dew point error 0x0008 Air pressure...

Page 63: ...lvin 10 40031 30 int16 Lower humidity threshold 40032 31 int16 Upper humidity threshold 40033 32 int16 Humidity dead band 40051 50 int16 Lower dew point threshold in Centigrade 10 40052 51 int16 Upper...

Page 64: ...4 1 3444 1 14 1 2 1 5 2 Humidity sensor 1 3 6 1 4 1 3444 1 14 1 2 1 5 3 Calculated dew point 1 3 6 1 4 1 3444 1 14 1 2 1 5 4 Air pressure sensor 1 3 6 1 4 1 3444 1 14 2 0 101 Trap code for the normal...

Page 65: ...n e g egnite Querx WLAN THP Version 6 0 2 0 Activating the SNMP Agent Open the page Interfaces SNMP 1 Activate the agent by setting a check mark 2 Check the Read community and select the settings you...

Page 66: ...r the Syslog server s IP address or its host name 2 Enter the Syslog port The default setting is 514 3 Click Save to apply your settings The Querx Hub application features an integrated syslog server...

Page 67: ...N Models Select the LED s brightness in its normal state 3 WLAN Models Select the LED s Brightness when signalling alerts 4 Select the color that will be used to signal Temperature alerts 5 TH and THP...

Page 68: ...to a cloud service Email sends an email to a recipient SNMP trap sends an SNMPv1 or SNMPv2 trap to an SNMP manager Querx WLAN additionally offers the following options Sound generates an acoustic sig...

Page 69: ...ge without saving the configuration by clicking Cancel 7 test the configuration by clicking Test The middle section of the page is sub divided into two further sections The first configures the action...

Page 70: ...Account that will be used to send the email All the configured accounts are listed with the corresponding user and server names Instructions for the configuration of email accounts are available in C...

Page 71: ...munity if it does not correspond to the default settings public Continue configuring the event Configuring an MQTT Action The MQTT network protocol is only supported by egnite Querx WLAN 1 Name of the...

Page 72: ...to access the FTP server 4 Name of the template file and potentially one or more parameters Refer to Chapter 21 Custom Templates Continue configuring the event Cofiguring Sensor Alarm Events 1 Alerts...

Page 73: ...Time interval Events 1 Specify the Update rate at which the event is triggered 2 If the option On change only is activated the event will only be triggered if the sensor data has changed since the la...

Page 74: ...he specified time on the specified weekday 3 The event is triggered monthly at the specified time on a specific day of each month 4 Select the Weekday for weekly events 5 Select the Day of month for m...

Page 75: ...er Querx will usually communicate with very few servers Thus it will suffice to save the certificates of a small number of certification authorities These need to be saved in a file in the PEM format...

Page 76: ...on for the email account Click the Edit symbol next to the account that you want to edit in the section Email accounts Select how the device will react when a certificate can not be verified See below...

Page 77: ...rigger a syslog notification but are not tolerated Instead the connection to the server will be aborted Please note that CA certificates have am expiry date If this option is selected the certificate...

Page 78: ...se simply be entered directly without using a placeholder However if the name is ever changed this would mean that all the templates would need to be updated The use of placeholders also makes it poss...

Page 79: ...2 exp1 exp2 Result is 1 if exp1 is unequal to exp2 exp1 exp2 Result is 1 if exp1 is smaller than exp2 exp1 exp2 Result is 1 if exp1 is smaller than or equals exp2 exp1 exp2 Result is 1 if exp1 is larg...

Page 80: ...A B C D and E Commands Commands are enclosed by braces with percent signs Kommando The following commands can currently be used if elif else and endif Skips lines within a template file for and endfo...

Page 81: ...lse elif can be used repeatedly else can only be used in a single instance These commands are only executed if the preceding if command and all expressions of the preceding elif commands were false De...

Page 82: ...also possible to access a value of a specific line in a table by adding a period followed by a 0 based index to the name of the variable The example sensortab_value 0 will return the most recent valu...

Page 83: ...he option command is followed by the value and the endoption command The template s options depend on its application Templates for actions can influence the settings page after selecting a template T...

Page 84: ...nction The parameter argument can either be a number that determines which GET parameter will be retrieved Alternatively the name of the GET parameter can be specified Table of Web Variables The follo...

Page 85: ...be omitted is used for the first sensor Both sensortab_name 0 and sensortab_name will retrieve the name of the first sensor Simple Web Variables Name Type Content cmnty_read char 15 SNMP Community for...

Page 86: ...active histo_flags uint16 Flag for data logger Bit 0 Compression histo_rate uin32 Logging rate in seconds only full minutes histo_rate_m uint32 Loggin rate in minutes histo_start ts Time stamp of the...

Page 87: ...of sensor 1 mqtt_topic_s2 char 63 MQTT topic for PUBLISH for values of sensor 2 mqtt_topic_s3 char 63 MQTT topic for PUBLISH for values of sensor 3 mqtt_topic_s4 char 63 MQTT topic for PUBLISH for va...

Page 88: ...Time zone in hours and minutes trap_ena bool SNMP traps activated tz_bias int32 Difference between selected time zone and UTC in seconds tz_idx int32 Index of selected time zone uptime uint32 Time sin...

Page 89: ...iontab_rate_m uint32 Update rate for the time interval event and repetition of alert event in minutes actiontab_regular_daily check Daily timed event activated actiontab_regular_mday uint32 Day of the...

Page 90: ...calibration or adjustment caltab_offset fixed Zero offset of sensor values caltab_ref_hi fixed Upper reference point for calibration caltab_ref_lo fixed Lower reference point for calibration caltab_s...

Page 91: ...istory and is not treated as a sensor Therefore sensor 3 in histotab corresponds to sensor 4 in sensortab Name Type Contents histotab_date date Date of measurement local time histotab_flags uint16 Sen...

Page 92: ...address of primary DNS server netiftab_cdns_ip_sec ip4 Configured static IP address of secondary DNS server netiftab_cip_addr ip4 Configured static IP address netiftab_cip_gate ip4 Configured static I...

Page 93: ...r values in minutes sensortab_gain fixed Factor by which the meausred sensor values are multiplied sensortab_hyst fixed Dead band for sensor alerts sensortab_led_color int32 LED color for this sensor...

Page 94: ...F or K depending on sensortab_userunit sensortab_userunit char 1 Configurable unit sensortab_value fixed Current value measured by sensor sensortab_value_ex fixed Current value measured by sensor in e...

Page 95: ...cation Wifitab Table The wifitab table contains information on all discovered WiFi networks Name Typ Contents wifitab_level int32 Signal strength or 0 for blank entry wifitab_name char Name of network...

Page 96: ...device This does not entail an adjustment or correction If you send us a device for calibration the sensor is initially checked In the case of larger deviations we suggest replacing the sensor instead...

Page 97: ...the potentially wrong value gathered by the sensor A gain setting of 2 for clarity s sake with an offset of 0 thus means that the correct value is always twice as high as the uncorrected measured valu...

Page 98: ...e applies the same formulas as detailed in the section Manual Adjustment with Offset and Gain In order to let Querx adjust offset and gain automatically please proceed as follows Open the page Sensors...

Page 99: ...ory by entering any string of text into the input field Annotation before clicking Save Since Querx can only save the data of up to 30 calibration processes and it can not be deleted once saved it is...

Page 100: ...on Restore configuration and select the configuration file that you intend to activate from the dialog box The button s label depends on the browser you are using 2 Click Upload Finally restart Querx...

Page 101: ...want to install 3 Click Upload to save the firmware image in the selected buffer Activating a Firmware Image Once it has been installed the new firmware version needs to be activated Open the page Ma...

Page 102: ...ecting egnite Querx to the micro USB cable 4 The status LED will start to flash red It will stop flashing and remain red after a few seconds 5 The firmware image stored in the secondary buffer will be...

Page 103: ...ed in the upper part of the configuration area If you need to make further changes to the configuration you can make them before rebooting the system Once you have made all the required changes click...

Page 104: ...y settings via the web interface or a hardware button When the configuration is reset via the web interface the network settings will remain unchanged This function can be used if any changes to the c...

Page 105: ...o press the button In such cases please use a thinner biro or a toothpick 1 Use the biro to press the reset switch while the device is turned on see image The status LED will start to flash red 2 Keep...

Page 106: ...ons at a temperature of approx 23 degrees centigrade Querx WLAN additionally uses the battery for the authentication for SNMPv3 See Chapter 16 Activating the SNMPv3 Agent for additional information Th...

Page 107: ...p at the edge opposite the sensor cable 4 Press the old battery out of the fixture using one of the screwdrivers 5 Press the new battery into the fixture If required use the screwdriver to push the ba...

Page 108: ...49 0 2305 441256 Fax 49 0 2305 441487 www egnite de Disclaimer egnite can not be held responsible for technical or typographical mistakes We reserve the right to alter the documentation without furth...

Reviews: