


Eela Audio D3 manual, October 2009
7
SYSTEM:
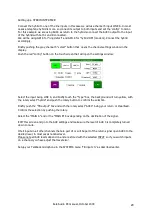
Touching the SYSTEM button opens the main settings menu:
You can touch the value in the boxes to activate them, the background will turn yellow; with the
rotary knob you can change the settings. Please note, these settings need to be confirmed by pressing
op top of the rotary. Currently only one meter type (PPM characteristic) is available so this setting
cannot be changed.
You can assign the output faders as a master to one of the outputs or simply disable the fader.
“TB input ch” is the microphone input that is used for TalkBack purposes e.g. the DJ microphone. The
unit does not have a separate built-in TalkBack microphone but you can select any of the inputs.
You can set the dim level for control room and studio loudspeakers.
GPIO:
The D3 has 8 opto isolated outputs and 8 opto isolated switching inputs on board. A further 16 GPI/O
are available on the EA963 extender. The GPIO button takes you into the main screen GPIO menu.
Inputs can be used to remotely load presets just with the help of a contact closure.
Red-light signaling outputs for Studio and CR can be selected to feed a lamp relays system.
Here you can also set the type and shape of the GPIO’s: pulse or continuously, inverted or not….
NOTE THAT AN INVERTED GPI WILL BE ACTIVE WHEN NO CONNECTION IS MADE!! E.g. if you have
assigned a GPI to an input mute that channel will be muted if the switch is not connected!
If set to “EDGE” the GPI signal will toggle the function ’on’ on the first pulse and ‘off’ on the second.
You can step trough the pages for the settings of the GPI and GPO 9 to 24 on the EA963 extender.


