background image

Call:

 888.505.8878      

Online:

 edugear.com     

Email:

 [email protected]

9

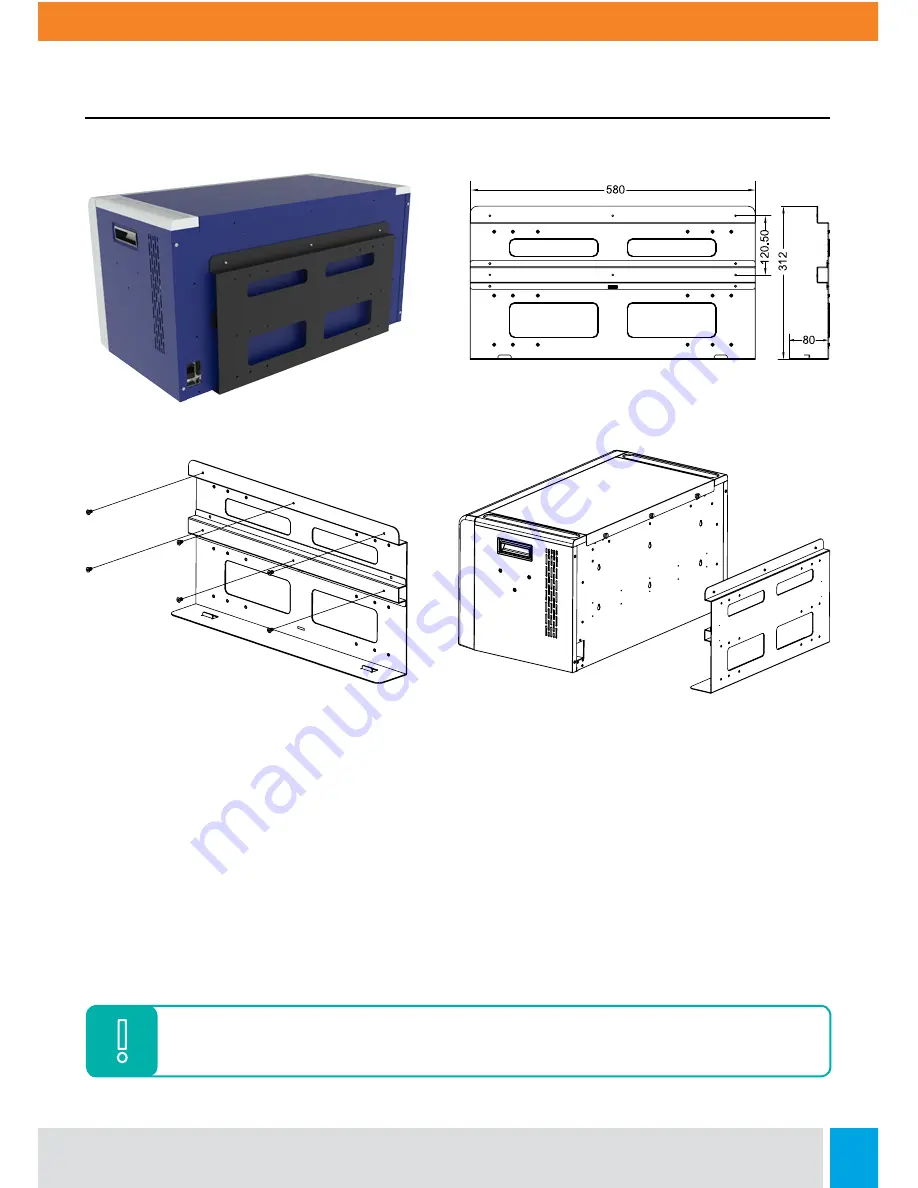
Wall-Mount Bracket View

•  Attaching the wall-mount bracket: Preparation: 6pcs Bracket Screw / M5 x L10mm, 6pcs Wall 

Screw / T4 x L30mm, 6pcs Washer.

•  Wall-mounting kit only applies on wood structure wall and concrete wall.

•  Make sure there is enough space on the wall with the product door open. Drill the hole 

and drive the anchor nuts into the wall. Place the holding plate on the wall, and then 

tighten with M5 stainless screws. Position product over the wall bracket and then slide it 

downward to set it in place.

One wallmount kit can only support one cabinet.

Summary of Contents for mobiLAB

Page 1: ...heseoperatinginstructionscarefully They contain important advice concerning the use and safety of your Charging Cabinet The Charging Cabinet must only be used for its intended purpose in accordance with these operating instructions Charging Cabinet Owner s Manual by eduGear ...

Page 2: ...Contents Product Specifications Before You Start Introduction Package Contents Cabinet Diagrams Door Lock LED Status Interior View Setup Optional Features 2 3 4 4 4 5 5 5 6 8 ...

Page 3: ...y 2 User can plug in 14 devices at one time for charging 3 Always TURN OFF the POWER before plugging in the devices and unplugging the cabinet 4 Do not plug the cabinet in if the switch or power cord has been damaged 5 Do not plug in power cord to another extension cord 6 Keep the door closed and or lock and away from water when in use 7 Be sure to turn the power switch off and unplug cabinet befo...

Page 4: ...aged Do not unplug by pulling on the cable Do not plug the cable into an extension cable Keep the door closed and locked when in use This product is designed to be used indoors only This product is not designed to be operated by a child or student Only Adult operation and supervision should move this product Do not allow anyone to set stand or climb on the product Move the product with caution Kee...

Page 5: ...4 Cabinet x 1 Side View Front View Rear View Introduction User Manual x 1 Power Cord x1 Cable Clips x 14 Package Contents Cabinet Diagrams ...

Page 6: ...Call 888 505 8878 Online edugear com Email support edugear com 5 Door Lock Interior View Top View with Top Cover Off LED Status Off Power off ON Green Light on Devices are charging ...

Page 7: ...ep 1 Remove the 3 screws Step 3 Insert the power plug of your device into the power strips located in the top compartment of the cabinet Step 2 Slide the top cover of cabinet then open the front doors Setup ...

Page 8: ...to easily plug into each device and use the cable hooks or clips to secure the cable in place Step 6 Once all of your devices and cables are properly in place connect all of your devices and power on the cabinet to make sure all devices are receiving a charge Step 4 Store the AC Adapter brick from your device in the individual adapter holder located on the top compartment FOR ASSISTANCE CONTACT TE...

Page 9: ...8 Install Casters View 2 Wheel Set 2 with brake 2 w o brake 16pcs Wheel Screw M5 x 10mm 16pcs Washer Screw the wheels Optional Features ...

Page 10: ...mounting kit only applies on wood structure wall and concrete wall Make sure there is enough space on the wall with the product door open Drill the hole and drive the anchor nuts into the wall Place the holding plate on the wall and then tighten with M5 stainless screws Position product over the wall bracket and then slide it downward to set it in place One wallmount kit can only support one cabin...

Page 11: ...Call 888 505 8878 Email support edugear com Online edugear com Need Support Contact Us by ...

Reviews: