


4
5
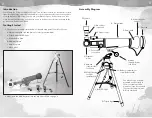
Assembling Your MoonScope
There’s a lot to this MoonScope, but don’t worry—assembling it is a snap! Use the
diagram on the previous page and the directions below to assemble your MoonScope.
Or, watch a 4-minute assembly video at www.nancybscienceclub.com/moonscope.
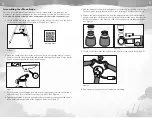
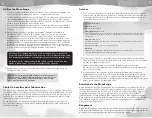
1. Gently pull the tripod legs (O) apart as far as they will go. Press down on the center
of the tripod supports until the tripod locks open. (See Figure 1.)
2. Place the optical tube (A) over the mount and lower it so that the plastic “tongue”
on the mount slips into the bracket underneath the tube. (See Figure 2.) Line up the
holes on the prongs with the holes in the tongue.
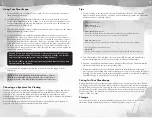
5. Find the azimuth lock knob (K) and tighten it, if necessary, by turning it clockwise.
The knob, when fully tightened, will lock your telescope’s horizontal movement.
6. Remove the protective plastic cap from the diagonal mirror (H). Find the 20mm
eyepiece and take off the protective cap. Optional: Insert the moon filter into the
back of the eyepiece. (See Figure 3.) Slide the eyepiece into the diagonal mirror.
(See Figure 4.)
ON
OFF
Figure 1
Assembly Video
Figure 3
Figure 4
Figure 5
Figure 2
7. To turn on the light, slide the switch on the bottom of the tripod. (See Figure 5.)
3. Push the screw of the altitude lock knob (J) through the holes in the optical tube
and the mount. Turn it clockwise to screw it in place. (See Figure 2.)
4. Tighten the altitude lock knob enough so that you can move the optical tube up or
down and it will stay pointed at the angle you want. (See Figure 2.)
8. Don’t forget to remove the lens cap before observing.


