background image

19 


V-3.


WPS 

WPS is a simple way to establish connections between WPS compatible 
devices. WPS can be activated on compatible devices by pushing a WPS 
button on the compatible device or from within the compatible device’s 
firmware / configuration interface (known as PBC or “Push Button 
Configuration”).   
When WPS is activated in the correct manner and at the correct time for two 
compatible devices, they will automatically connect.   
“PIN code WPS” is a variation of PBC which includes the additional use of a 
PIN code between the two devices for verification. 


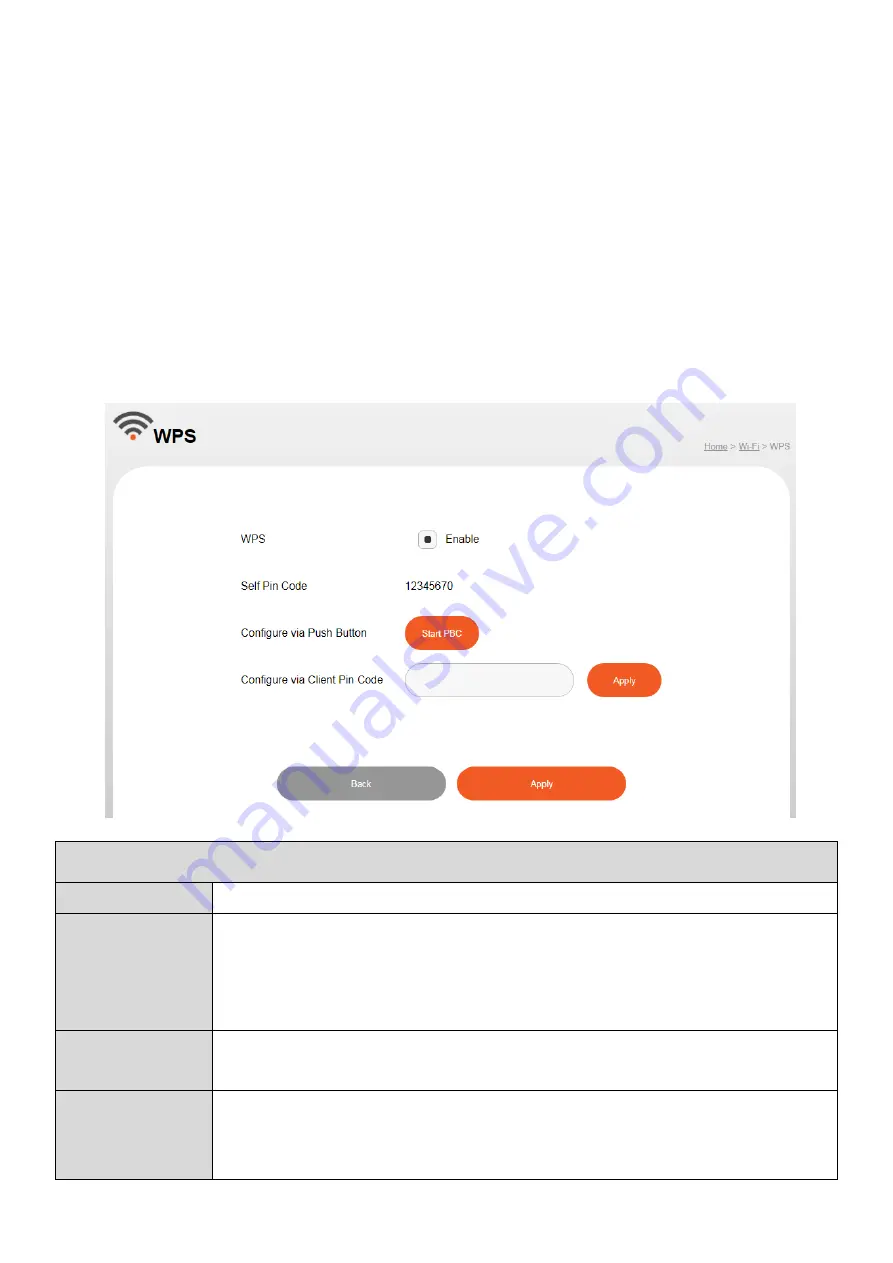
WPS 

WPS 

Check/uncheck this box to enable/disable WPS functionality.   

Self Pin Code 

Displays the WPS PIN code of the device, used for PIN code 
WPS. You will be required to enter this PIN code into another 
WPS device for PIN code WPS. Click “Generate PIN” to 
generate a new WPS PIN code. 

Configure via 
Push Button 

Click “Start PBC” to activate WPS. 

Configure via 
Client Pin 
Code   

Enter the PIN code of another WPS device and click “Apply” to 
attempt to establish a WPS connection.   

Summary of Contents for BR-6473AX

Page 1: ...BR 6473AX User Manual 12 2019 v1 0 Questo manuale d istruzione è fornito da trovaprezzi it Scopri tutte le offerte per Edimax BR 6473AX o cerca il tuo prodotto tra le migliori offerte di Router ...

Page 2: ...II 1 AP Router Mode 8 IV Quick Setup 9 V Wi Fi Settings 16 V 1 Main Wi Fi 16 V 2 Guest Wi Fi 18 V 3 WPS 19 VI Administration 21 VI 1 System Information 22 VI 2 Password 23 VI 3 Firmware Upgrade 24 VI 4 Backup and Restore 25 VI 5 System Log 28 VI 6 Statistic 30 VI 7 Time Zone 31 VII Security 31 VII 1 Access Control 32 VII 2 Port Forwarding 33 VII 3 DMZ 34 ...

Page 3: ...s delivers fast and reliable long range Wi Fi coverage to every corner of your home With the simple and intuitive web UI interface you can easily set up the router and remotely control through the browser or phone You can find all supporting documents from the link below or via QR Code https www edimax com download Once you ve visited the Edimax official website please enter the model no BR 6473AX...

Page 4: ... if there is anything missing in the package and contact your dealer to claim the missing item s II 1 System Requirements Existing cable DSL modem router Computer with web browser for AP configuration BR 6473AX Power Adapter 12V Ethernet Cable Quick Installation Guide ...

Page 5: ...3 II 2 Hardware Overview 1 2 3 4 6 5 7 9 8 10 ...

Page 6: ...No Description 1 LED 2 4G 5G WPS LAN1 LAN2 LAN3 LAN4 WAN POWER 2 Selector Switch Router and AP mode 3 WPS Button 4 RESET Button 5 LAN4 Port 6 LAN3 Port 7 LAN2 Port 8 LAN1 Port 9 WAN Port 10 DC Power Jack ...

Page 7: ...g data WPS BLUE Blinking WPS connection established WPS LED blinks for 2 seconds to indicate a successful connection LAN Blue On LAN port is connected Off LAN port is not connected WAN Blue On WAN port is connected Off WAN port is not connected or no Internet Power Red Blinking Upgrading firmware or reset Green on Router mode Power on Blue on AP mode Power on ...

Page 8: ...de you through the steps to set up the BR 6473AX 1 Plug the included AC adapter into the router s power jack and the other end into an electrical socket Note Ensure the POWER LED lights on GREEN Router Mode If not the device is not properly connected ...

Page 9: ...7 2 Connect an Ethernet cable to the LAN port on your XDSL Cable modem And connect your modem to the router of the WAN port with an Ethernet cable NOTE Ensure the WAN LED lights on BLUE ...

Page 10: ...You can change the operation mode via the selector switch behind the router Move the selector switch left or right to change the operation mode AP router mode NOTE Please unplug the AC adapter when changing the operation mode ...

Page 11: ...d configure its basic settings Please follow the steps below 1 Please find the default User Name admin and unique 8 digits default Password XXXXXXXX of your router on the sticker NOTE If you are using iOS 11 or later version you can easily connect your smart phone to the router using the QR code on the sticker ...

Page 12: ...name and password Enter the Username and the password Click the Sign in button 3 Click the Auto Detect button to run the Easy Setup NOTE In the Easy Setup you can configure the router to access the Internet with different modes such as DHCP Static IP and PPPoE ...

Page 13: ...11 DHCP If you use DHCP please wait while the router setting is completed ...

Page 14: ...12 Click the Setup Complete button to complete the setup Static IP Enter IP address default gateway subnet mask and DNS1 DNS2 Click the next button to proceed to the next step ...

Page 15: ...isplays the IP address of the default gateway Subnet Mask Specify a subnet mask The default value is 255 255 255 0 DNS1 For static IP users the default value is blank DNS2 For static IP users the default value is blank Click the Setup Complete button to complete the setup ...

Page 16: ...14 PPPoE Enter the Username Password and click the next button ...

Page 17: ...15 Click the Setup Complete button to complete the setup If settings failed or Ethernet cable is not connected properly you will be prompted to check the following settings below ...

Page 18: ...16 V Wi Fi Settings In this page allows you to configure the Wi Fi guest Wi Fi and WPS settings that suit your needs V 1 Main Wi Fi You can change the basic settings for 2 4GHz and 5GHz ...

Page 19: ...the channel width 2 4 GHz 20MHz lower performance but less interference 40MHz higher performance but potentially higher interference Auto automatically select based on interference level 5GHz 20MHz lower performance but less interference 40MHz 80MHz 160MHz higher performance but potentially higher interference Auto automatically select based on interference level Channel 2 4 GHz Select a wireless ...

Page 20: ... Wi Fi connectivity without accessing your primary networks Guest Wi Fi Guest Wi Fi Enable Disable SSID Displays the SSID name s for the guest Wi Fi Authentication Methods Displays the authentication method for the specified SSID Encryption Key Displays the encryption type for the guest Wi Fi ...

Page 21: ...atically connect PIN code WPS is a variation of PBC which includes the additional use of a PIN code between the two devices for verification WPS WPS Check uncheck this box to enable disable WPS functionality Self Pin Code Displays the WPS PIN code of the device used for PIN code WPS You will be required to enter this PIN code into another WPS device for PIN code WPS Click Generate PIN to generate ...

Page 22: ...20 You can also activate WPS via hardware 1 Press and hold the WPS button for 2 seconds to activate WPS 2 WPS feature is enabled on your router when the WPS LED blinking BLUE light ...

Page 23: ...21 VI Administration Centralized administration makes setup and management fast and easy In this page you can check system information system log and statistics etc ...

Page 24: ...22 VI 1 System Information System Information page displays basic system information internet information and Wi Fi guest 2 4GHz 5GHz information ...

Page 25: ... Password In this page you can reset the password of your router Please follow the steps below to reset the password 1 Enter the new password 2 Confirm your password 3 Click the Apply button to save the change ...

Page 26: ...ither OTA or manual update Please follow the steps below to upgrade firmware 1 Click Check Version to check if the current firmware is up to date or not Select Local File to upload the firmware file to the router Select Online Upgrade to update the firmware via OTA ...

Page 27: ...25 2 Click the Upgrade and OK button to start upgrading the firmware VI 4 Backup and Restore In this page you can reset the router to factory settings backup and restore all the settings on the router ...

Page 28: ... steps below to back up and restore the settings on you router 1 Click the Save button to backup all the settings 2 Click the Select Files button and select the backup file that you want to upload 3 Click the Upload button ...

Page 29: ...t the device Hardware Reset 1 Press and hold the reset button on the router for at least 5 seconds then release the button Please wait a few minutes for the router to restart When the device restarts all settings will be reset 2 Wait for the router to restart The router is ready for setup when the power LED blinking RED light ...

Page 30: ...e Click the Reset and OK button to reset the router to factory settings VI 5 System Log System log displays system operation information such as up time and connection processes This information is useful for administrators ...

Page 31: ...29 To backup the system log please click the Save to File button and press Save ...

Page 32: ...30 To clear the system log please click the Clear button VI 6 Statistic Your router stats can be found in this page such as Ethernet LAN WAN 2 4GHz 5GHz Wireless ...

Page 33: ...egion is not listed please select another country region whose time zone is the same as yours VII Security The router provides various security options for example access control and DMZ It is essential to configure security in order to prevent unauthorised access to your network ...

Page 34: ...evices permitted to connect to the router Devices are each identified by their unique MAC address If a device not on the list of permitted MAC addresses attempts to connect to the router it will be denied The Access Control panel displays information about MAC Access Control MAC Access Control Groups and Groups and allows you to add or edit MAC Access Control MAC Access Control Group settings ...

Page 35: ...33 VII 2 Port Forwarding A port forward opens specific ports on your router and is a way of making a computer network accessible to any networking application ...

Page 36: ... and as a subnetwork containing an organization s exposed outward facing services It acts as the exposed point to an untrusted networks commonly the Internet Please follow the steps below to setup DMZ on your router 1 Enable DMZ 2 Enter the DMZ IP address 3 Click the Apply button ...

Page 37: ...sold or licensed as is Should the programs prove defective following their purchase the buyer and not this company its distributor or its dealer assumes the entire cost of all necessary servicing repair and any incidental or consequential damages resulting from any defect in the software Edimax Technology Co Ltd reserves the right to revise this publication and to make changes from time to time in...

Page 38: ...cept any interference received including interference that may cause undesired operation Any changes or modifications not expressly approved by the party responsible for compliance could void the authority to operate equipment Federal Communications Commission FCC Radiation Exposure Statement This equipment complies with FCC radiation exposure set forth for an uncontrolled environment In order to ...

Page 39: ...4 53 EU 2014 35 EU Deutsch Dieses Gerät erfüllt die Voraussetzungen gemäß den Richtlinien 2014 53 EU 2014 35 EU Español El presente equipo cumple los requisitos esenciales de la Directiva 2014 53 EU 2014 35 EU Italiano Questo apparecchio è conforme ai requisiti essenziali e alle altre disposizioni applicabili della Direttiva 2014 53 EU 2014 35 UE Nederlands Dit apparaat voldoet aan de essentiële e...

Page 40: ...U Spectrum EN 300 328 V2 1 1 2016 11 EN 301 893 V2 1 1 2017 05 EMC EN 301 489 1 V2 2 0 2017 03 EN 301 489 17 V3 2 0 2017 03 EMF EN 62311 2008 Safety LVD IEC 62368 1 2014 2nd Edition and or EN 62368 1 2014 A11 2017 Date of Signature Dec 2019 Signature Printed Name Albert Chang Title Director Edimax Technology Co Ltd Edimax Technology Europe B V Fijenhof 2 5652 AE Eindhoven The Netherlands a company...

Page 41: ...software or if you modify it For example if you distribute copies of such a program whether gratis or for a fee you must give the recipients all the rights that you have You must make sure that they too receive or can get the source code And you must show them these terms so they know their rights We protect your rights with two steps 1 copyright the software and 2 offer you this license which giv...

Page 42: ... a work based on it under Section 2 in object code or executable form under the terms of Sections 1 and 2 above provided that you also do one of the following a Accompany it with the complete corresponding machine readable source code which must be distributed under the terms of Sections 1 and 2 above on a medium customarily used for software interchange or b Accompany it with a written offer vali...

Page 43: ...ribution limitation excluding those countries so that distribution is permitted only in or among countries not thus excluded In such case this License incorporates the limitation as if written in the body of this License 9 The Free Software Foundation may publish revised and or new versions of the General Public License from time to time Such new versions will be similar in spirit to the present v...

Reviews: