background image

43

ENGLISH

If problems occur, the product shuts itself off automatically.
The display will show the reason (see below).
Do not disconnect from the power supply.
To start the appliance up again, allow the shutdown procedure to complete, then press the ON/OFF button on the 
remote control or the simplified ignition button.

Before starting the product up again, check the reason for the shutdown and CLEAN the burning pot.
The product is equipped with the necessary safety devices but, if the burning pot is not cleaned regularly as explained 
above, ignition may involve a slight detonation. If white smoke forms in the combustion chamber for a long time, 
disconnect the mains supply and wait 30 minutes before opening the door and emptying out the burning pot.

TROUBLESHOOTING

SHUTDOWN MESSAGES AND THEIR SOLUTIONS:

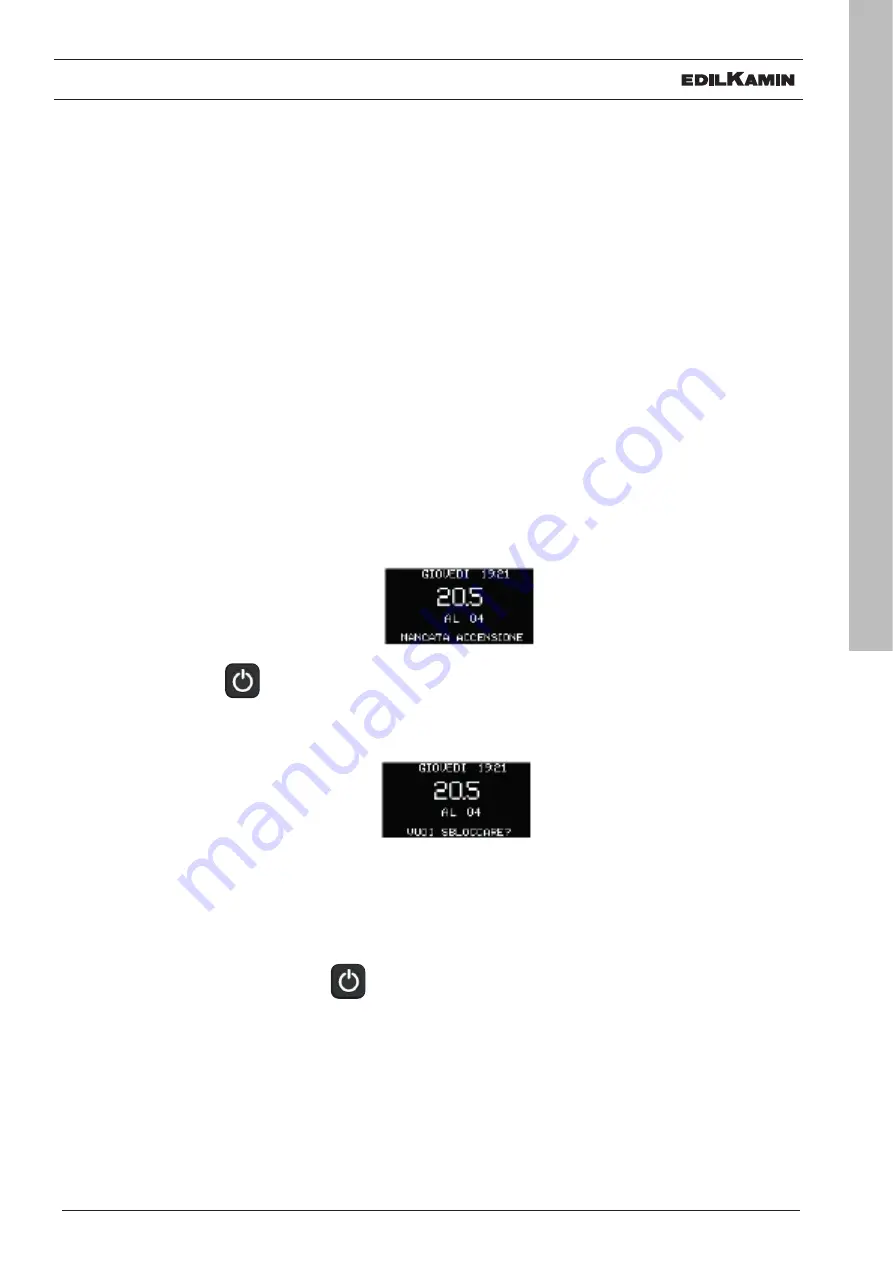
Instead of the room temperature SET being displayed, there is an alarm code preceded by “ALL” 
The description of the alarm is displayed in a single line on the status bar (the two lines of the language file following, 
separated by a space)

Prolonged pressing of the 

 button (like switching on) leads to a request for the product to be unlocked.

In the INFO bar at the bottom, the request for unlocking appears translated into the various languages.

A further pressing lasting 2 seconds of the 

 button unlocks the product.

USER/INSTALLER

Summary of Contents for Vyda2 Air Tight

Page 1: ...VYDA2 AIR TIGHT EN Installation use and maintenance page 2 PELLET STOVE...

Page 2: ...i 47 20123 Milan Italy Italian Tax ID VAT NO 00192220192 Hereby declares under its sole responsibility that The pellet stoves mentioned below comply with EU Regulation 305 2011 and the harmonised EU s...

Page 3: ...nd for anything not specifically indicated in the manual observe local regulations The diagrams provided in this manual are for illustration purposes only they do not always strictly refer to your spe...

Page 4: ...flue may catch fire and environmental damage may ensue Cleaning the combustion chamber when hot DO NOT CLEAN WITH A VACUUM CLEANER WHEN HOT You could damage the vacuum cleaner and risk the emission of...

Page 5: ...5 ENGLISH USER INSTALLER DIMENSIONS VYDA2 AIR TIGHT DIMENSIONS cm 8 cm smoke outlet 6 cm combustion air...

Page 6: ...wer 10 6 3 7 kW Efficiency 92 3 90 8 CO emissions at 13 O2 0 003 0 002 Fumes temperature 152 114 C Fuel consumption 2 3 0 83 kg h Tank capacity 17 kg Draw 11 4 10 Pa Autonomy 7 22 hours Heatable volum...

Page 7: ...with suitable equipment and in observance of safety regulations Do not turn the package over and handle all parts requiring installation with care PACKAGING details in the cladding paragraph The deliv...

Page 8: ...IT TO THE PALLET THE DRAWINGS ARE FOR GUIDANCE ONLY USEFUL FOR THE INSTALLATION BUT THEY MAY NOT REFER TO THE SPECIFIC MODEL 1 2 TO REMOVE THE STOVE FROM THE PALLET To remove the stove from the palle...

Page 9: ...ir from the outside For different countries check if air from the outside For different countries check if there are particular installation conditions allowed for there are particular installation co...

Page 10: ...some mid point of its length THE FUMES DUCT THE FUMES DUCT Further to the general prescriptions for the fumes duct and flue the fumes duct may not be made of flexible metal material must be insulated...

Page 11: ...er conditions must be anti downdraught must have an internal cross section equivalent to that of the flue and a fumes outlet at least double that of the interior of the flue for dual flues which shoul...

Page 12: ...t 80 cm2 diameter 10 cm To prevent draughts we recommend installing the intake behind the product or behind a radiator Installing it in front of the appliance will create unpleasant draughts The air m...

Page 13: ...o fumi dietro presa aria dietro co uso coassiale Examples of possible installations For the smoke discharge conditions on roof etc check local regulations for sealed pellet stoves rear smoke discharge...

Page 14: ...lectrical system must be compliant check the operation of the earth in particular Edilkamin is not responsible for malfunctions resulting from an improperly earthed system The power line must be of ad...

Page 15: ...t or right interchangeable side panels ceramic or stone with metal bracket fitted 3 2 Top ceramic or stone 4 1 INSTALLER 1 3 3 4 2 Small parts M4 screws with washers for securing ceramic parts M6 scre...

Page 16: ...ide parts and screwed on the top part Fitting of the stone or ceramic front panel above the door 1 To make alignment adjustments between ceramic stone and the door you can use the screws A and B Screw...

Page 17: ...17 ENGLISH 3 Refit the aesthetic cover CLADDING 3 4 Screw it back with the two screws removed in point 1 aesthetic cover 4 INSTALLER...

Page 18: ...front 3 Place the top ceramic or stone front panel 2 on the metal support S Fit the front panel 2 using the screws removed previously back view Close the combustion chamber door and check the alignmen...

Page 19: ...tments between ceramic stone and the door you can move the top or bottom screws of the bracket fixed to the structure The top screws in the slots allow the alignment with the top The bottom screws in...

Page 20: ...of the stone or ceramic top 4 1 While keeping the top metal plate in a forward position place the top and fit it with the screws underneath For stone top For stone top For ceramic top For ceramic top...

Page 21: ...first loading of the pellet tank see pellet loading When the stove is hot DO NOT MAKE CONTACT between the pellet bag and the top grille Use the glove when loading the stove while it is operating and...

Page 22: ...batteries of an incorrect type The remote control has a probe which reads the temperature and communicates with the product for automatic management Day Date and Time DECREASE INCREASE ON OFF switch...

Page 23: ...the display switches off completely USER DAY AND TIME WARNING Symbols MODE Auto or Timer INFO Bar SET or ALARM or OFF FLAME and FAN Symbols ROOM TEMPERATURE ON OFF INCREASE DECREASE CONFIRM OK MENU AU...

Page 24: ...and By automatic crono when the desired temperature is reached the product switches off and then back on again when the temperature drops RELAX manual automatic crono enables natural convection mode f...

Page 25: ...in the cleaning phase START in the Load Pellets and Start 1 phases START in the Start 2 phase with the flame symbol WARM UP in the Warm Up phase with the flame symbol If timer scheduling is active The...

Page 26: ...the value of T1 T2 or T3 To do so you need to access the Menu The or buttons are disabled The flashing SET or MAN symbol appears the operating Mode symbols and the Power level and Ventilation symbols...

Page 27: ...symbol appears the operating Mode symbols and the Power level and Ventilation symbols disappear The Set is modified with the or buttons and the setting is confirmed with the button or by waiting 5 sec...

Page 28: ...in all modes automatic manual and crono Press the button for two seconds to activate the Relax function Activation is indicated on the display with the RELAX symbol instead of the frontal fan Again by...

Page 29: ...M list displays the buttons have the following functions Active buttons go back to main display go back one level scroll down the AM Menu items select the AM Menu items CRONO FAN STAND BY visible only...

Page 30: ...king of one of the three temperatures T1 T2 or T3 with a time period DISPLAY CHANGE To access the Crono setting function you must enter the Menu with the button An the first item is CRONO You confirm...

Page 31: ...mally T1 Night Level 16 C T2 Day Level 20 C T3 Comfort Level 22 C You choose T1 T2 or T3 with going up the Menu and going down the Menu and confirm the item with the button The or buttons are used to...

Page 32: ...s positioned on the symbol Set The button is used to move the cursor between the Set symbol and the Day of the Week The button is used to go back to the previous display If the cursor indicates the sy...

Page 33: ...top right the starting time of the time period 00 00 with the cursor below the graphic bar The current Set between OFF and the values of T1 T2 and T3 are displayed bottom centre The or buttons are use...

Page 34: ...34 ENGLISH USER INSTRUCTIONS CRONO USER to Delete If the Delete action is chosen and confirmed with the button the scheduling is reset...

Page 35: ...day is chosen on which the scheduling is to be pasted The button is used to confirm the copy action The day on which the action was performed is highlighted and the action can be repeated The button i...

Page 36: ...36 ENGLISH USER INSTRUCTIONS VENTILATION USER for the ventilation...

Page 37: ...ure setpoint is reached NOTE visible only if the product is in automatic mode The product is programmed by default with a delta of 1 C to optimise comfort The technician can change this setting during...

Page 38: ...is not active This function switches the product on off after a set period from activation of the function This is convenient if you go to bed and want the product to switch on off after a few hours 1...

Page 39: ...e the function in other statuses will not be allowed The function is available only in the OFF status It is not visible in other statuses Status These readings should only be done when requested by th...

Page 40: ...e fields by moving the cursor forwards The button is used to scroll through the fields by moving the cursor backwards The button is used to save and go back to the previous display Language Selects th...

Page 41: ...ing pot into which the ash falls 3 Scrape the burning pot with the scraper and clean out any obstructed holes 4 If necessary clean the glass when cold using a dedicated product e g Glasskamin which yo...

Page 42: ...ASONAL MAINTENANCE to be carried out by the technical assistance centre This consists of cleaning the stove inside and out If the product is used intensively we recommend cleaning the fumes duct and f...

Page 43: ...ight detonation If white smoke forms in the combustion chamber for a long time disconnect the mains supply and wait 30 minutes before opening the door and emptying out the burning pot TROUBLESHOOTING...

Page 44: ...on air intake is below the set level Ensure the furnace door is closed Check that the appliance the flue and combustion air conduit are clean H02 Displays when the circuit board is not detecting the c...

Page 45: ...1 Switching OFF due to the inter vention of the safety pressure switch Ensure the product and flue are clean Contact the technician H12 Room temperature probe failure The product is operating in manua...

Page 46: ...tion remains at the last display If the lack of communication occurs during navigation through the Menus it automatically goes back to the main display PELLET RESERVE INDICATOR The function is only av...

Page 47: ...47 ENGLISH...

Page 48: ...w w w e d i l k a m i n c o m 942270 GB code 942270 GB 03 21 A...

Reviews: