5
ENGLISH
Ø 6
cm
ducting
Ø 6 cm
(optional)
112,5
110
11,5
3
35
15 12,5
23
Ø 8
cm smoke outlet
Ø 13
cm coaxial
55
USER/INSTALLER
DIMENSIONS
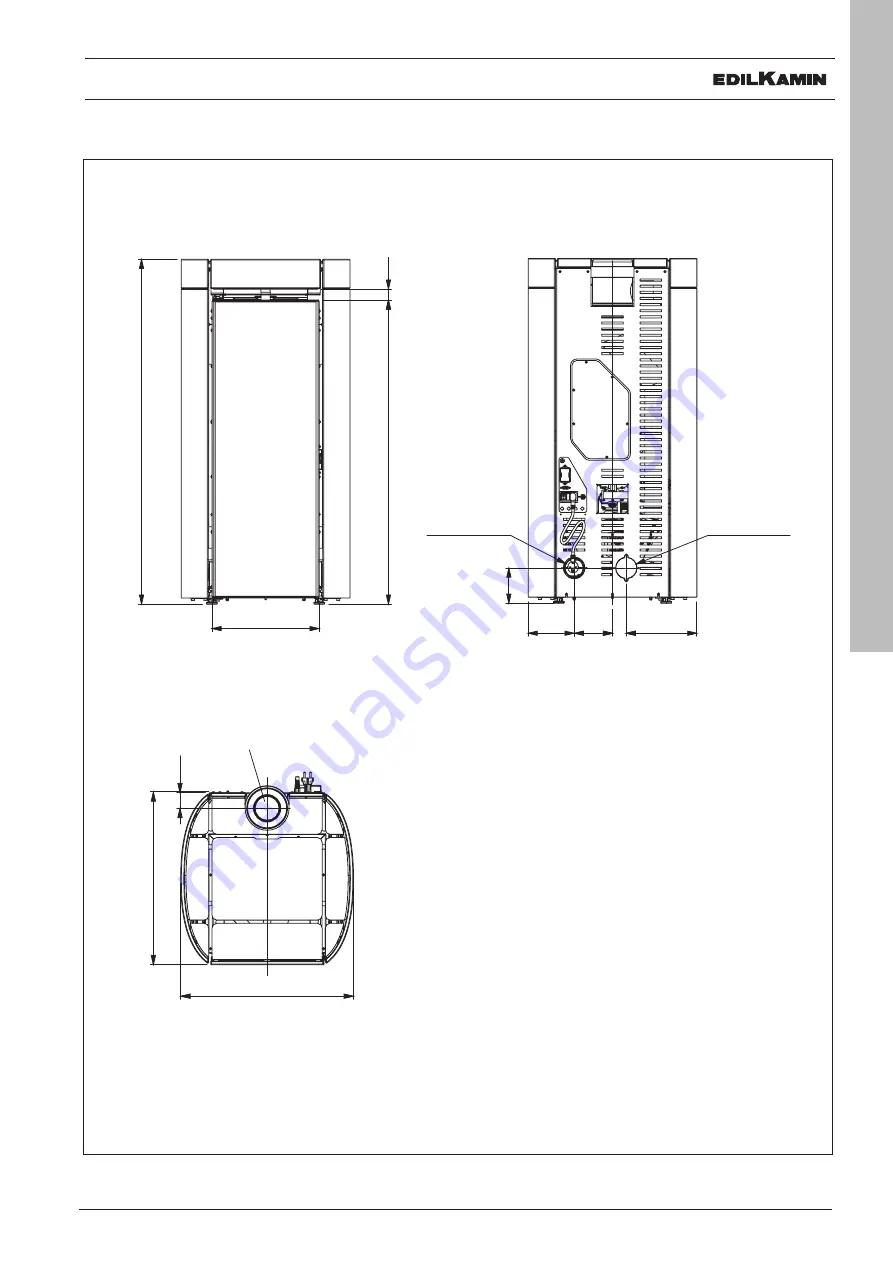
RADA AIR TIGHT C - DIMENSIONS (cm)
Page 1: ...EN Installation use and maintenance page 2 RADA AIR TIGHT C PELLET STOVE...
Page 2: ...C SERIAL NO Rating plate reference RADA AIR TIGHT C Performance declaration DoP EK n 177 Moreover the company hereby declares that the RADA AIR TIGHT C wood pellet stoves satisfy the requirements of t...
Page 3: ...to follow the instructions in it could cause serious damage to the product and put the safety of those using it at risk OPERATING SEQUENCE follow the instructions for the operations described Product...
Page 4: ...y become soiled the flue may catch fire and environmental damage may ensue Cleaning the combustion chamber when hot DO NOT CLEAN WITH A VACUUM CLEANER WHEN HOT You could damage the vacuum cleaner and...
Page 5: ...5 ENGLISH 6 cm ducting 6 cm ducting optional 112 5 110 11 5 3 35 15 12 5 23 8 cm smoke outlet 13 cm coaxial 55 5 55 USER INSTALLER DIMENSIONS RADA AIR TIGHT C DIMENSIONS cm...
Page 6: ...kW Efficiency 91 3 93 CO emissions at 13 O2 0 007 0 023 Fumes temperature 186 69 C Fuel consumption 2 9 0 6 kg h Tank capacity 24 kg Draw 11 9 Pa Autonomy 8 40 ore Heatable volume 335 m3 Fume duct dia...
Page 7: ...pplicable laws Eachhandlingoperationmustbeperformed in vertical position by appropriate means and in accordance with current safety regulations Do not overturn the packaging PACKAGING Two parcels are...
Page 8: ...FOR THE INSTALLATION BUT THEY MAY NOT REFER TO THE SPECIFIC MODEL HOW TO REMOVE THE STOVE FROM THE PALLET 1 Remove the sides loosening the upper screws 2 Open the door and remove the fan protection g...
Page 9: ...e appliance Pursuant to Standard 10683 rev 2012 point 6 3 in Italy you can also install the appliance in bedrooms or in rooms which already include a product that takes air from it for combustion prov...
Page 10: ...ts length THE FUMES DUCT Further to the general prescriptions for the fumes duct and flue the fumes duct may not be made of flexible metal material must be insulated if routed through unheated areas o...
Page 11: ...ic waiver conditions must be anti downdraught must have an internal cross section equivalent to that of the flue and a fumes outlet at least double that of the interior of the flue for dual flues whic...
Page 12: ...adjacent room only if the flow is taken from permanent unobstructed openings communicating with the outdoors the air pressure in the adjacent room is never reduced to a level below outdoor pressure th...
Page 13: ...tion of the stove The electrical system must be compliant check the operation of the earth in particular Edilkamin is not responsible for malfunctions resulting from an improperly earthed system The p...
Page 14: ...alignment between side and tile Tighten the screws shown in figure keeping the tile front edge leveled with the side as indicated by the arrows B Side alignment between side and tile Loosen the screws...
Page 15: ...tile with supplied screws and washers SETTINGS Align the front tile so that it is centred compared with the top and at the same side tiles height level NOTE Use high temperature silicone to fix the ti...
Page 16: ...iles using supplied screws and washers NOTE Use high temperature silicone to fix the tile well just apply a layer right in the middle of the tile to fix it to the tinny holder sufficiente stendere un...
Page 17: ...technician performs the first ignition and the first loading of the pellet tank see pellet loading FUEL Use UNI EN ISO 17225 2 category A1 wood pellets or similar regulatory products with the followi...
Page 18: ...ures the stove has the following phases Ignition Flame ignites and grows stable This is the result of manual ignition with ignition button request from Crono power request during stand by request from...
Page 19: ...on the type of batteries and the intensity of use Edilkamin and the retailer will not consider claims for battery life under any circumstances If the battery charge is low a warning displays at the t...
Page 20: ...s the menu ON STATE The product is ON The display shows figure 4 1 the current time 2 the current room temperature 3 the room temperature setting or manual mode 4 the power level represented by the fl...
Page 21: ...e according to room temperature target NUMBER BESIDE BLADE OR FLAME ICONS WILL APPEAR DURING SETTINGS ONLY Position 1 F l a m e icon B l a d e icon USER INSTRUCTIONS USER CONTROLS REMOTE CONTROL ON OF...
Page 22: ...setpoint is reached To access the function from the main menu as indicated in the Menu section above press the M button Scroll using the buttons and select the function by pressing the OK button Use...
Page 23: ...n press the M button LOAD PELLETS STAND BY CRONO NIGHT DATE TIME DISPLAY LANGUAGE BEEP INFO TECHNICAL MENU scroll buttons OK button to confirm The following screen will appear Scroll to ENABLE underli...
Page 24: ...e buttons Press the OK button to confirm and select SET Press the M button to go back to the previous screen press the OK button to enter the SET function ENABLE TEMP CHANGE SET scroll buttons OK butt...
Page 25: ...quickly Press the OK button to confirm and go to the temperature selection T1 T2 or T3 Press the buttons to switch between the temperatures To continue with other changes press the OK button To choose...
Page 26: ...ian during commissioning Available only in the OFF state If you attempt to activate the function in other states access is not granted To access the function from the main menu as indicated in the Men...
Page 27: ...rm by pressing the OK button for 2 seconds Beep Allows you to enable disable the beep To access the function from the main menu as indicated in the Menu section above press the M button Scroll using t...
Page 28: ...E Before doing any maintenance disconnect the appliance from the mains Regular maintenance is essential to keep the appliance in good working order Failure to service the product properly will prevent...
Page 29: ...he compartment around the burning pot into which the ash falls 3 Scrape the burning pot with the provided scraper and clean out any obstructed holes 4 If necessary clean the glass when cold using a de...
Page 30: ...basis by an authorized technician according to local and national regulations SEASONAL MAINTENANCE to be carried out by the technical assistance centre This consists of cleaning the stove inside and o...
Page 31: ...displays when the combustion air intake is below the set level Check that the combustion chamber door is closed Check the regular maintenance of the stove Check that smoke discharge and combustion ai...
Page 32: ...chnician H10 Switching OFF due to circuit board overheating Contact the technician H11 Switching OFF due to the inter vention of the safety pressure switch Ensure the stove and flue are clean Contact...
Page 33: ...PLY WARNINGS LOW REMOTE CONTROL BATTERY LEVEL The battery symbol will appear on the remote control display if the battery is low MAINTENANCE A wrench symbol is shown on the display after 2000 hours of...
Page 34: ......
Page 35: ......
Page 36: ...cod 942040 GB 07 19 B w w w e d i l k a m i n c o m 942040 GB...