background image

18 | www.eddyfi.com

Magnifi GO Overview

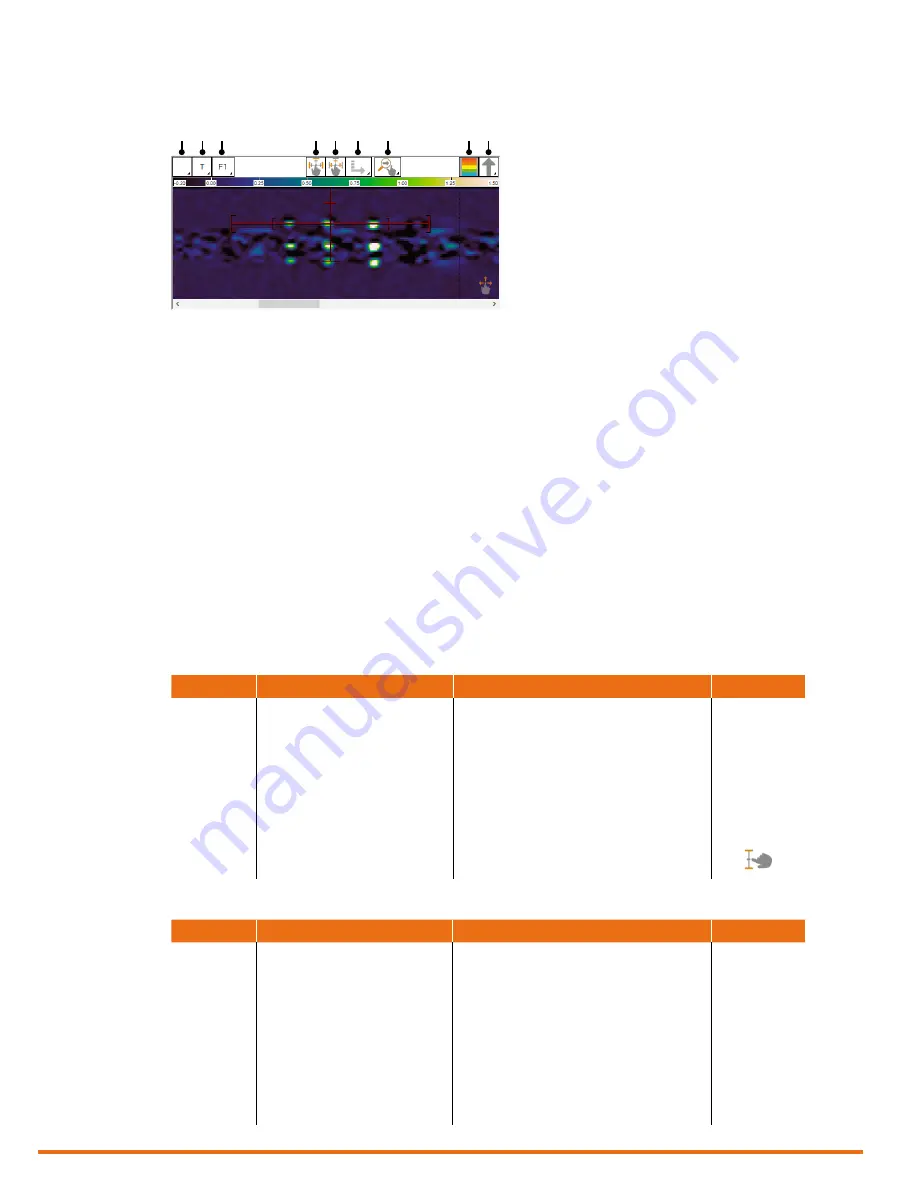
C-Scan View

Figure 2–4 

C-scan

1.  Global channel/C-scan selector
2.  Channel/C-scan group name and 

selector

3.  Frequency selector
4.  Resize cursor button (toggle 

behavior)

5.  Resize mini - cur sor (toggle 

behavior, available when the mini-

strip chart are active)

6.  Component selection for Resize 

cursor action

7. 

Define the zoom axis when using 

the multi-touch pinch mode

8.  Show/Hide color palette in the 

view

9.  Signal component selector

Multi-Touch Interface

The multi-touch interface of Reddy is designed for ease-of-use. According to your location in Magnifi GO, 
the multi-touch behavior changes.
The backstage view uses , dialog boxes, and setup wizards, the multi-touch behavior is standard: a short 
tap on an element of the GUI enables the associated function, exactly as it would at the click of a mouse.
Elsewhere, the multi-touch behavior is more elaborated. The tables below summarize the various 
behavior according to the view you are using.

Table 2–1 

Multi-touch behavior in the strip chart view

Location

Touch

Behavior

Condition

View toolbars

Tap

List buttons: Selects the next option in list

Toggles: Enables/disables option

Touch and hold

List buttons: Displays entire options list

Touch and hold, move up or down

Scale: Increases/Decreases the scale

Data area

Tap

Moves cursor to touch position

Touch and move

Moves cursor in view

Two-finger touch, move up or down

Pans data in strip chart; same effect as scrollbar

Pinch-zoom in or out

Zooms in/out

Table 2–2 

Multi-touch behavior in the Lissajous view

Location

Touch

Behavior

Condition

View toolbars

Tap

List buttons: Selects the next option in list

Toggles: Enables/disables option

Touch and hold

List buttons: Displays entire options list

Touch and hold, move up or down

Rotation: Rotates data

Scale: Increases/Decreases the scale

Data area

Tap

Centers selected data in Lissajous

Touch and move

Pans data in Lissajous

Two-finger rotation

Rotates data in Lissajous

Toggle

Pinch-zoom in or out

Increases/Decreases the scale

1 2 3

4 5 6

7

8 9

Summary of Contents for Reddy

Page 1: ...User s Guide...

Page 2: ...treet Suite 100 Qu bec QC G1P 0A4 CANADA Eddyfi Magnifi Reddy and their associated logos are trademarks or registered trademarks of Eddyfi NDT Inc Eddyfi reserves itself the right to change product of...

Page 3: ...y 9 Connecting Probes 10 Batteries 10 Chapter 2 MagnifiGO Overview Introducing Magnifi GO 15 Chapter 3 Preferences Managing Preferences 23 Chapter 4 Keypad and Keyboard Functions Keyboard Shortcut Key...

Page 4: ...3 ECA 53 ECT 54 Appendix A Connector Reference ECA Connector 160 pins 57 ECT Connector 19 pins 57 I O Connector 12 pins 57 Ethernet Connector 58 HDMI Connector 58 USB Connectors 59 3 5mm Audio Connect...

Page 5: ...e 3 4 Help 24 Figure 5 1 Medium Shark probe 29 Figure 5 2 Removable Sharck encoder and guiding wheels 29 Figure 5 3 Simplified TECA working principles 30 Figure 5 4 Typical signal signature 30 Figure...

Page 6: ...positioning along the scanning axis probe shown top view 40 Figure 5 27 Disabled functions during acquisition 41 Figure 5 28 Saving data 41 Figure 5 29 Flaw like and spurious indications 42 Figure 5 3...

Page 7: ...anchor strap 64 Figure B 10 Alternative method of securing anchor strap to bumper 65 Figure B 11 Anchor strap on harness belt 65 Figure B 12 Slipping male buckle through bumper 65 Figure B 13 Mating...

Page 8: ...able 7 3 Eddy current array specifications 53 Table 7 4 Eddy current testing specifications 54 Table A 1 ECT connector data 57 Table A 2 ECT connector pinout 57 Table A 3 I O connector data 57 Table A...

Page 9: ...ix...

Page 10: ...x www eddyfi com General Precautions and Conventions General Precautions and Conventions...

Page 11: ...pe indicated on the rating plate If you use the system in a manner that deviates from that specified by Eddyfi the protection provided on the equipment may be rendered null and void Do not use substit...

Page 12: ...of lead mercury cadmium hexavalent chromium polybrominated biphenyl and polybrominated diphenyl ether in certain classes of electrical and electronic units as of July 1 2006 This label acts as a remin...

Page 13: ...rates uses and can radiate radio frequency energy and if not installed and used in accordance with the user s guide may cause harmful interference to radio communications Operation of this equipment i...

Page 14: ...ed the purchase price of the applicable item s This warranty is in lieu of all other warranties whether oral written expressed or implied including any warranty of merchantability or fitness for a par...

Page 15: ...xv General Precautions and Conventions...

Page 16: ...2 www eddyfi com Reddy Overview Chapter 1 Reddy Overview...

Page 17: ...ifferently DC power Green batteries fully charged Blinking green batteries charging Red battery or charger error Unlit no batteries in Reddy Battery power Unlit remaining charge over 40 Orange remaini...

Page 18: ...s The four corner bumpers provide shock absorption and support Reddy at an angle when it is set on a flat surface The bumpers are also hooked for harnessing For details about harnessing see page 61 10...

Page 19: ...ith the probe s encoder for example See page 10 for details 2 ECT connector Connect your eddy current testing probes to this connector See page 10 for details 3 ECA connector Connect your eddy current...

Page 20: ...cators with the following behavior Connection indicator upper Green communication established between Reddy and the network Blinking green activity between Reddy and the network Unlit no link to netwo...

Page 21: ...1 7 Reddy Overview Rear 1 Instrument stand This stand retracts outward to hold Reddy at an angle preventing the instrument from falling over horizontally...

Page 22: ...er Reddy has two safe operating positions horizontal and tilted To use Reddy in a tilted position simply pull out the stand located at the rear of the instrument until Reddy is at the desired angle If...

Page 23: ...eat dissipation while the instrument is in use Starting Reddy Proceed as follows to turn on your instrument or exit the standby mode 1 Make sure that at least one of the two batteries is inserted into...

Page 24: ...ou have not already done so remove the protective cap from the ECT connector 3 Align the probe s connector pins with the ECT connector on the instrument Hint The alignment mark on the probe s connecto...

Page 25: ...n operate with a single battery Should the power in the remaining battery be insufficient to keep Reddy operating the instrument shuts down without damaging electronic components but all your work in...

Page 26: ...Blue battery charge gauge calibrated Blinking red battery charge gauge in need of calibration Red error Calibrating Batteries To ensure that your batteries perform at their full capacity for the long...

Page 27: ...13 Reddy Overview...

Page 28: ...14 www eddyfi com MagnifiGO Overview Chapter 2 MagnifiGO Overview...

Page 29: ...dy directly on your computer Magnifi SR offers the same graphical user interface than MagnifiGO so any analyst can be up and running in next to no time with a wider range of large monitor data layouts...

Page 30: ...3 Status icons These icons convey unit status information graphically Continue reading for details 4 Data display area This area is where you see the inspection data 5 File navigator Use the file navi...

Page 31: ...me and selector 3 Frequency selector 4 Resize cursor 5 Scale 6 Signal component selector Lissajous View Figure 2 3 Lissajous 1 Global channel C scan selector 2 Channel C scan group name and selector 3...

Page 32: ...e the various behavior according to the view you are using Table 2 1 Multi touch behavior in the strip chart view Location Touch Behavior Condition View toolbars Tap List buttons Selects the next opti...

Page 33: ...option in list Toggles Enables disables option Touch and hold List buttons Displays entire options list Data area Tap Move cursor to tapped position Touch and move Move cursor in C scan Resize the ma...

Page 34: ...20 www eddyfi com MagnifiGO Overview Figure 2 6 Acquisition Summary Figure 2 7 Report Summary...

Page 35: ...21 MagnifiGO Overview Figure 2 8 Save Figure 2 9 Material Database...

Page 36: ...22 www eddyfi com Preferences Chapter 3 Preferences...

Page 37: ...0 minutes By default the sleep time is 15 minutes Power Management turns off the display and the power LED goes from green to red Reddy goes into sleep mode when the touchscreen and keypad buttons exc...

Page 38: ...24 www eddyfi com Preferences Figure 3 3 Analysis preferences Figure 3 4 Help...

Page 39: ...25 Preferences...

Page 40: ...26 www eddyfi com Keypad and Keyboard Functions Chapter 4 Keypad and Keyboard Functions...

Page 41: ...ds shortcuts Table 4 1 Keyboard shortcut keys Keypad Function Keyboard Shortcut Left arrow Left arrow key Up arrow Up arrow key Right arrow Right arrow key Down arrow Down arrow key Start Stop acquisi...

Page 42: ...28 www eddyfi com Using Reddy with Sharck Probes Chapter 5 Using Reddy with Sharck Probes...

Page 43: ...eveloped to detect and size the length and depth of axial surface breaking linear indications in carbon steel Sharck probes are also capable of detecting transverse cracks perpendicular to the scan ax...

Page 44: ...ff signal Crack like indications approximately 90 relative to the liftoff signal All crack like indications feature the same phase shift Vertical signal amplitude linked to the defect depth see figure...

Page 45: ...e following figure Figure 5 6 Integrated 3D depth plane to correlate crack depth vertical amplitude and liftoff When the acquired data shows that the permeability varies from the normalization area it...

Page 46: ...power button on the front of Reddy to turn it on Notes You may connect and disconnect Sharck probes when the instrument is on Reddy verifies the probe s compatibility to make sure that the current set...

Page 47: ...e Open setup 9 Once you are done tap Start Working Magnifi GO switches to the front stage view Note When you open a new inspection folder for the first time and then tap Start Working the Acquisition...

Page 48: ...that the setup file is correctly applied Figure 5 13 Verifying the applied setup Creating a New Setup with the Setup Wizard 1 In the backstage view tap Create New Setup The new setup wizard starts No...

Page 49: ...ed to Reddy Figure 5 15 Probe selection 5 Tap Next 6 In Scan Definition select the encoder and specify the type of scan Note Do not configure the maximum probe speed at a value higher than 200 0mm s 7...

Page 50: ...perties of your filters Figure 5 18 Data definition configuring filters Notes Sharck probe setups are tailored for carbon steel That is why you cannot change the frequencies and injection voltages of...

Page 51: ...15 Tap Next 16 In Display configure the layout of your display Figure 5 21 Display layout Note The layout highlighted in blue is the layout displayed when you start working To select any of the other...

Page 52: ...nce 3 On Reddy s keypad press the Probe nulling button see page 3 Alternatively in the front stage view on the Home or Calibration ribbon tap Null Calibrating the Sharck Probe 1 In the front stage vie...

Page 53: ...to account and manages accordingly 12 In the Sharck Assisted Calibration dialog box tap Calibrate When the necessary data is acquired a green check mark appears next to Calibrate Figure 5 24 Sharck As...

Page 54: ...op acquisition button see page 3 Alternatively in the front stage view on the Home or Calibration ribbon tap Stop Notes To maintain data files at a reasonable size and facilitate analysis when inspect...

Page 55: ...front stage view on the Home ribbon tap Save Data Alternatively on the Reddy keypad press the Save inspection data button see page 3 Figure 5 28 Saving data Notes When data is saved Save Data is disa...

Page 56: ...bility variations Analysis Methodology Data is analyzed by reviewing the Depth Short or Depth Long and the Length C scans Flaw like indications are characterized by the presence of bright spots on the...

Page 57: ...ummaries of your findings Figure 5 31 Take screen captures with defect report entry check box To analyze data with Reddy proceed as follows 1 Find the file navigator at the bottom of the Magnifi GO fr...

Page 58: ...select the adequate indication code and then tap it in an impedance plane The entry is grayed to show that it is now part of the summary report Figure 5 33 Entering a detected defect Notes The current...

Page 59: ...defects have a color opposite that of axial cracks red blue instead of blue red see Figure 41 Those values can be altered by geometrical features and or permeability variations A differential signal...

Page 60: ...ation as necessary Figure 5 37 Report summary 3 To save the setup and inspection data in the current inspection project on the left menu bar tap Save 4 On the left menu bar tap Project 5 To edit your...

Page 61: ...irm the information and edit it as necessary Figure 5 39 Report summary 9 When you are done tap Finish The report is generated Use the controls at the top of the report viewer to save it to various fo...

Page 62: ...48 www eddyfi com Maintenance and Troubleshooting Chapter 6 Maintenance and Troubleshooting...

Page 63: ...fiGO you must first meet the following requirements USB mass storage device with a minimum of 4 GB free space 1 Hardwired Internet connection There are two methods of updating or upgrading MagnifiGO S...

Page 64: ...mpted press the up arrow of the keypad The update process starts This normally takes between 5 and 10 minute When the process is complete the system restarts 8 Activate Windows See Activating Windows...

Page 65: ...evice Cannot display the options screen You do not press and hold the probe nulling button and the change layout button see page 4 long enough you do not press and hold the correct buttons or you do n...

Page 66: ...52 www eddyfi com Specifications Chapter 7 Specifications...

Page 67: ...lly bonded LCD and touchscreen Passive backlight enhancement Video output HDMI Storage SSD 100GB Cooling Sealed and fanless Encoders 2 axes quadrature Connectivity Gigabit Ethernet Wi Fi Bluetooth USB...

Page 68: ...ication Value Inputs 4 Frequency range 5Hz 10MHz Frequencies 4 ECA connector 19 pin Fischer Generator output Coil drive Up to 20Vpp Injection modes Multiplexed simultaneous continuous Receiver gain 41...

Page 69: ...55 Specifications...

Page 70: ...56 www eddyfi com Connector Reference Appendix A Connector Reference...

Page 71: ...n 1 1WIRE_PROBE_ET_2 Probe Probe identification 2 GEN1_50_100 ECT1 eddy current generator output 1 50 or 100 3 HSWAP_ET_IN_2 Automatic probe detection 4 GND Ground 5 GND Ground 6 GND Ground 7 GEN2_50_...

Page 72: ...r P N PEI Genesis Amphenol RJF22B00SCC Eddyfi P N MACN4016 Table A 6 Ethernet connector pinout Pin I O Signal Description 1 Bidirectional Bi_DA Bidirectional pair A 2 Bidirectional Bi_DA Bidirectional...

Page 73: ...l DDC 16 SDA I2 C serial data line for DDC 17 DDC CEC ARC HEC Ground Grounds for DDC CEC ARC and HEC 18 5V 5V supply maximum 0 05A 19 Hot Plug Detect Hot plug detection pin USB Connectors The USB conn...

Page 74: ...60 www eddyfi com Using the Optional Harness Appendix B Using the Optional Harness...

Page 75: ...wearing the harness Adjusting the Harness to your Body 1 Grab the harness shoulder straps and slip it over your shoulders as you would a jacket Figure B 1 Slipping the harness on 2 Verify the fit of t...

Page 76: ...to adjust the height of the harness belt to suit your body type You may need to perform this adjustment several times to get the proper fit Note Your belt s height determines the lowest position of R...

Page 77: ...e adjusted it Figure B 5 Securing the belt 8 Make sure that the harness fits snuggly 9 Make sure that the harness shoulder anchor straps are loose Figure B 6 Shoulder anchor straps 10 Unfasten the two...

Page 78: ...ntally in your lap 13 Slip the looped portion of the strap removed above in the hook of one of the two upper Reddy bumpers as illustrated Figure B 8 Sliding strap loop through bumper hook 14 Slip the...

Page 79: ...egant and less easy to remove fashion as illustrated here Figure B 10 Alternative method of securing anchor strap to bumper 16 Locate the anchor strap on the harness belt Figure B 11 Anchor strap on h...

Page 80: ...9 Close and secure the battery compartment door Figure B 14 Closing battery compartment door 20 Repeat the procedure for the opposite belt anchor strap no door to open 21 Adjust the length of the anch...

Page 81: ...opposite shoulder anchor strap 24 Tighten each shoulder anchor straps to achieve the desired view angle for Reddy Figure B 16 Tightening shoulder anchor straps Note Use the belt strap to hook your pro...

Page 82: ...www eddyfi com...

Reviews: