background image


14 

4. 

Install the DIMM module into the slot and press it firmly down until it 
seats correctly. The slot latches are levered upwards and latch on to the 
edges of the DIMM. 

5. 

Install any remaining DIMM modules. 

Installing a Hard Disk Drive/CD-ROM 

This section describes how to install IDE devices such as a hard disk drive 
and a CD-ROM drive. 

About IDE Devices 

Your mainboard has a primary and secondary IDE channel interface (IDE1 and 
IDE2). An IDE ribbon cable supporting two IDE devices is bundled with the main-
board.  

If you want to install more than two IDE devices, get a second IDE cable and 
you can add two more devices to the secondary IDE channel.  

IDE devices have jumpers or switches that are used to set the IDE device as 
MASTER or SLAVE. Refer to the IDE device user’s manual. When installing two 
IDE devices on one cable, ensure that one device is set to MASTER and the 
other device is set to SLAVE. The documentation of your IDE device explains 
how to do this. 

About UltraDMA 

This mainboard supports UltraDMA 66/100. UDMA is a technology that accel-
erates the performance of devices in the IDE channel. To maximize 
performance, install IDE devices that support UDMA and use 80-pin IDE ca-
bles that support UDMA 66/100.  

Installing a Hard Disk Drive 

1. 

Install the hard disk drive into the drive cage in your system case. 

2. 

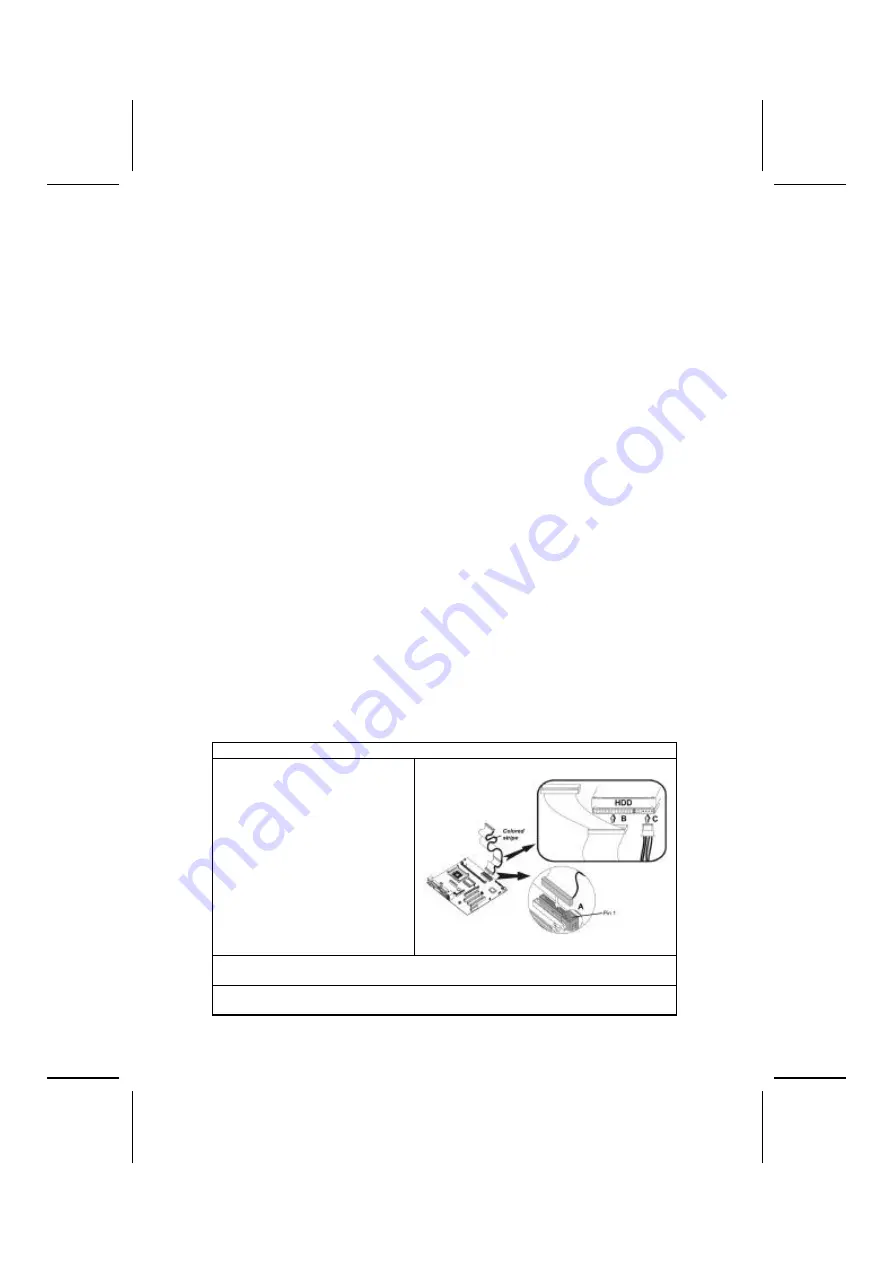
Plug the IDE cable into IDE1 
(

A

): 

Note: 

 Ribbon cable connectors 

are usually keyed so that they can 
only be installed correctly on the 
device connector. If the connector 
is not keyed, make sure that you 
match the pin-1 side of the cable 
connector with the pin-1 side of the 
device connector. Each connector 
has the pin-1 side clearly marked. 
The pin-1 side of each ribbon ca-
ble is always marked with a 
colored stripe on the cable. 


3. 

Plug an IDE cable connector into the hard disk drive IDE connector (

B

). It 

doesn't matter which connector on the cable you use. 

4. 

Plug a power cable from the case power supply into the power connector on 
the hard disk drive (

C

). 

Summary of Contents for L4S5M2

Page 1: ...ested and found to comply with the limits for a Class B digi tal device pursuant to Part 15 of the FCC Rules These limits are designed to provide reasonable protection against harmful interference in...

Page 2: ...erference causing Equipment Regulations Cet appareil num rique de la classe B respecte toutes les exigences du R glement sur le mat riel brouilieur du Canada About the Manual The manual consists of th...

Page 3: ...g Jumpers 7 Checking Jumper Settings 8 Jumper Settings 8 Connecting Case Components 9 The Panel Connector 10 Installing Hardware 10 Installing the Processor 10 Installing Memory Modules 13 Installing...

Page 4: ...ion 42 Set Password Option 42 Save Exit Setup Option 43 Exit Without Saving 43 CHAPTER 4 44 Using the Mainboard Software 44 About the Software CD ROM 44 Auto installing under Windows 98 44 Running Set...

Page 5: ...essors supporting system bus FSB speeds up to 400 MHz The L4S5M2 incorporates the SiS645 Northbridge and SiS961 Southbridge chipsets which includes integrated audio networking and communications capa...

Page 6: ...7 link for audio and modem hardware monitoring and ACPI OnNow power management Memory The mainboard accommodates SDRAM up to 2 GB using two 168 pin 3 3V unbuffered DIMM modules VGA The L4S5M2 includes...

Page 7: ...here are many types of computer cases on the market The mainboard com plies with the specifications for the micro ATX system case Some features on the mainboard are implemented by cabling connectors o...

Page 8: ...4 M Ma ai in nb bo oa ar rd d C Co om mp po on ne en nt ts s...

Page 9: ...Floppy disk drive connector IDE 1 Primary IDE channel IDE 2 Secondary IDE channel J2 Smart I O interface header JP1 Clear CMOS jumper JP2 BIOS protection jumper LED11 Memory module LED PANEL1 Connect...

Page 10: ...edges Do not bend circuit boards Q Qu ui ic ck k G Gu ui id de e This Quick Guide suggests the steps you can take to assemble your system with the mainboards The following table provides a reference...

Page 11: ...e appropriate 1 Place the mainboard over the mounting brackets Ensure that your case has an I O template that supports the I O ports and expansion slots on your mainboard C Ch he ec ck ki in ng g J Ju...

Page 12: ...1 2 Write protect disable 2 3 Write protect enable JP2 1 Jumper 1 Enables you to clear the BIOS Follow these instruc tions 1 Turn the system off 2 Short pins 2 and 3 on jumper 1 3 Return the jumper to...

Page 13: ...oard components Refer to the following 1 Connect the Pentium 4 processor auxiliary case power supply connector to ATX1 2 Connect the standard power supply connec tor to ATX2 3 Connect the CPU cooling...

Page 14: ...e sure that you DO NOT scratch the mainboard or any of the surface mount resistors with the clip of the cooling fan If the clip of the cooling fan scrapes across the mainboard you may cause serious da...

Page 15: ...478 processor socket When choosing a proc essor consider the performance requirements of the system Performance is based on the processor design the clock speed and system bus frequency of the proces...

Page 16: ...the locking lever down and hook it under the latch on the edge of the socket 8 Snap the four retention legs of the cooling fan into place Cooling Fan Retention Module Heatsink 9 Swing both lock levers...

Page 17: ...MHz frontside bus you can only install memory modules that operate at 66 or 100 MHz Installation Procedure The mainboard accommodates two memory modules You must install at least one module in any of...

Page 18: ...e is set to SLAVE The documentation of your IDE device explains how to do this About UltraDMA This mainboard supports UltraDMA 66 100 UDMA is a technology that accel erates the performance of devices...

Page 19: ...tripe on the cable 3 Plug an IDE cable connector into the CD ROM DVD drive IDE connector B It doesn t matter which connector on the cable you use 4 Plug a power cable from the case power supply into t...

Page 20: ...up your system go immediately to the Setup Utility to configure the floppy diskette drives that you have installed See Standard CMOS Features on page 26 for more information Installing Add on Cards T...

Page 21: ...the edge connector of the add on card into the expansion slot Ensure that the edge con nector is correctly seated in the slot 3 Secure the metal bracket of the card to the system case with a screw Not...

Page 22: ...ormation on connecting the mainboard s optional devices COM2 Onboard serial port connector Connect a serial port extension bracket to this header to add a second serial port to your system Pin Signal...

Page 23: ..._P0 USB_FP_P0 GROUND KEY 2 4 6 8 10 USBPWR1 USB_FP_P1 USB_FP_P1 GROUND USB_FP_OC0 WOL1 WOM1 Wake On LAN Wake On Modem If you have installed a LAN card use the cable provided with the card to plug into...

Page 24: ...al Digital Assistants PDAs and other computers Pin Signal Name 1 2 3 4 5 6 Not assigned No Pin 5V Ground IRTX IRRX J2 Smart I O interface header The Smart I O connector is for use with media storage d...

Page 25: ...se LPT1 to connect printers or other parallel com munications devices COM1 Use the COM port to connect serial devices such as mice or fax modems COM1 is identified by the sys tem as COM1 3 Game Port U...

Page 26: ...udio line out Lime Digital monitor flat panel White Microphone Pink MIDI game Gold Parallel Burgundy PS 2 compatible keyboard Purple PS 2 compatible mouse Green Serial Teal or Turquoise Speaker out su...

Page 27: ...rives diskette drives and peripherals Video display type and display options Password protection from unauthorized use Power management features The settings made in the Setup Utility affect how the c...

Page 28: ...out Saving E s c Quit Select Item F 1 0 Save Exit Setup Time Date Hard Disk Type BIOS Navigation Keys The BIOS navigation keys are listed below Key Function Esc Exits the current menu Scrolls through...

Page 29: ...or Message 7 Type the filename of the new BIOS in the File Name to Program text box Follow the onscreen directions to update the mainboard BIOS 8 When the installation is complete remove the floppy di...

Page 30: ...items show the current date and time on the computer If you are running a Windows OS these items are automatically updated when ever you make changes to the Windows Date and Time Properties utility I...

Page 31: ...an result in your system not recognizing the installed hard disk Access Mode This item defines ways that can be used to access IDE hard disks such as LBA Large Block Addressing Leave this value at Aut...

Page 32: ...on against viruses that try to write to the boot sector and partition table of your hard disk drive You need to disable this item when installing an operating system We recommend that you enable this...

Page 33: ...down key Typematic Delay Msec Use this item to define how many milli seconds must elapse before a held down key begins generating repeat characters Security Option Setup If you have installed passwor...

Page 34: ...ecurring instability into your system CMOS Setup Utility Copyright C 1984 2001 Award Software Advanced Chipset Features Item Help Advanced DRAM Control 1 Press Enter Prefetch Caching Disabled Memory H...

Page 35: ...1T memory read write commands are sent one clock cycle be hind the memory address When set to Normal read write and memory address commands are sent simultaneously Prefetch Caching Disabled Enables P...

Page 36: ...fe Defaults F7 Optimized Defaults SIS OnChip IDE Device Scroll to this item and press Enter to view the following screen CMOS Setup Utility Copyright C 1984 2001 Award Software SIS OnChip IDE Device I...

Page 37: ...CI bus and nonburstable transactions do not IDE DMA transfer access Enabled This item is used to enabled the IDE DMA transfer command Press Esc to return to the Integrated Peripherals screen SIS OnChi...

Page 38: ...timized Defaults Onboard FDC Controller Enabled This option enables the onboard floppy disk drive controller Onboard Serial Port 1 3F8 IRQ4 This option is used to assign the I O address and interrupt...

Page 39: ...el Port EPP are bi directional modes allowing both data input and output ECP and EPP modes are only supported with EPP and ECP awareperipherals ECP Mode Use DMA 3 When the onboard parallel port is set...

Page 40: ...access interface is the embedded bus or a PCI bus Audio ACCESS INTERFACE Embedded BUS This option determines whether the audio access interface is the embedded bus or a PCI bus Power Management Setup...

Page 41: ...turn its peripherals on and off for improved power management It also allows the PC to be turned on and off by external devices so that mouse or keyboard activity wakes up the computer ACPI Suspend T...

Page 42: ...is not accessed within a specified length of time Options are from 1 Min to 15 Min and Disable Power Button Override Instant Off Under ACPI Advanced Configuration and Power management Interface you ca...

Page 43: ...MI Enabled This option determines whether any activity for IRQ 3 7 9 15 will cause the system to wake from a power saving mode IRQ 8 Break Suspend Determines whether the system will monitor IRQ 8 acti...

Page 44: ...ict that the OS cannot boot Move Enter Select PU PD Value F10 Save ESC Exit F1 General Help F5 Previous Values F6 Fail Safe Defaults F7 Optimized Defaults Reset Configuration Data Disabled If you enab...

Page 45: ...s Shutdown Temperature Enables you to set the maximum temperature the system can reach before powering down System Component Characteristics These fields provide you with information about the systems...

Page 46: ...install the defaults The fail safe defaults place no great demands on the system and are generally stable If your system is not functioning cor rectly try installing the fail safe defaults as a first...

Page 47: ...lled 6 If you typed the password correctly the password will be installed Save Exit Setup Option Highlight this item and press Enter to save the changes that you have made in the Setup Utility and exi...

Page 48: ...ME TXT INSTALL TXT or something similar These files may contain important information that is not included in this manual A Au ut to o i in ns st ta al ll li in ng g u un nd de er r W Wi in nd do ow w...

Page 49: ...me software is installed in separate folders for different oper ating systems such as DOS WIN NT or WIN98 95 Always go to the correct folder for the kind of OS you are using To install the software ex...

Page 50: ...ext The following screen appears 3 Check the items you want to install The default options are recom mended 4 Click Next to run the Installation Wizard An item installation screen ap pears 5 Follow th...

Page 51: ...nvenience of customers The following software is furnished under license and may only be used or copied in accordance with the terms of the license Note The software in these folders is subject to cha...

Page 52: ...binet of CD ROM drives on your system to help you categorize and organize your CD collection A user friendly interface assists you in quickly creating images of both CDs and DVDs onto your system To i...

Reviews: