ECL-ACC997 / ECL-ACC999
V121203
Software Settings on 701Server
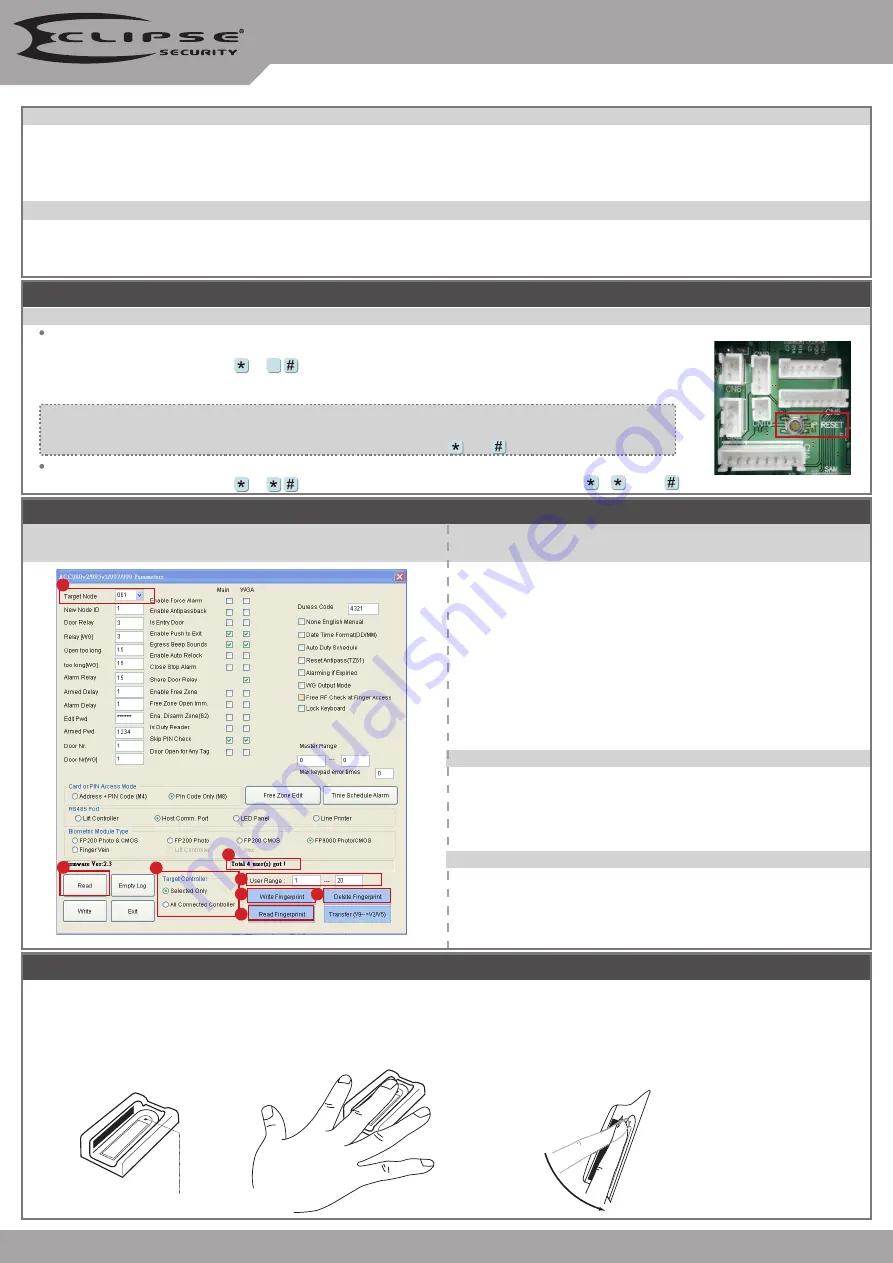
Uploading,downloading and deleting fingerprint
database via 701Server
Downloading fingerprint database from PC to the devices
First of all,please make sure users have registered their fingerprints
to the device.
1.Select node number of the device.
2.Click"Read".
3.Setting "User Range".
4. Click "Read Fingerprint".
5.Status popped up.
Uploading fingerprint database to PC
Deleting fingerprint database on the device
1
2
6
3
5
7
4
8
6.By selecting "Selected Only or All Connected Controller".
7.Click"Write Fingerprint".
3.Select the range of the fingerprints to be deleted.
8.Click"Delete Fingerprint".
Restoring Factory Settings
Reset all device parameters and user card data
Reset all user card data: Deleting All Fingerprint or Finger-Vein:
Access programming mode
→
29
29 Access programming mode
→
39
9 99999
※
After operation as above, you will hear the long reminder sound,and wait until the sound disappear then
reset the power of the controller,the device will restore factory setting. After restore factory default,
the biometric identification system will stop using, please refer to [38 DDD ] command to reopen.
Use the Button on the PCB:
Use the command:
Press
“IP Reset Button”
of main board for few seconds,then IP and all device parameters will reset. (Reference to picture)
Reset all device parameters and user card data:
Access programming mode
→
29
29 9
How to place finger for finger vein authentication unit
1. Set up the finger vein reader to the position where finger can easily be placed.
2. Use the middle or ring finger of either hand for the registration/authentication
purpose.
3. Put your finger tip first to the top of the unit and lower the finger down along
the finger guide slowly.
4. There is touch sensor on the rear end of the unit. Lower your finger
to touch the sensor to start verifying.
5. Red LED generates during the authentication.Please release the
finger when red LED turns off.
※
Do not bend the finger to authenticate
※
Do not press your finger on the recognition unit violently.
The top of the unit
Use the middle or ring finger
(suggestion)
Lower the finger down along the finger
guide slowly.Release the finger when red
LED turns off.
G. Adding / Deleting Fingerprint or Finger-Vein
H. The process of FP/Vein identification
1. For dual-fingerprint sensor module version, capactive sensor module is the only enabled way for enrolling FP.
2. For dual-fingerprint sensor module version, user just can select one of fingerprint sensor for identification and can't put two fingerprints to different sensor
at the same time.
3. Extra WG keypad panel is needed for adding card or downloading data connected to PC.
4. Each finger need to be collected
3 times
enrolling for ECL-ACC997 / Each finger need to be collected
1 times
enrolling for ECL-ACC999.
1. While attached a finger on biometric sensor, there is a beep sound for starting the scanner. Then, please don't move your finger until the ACC-997/ACC-999 makes
another beep sound.
2. If there is a 8-beep sound after user gets access by FP/Vein, the FP/Vein data shall be reset by command 39*9*99999# under the programming mode.
Cautions: Before reset the FP/Vein, please backup the data from source FP/Vein first.


